Good security starts early, not as an afterthought. Penetration testing helps you find weak spots before attackers do. In this guide, you’ll learn why pen testing matters, what Burp Suite can do, and exactly how to use its main tools step by step.
Why do we need Penetration Testing?
When we build and test software, we often focus heavily on whether it works. But does it work securely?
Security isn’t just a layer we add later—it should be part of how we think during development and testing. Penetration testing, or “pen testing,” plays a key role in helping us spot and fix vulnerabilities before attackers find them.
For Developers:
- It encourages writing secure code from the start.
- Things like authentication and authorization aren't just login pages—they’re your defense against data leaks and unauthorized access.
For Testers:
- Pen testing expands your role from checking if things work to also checking how things might break.
- It introduces an adversarial mindset: instead of just asking “Does this function work?”, you ask “Can someone misuse or break this?”
- You can uncover issues traditional functional testing often misses, like insecure endpoints or poor input validation.
When done right, penetration testing helps everyone—devs, testers, and security teams—collaborate more effectively to build safer software.
→ Read more: Penetration Testing Explained: A Developer and QA Tester’s Security Guide
What Is Burp Suite?
Burp Suite is a powerful, all-in-one platform designed for testing the security of web applications. It gives you full visibility and control over the HTTP and HTTPS traffic between your browser and the server.
With it, you can intercept, inspect, modify, replay, and analyze requests and responses—making it an essential tool for anyone interested in application security.
Key Components Inside Burp Suite
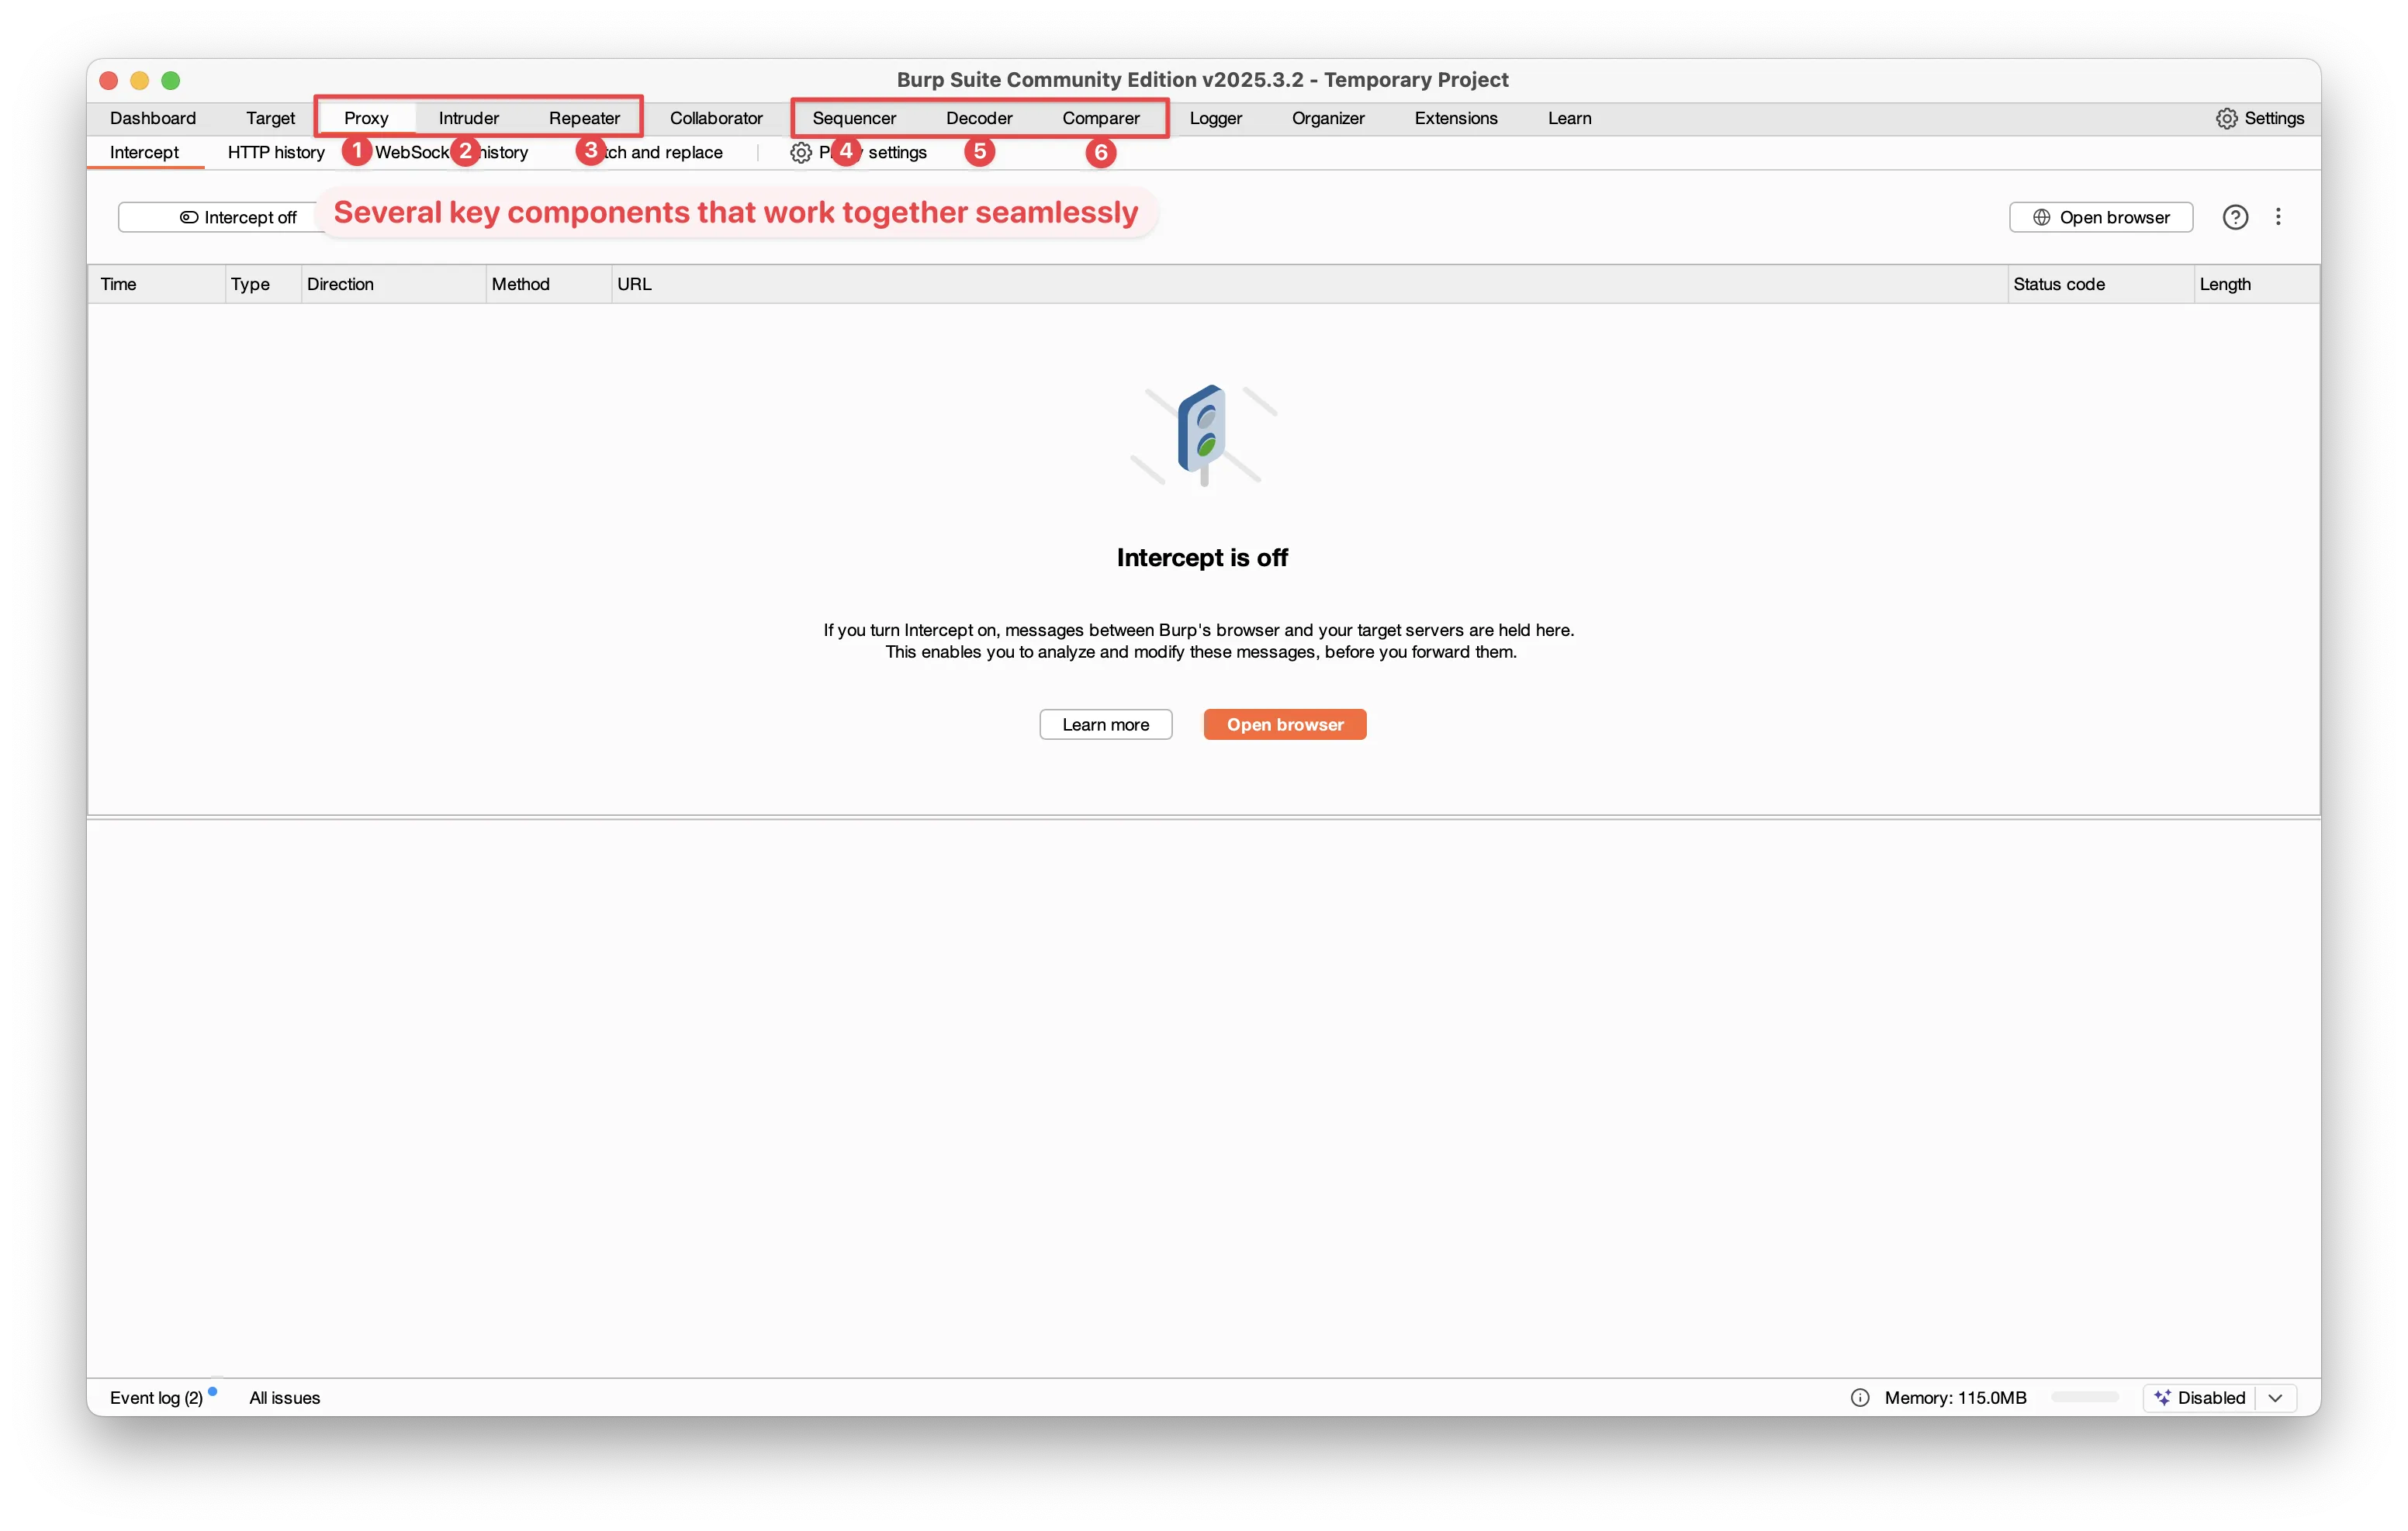
- Proxy
Acts as a middleman between your browser and the web application. It captures all traffic, allowing you to intercept and modify both requests and responses before they reach their destination. - Intruder
Used for automating customized attacks. Whether you're trying to brute-force login credentials, fuzz input fields, or tamper with parameters, Intruder makes it easy to launch these tests at scale. - Repeater
Lets you manually tweak and resend captured requests. This is especially useful for exploring how the server reacts to different inputs, edge cases, or potentially malicious data. - Sequencer
Evaluates the randomness of session tokens and other security-critical values. Weak randomness can lead to predictable patterns, and Sequencer helps identify these vulnerabilities. - Decoder
Helps you decode or encode data in formats like URL encoding, Base64, and HTML entities. This is key to understanding how data is transmitted—and how it can be manipulated. - Comparer
Allows you to visually compare two pieces of data side by side—like HTTP responses or session tokens—to identify small but significant differences that might expose a flaw. - Scanner (Professional Edition)
Performs automated scanning to detect a wide range of common web vulnerabilities.
(Note: This feature is only available in the Pro version, so we’ll skip it in our current setup.)
Setting Up and Intercepting Traffic
Before you can start inspecting and modifying requests with Burp Suite, you’ll need to set it up properly and configure your browser to send its traffic through Burp’s Proxy. Here’s how to get started:
1. Install Burp Suite
Download and install the Community Edition from the official PortSwigger website.
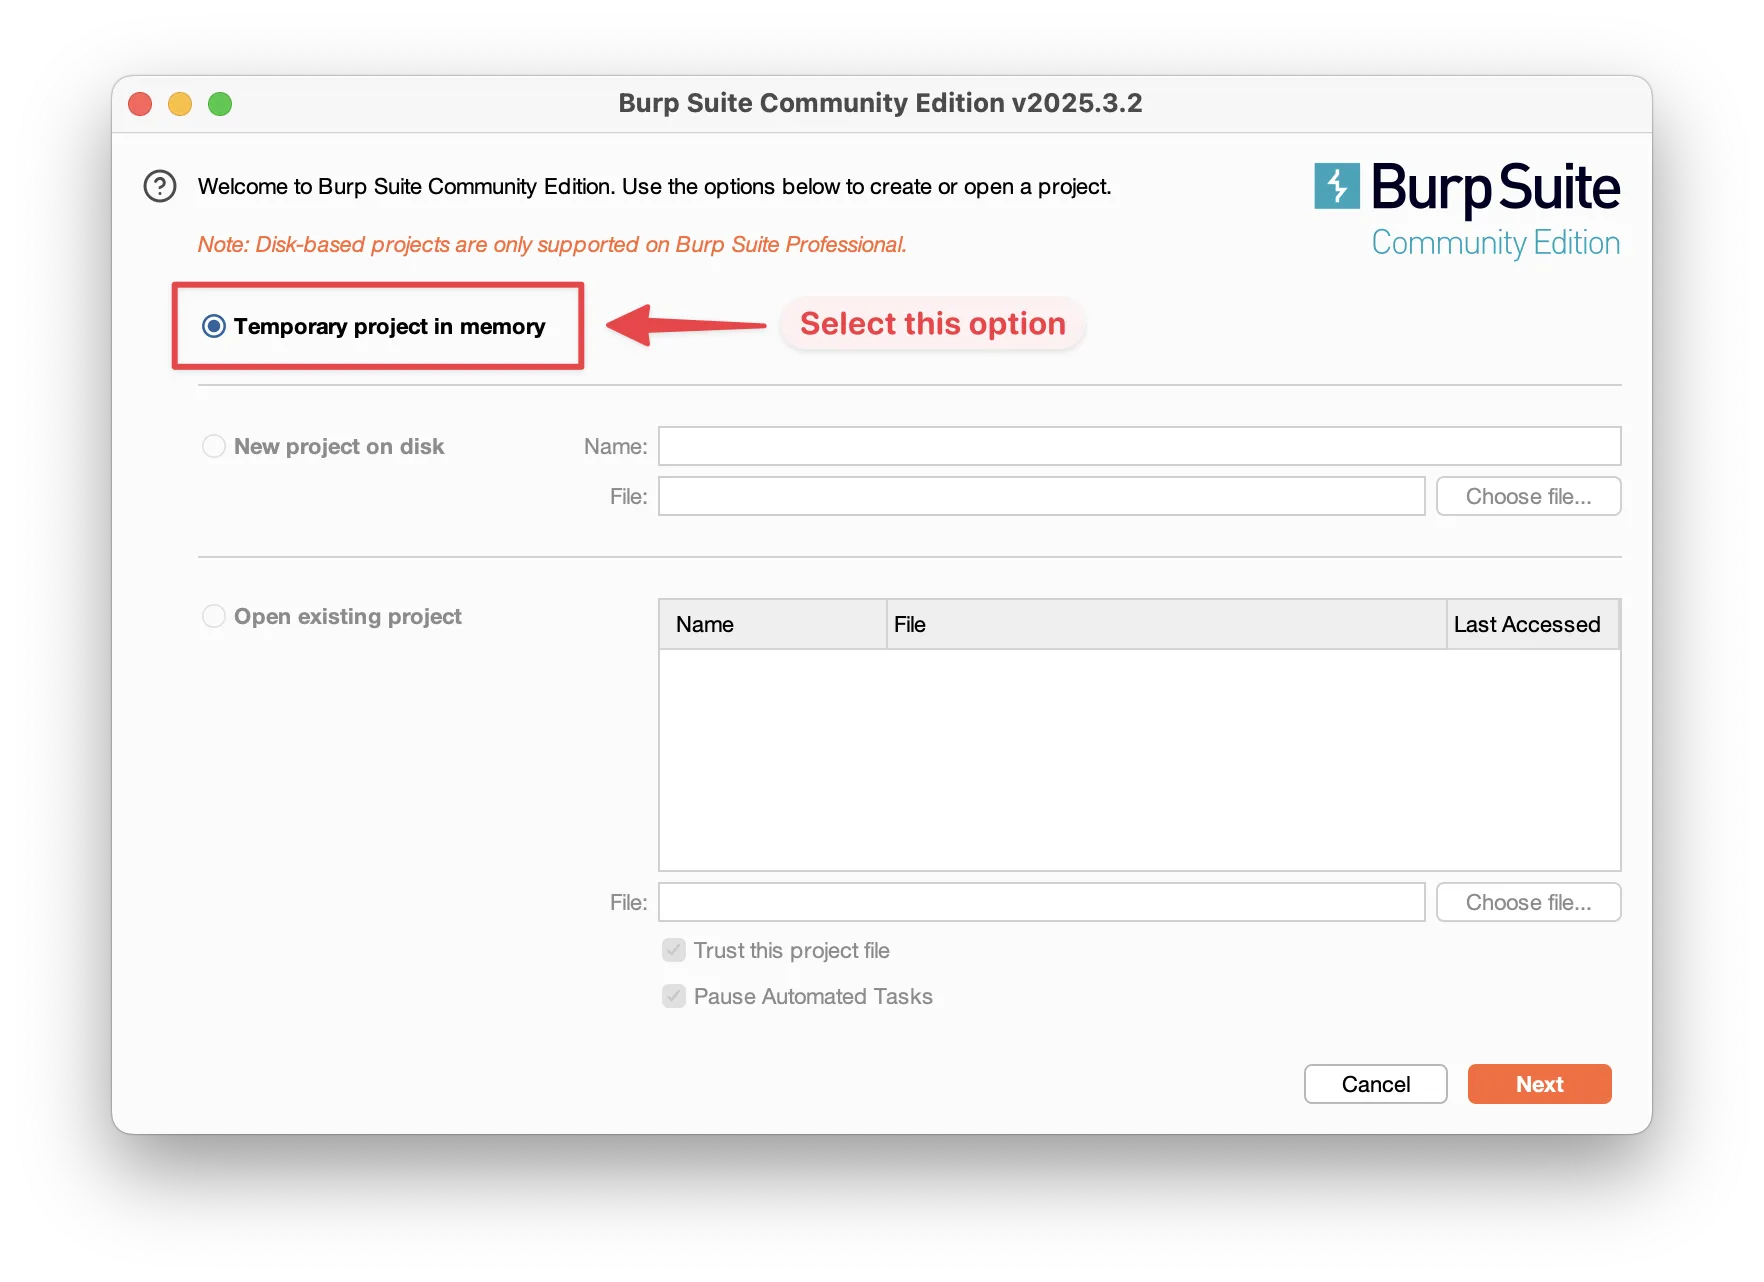
2. Launch Burp Suite and start a temporary project
When prompted, select Temporary Project and click Start Burp with the default settings.
3. Configure your browser to route traffic through Burp’s Proxy
By default, Burp Suite listens on 127.0.0.1 (your local machine) on port 8080. You’ll need to manually configure your browser to use this as its proxy server. Here’s how to do it on popular browsers:
- Chrome
Chrome uses your system's proxy settings. You can search for "proxy settings" in your operating system’s settings and configure it to use127.0.0.1on port8080.
Alternatively, you can use a browser extension like SwitchyOmega to manage proxy profiles more easily. - Firefox
- Open Firefox
Settings(orPreferences).
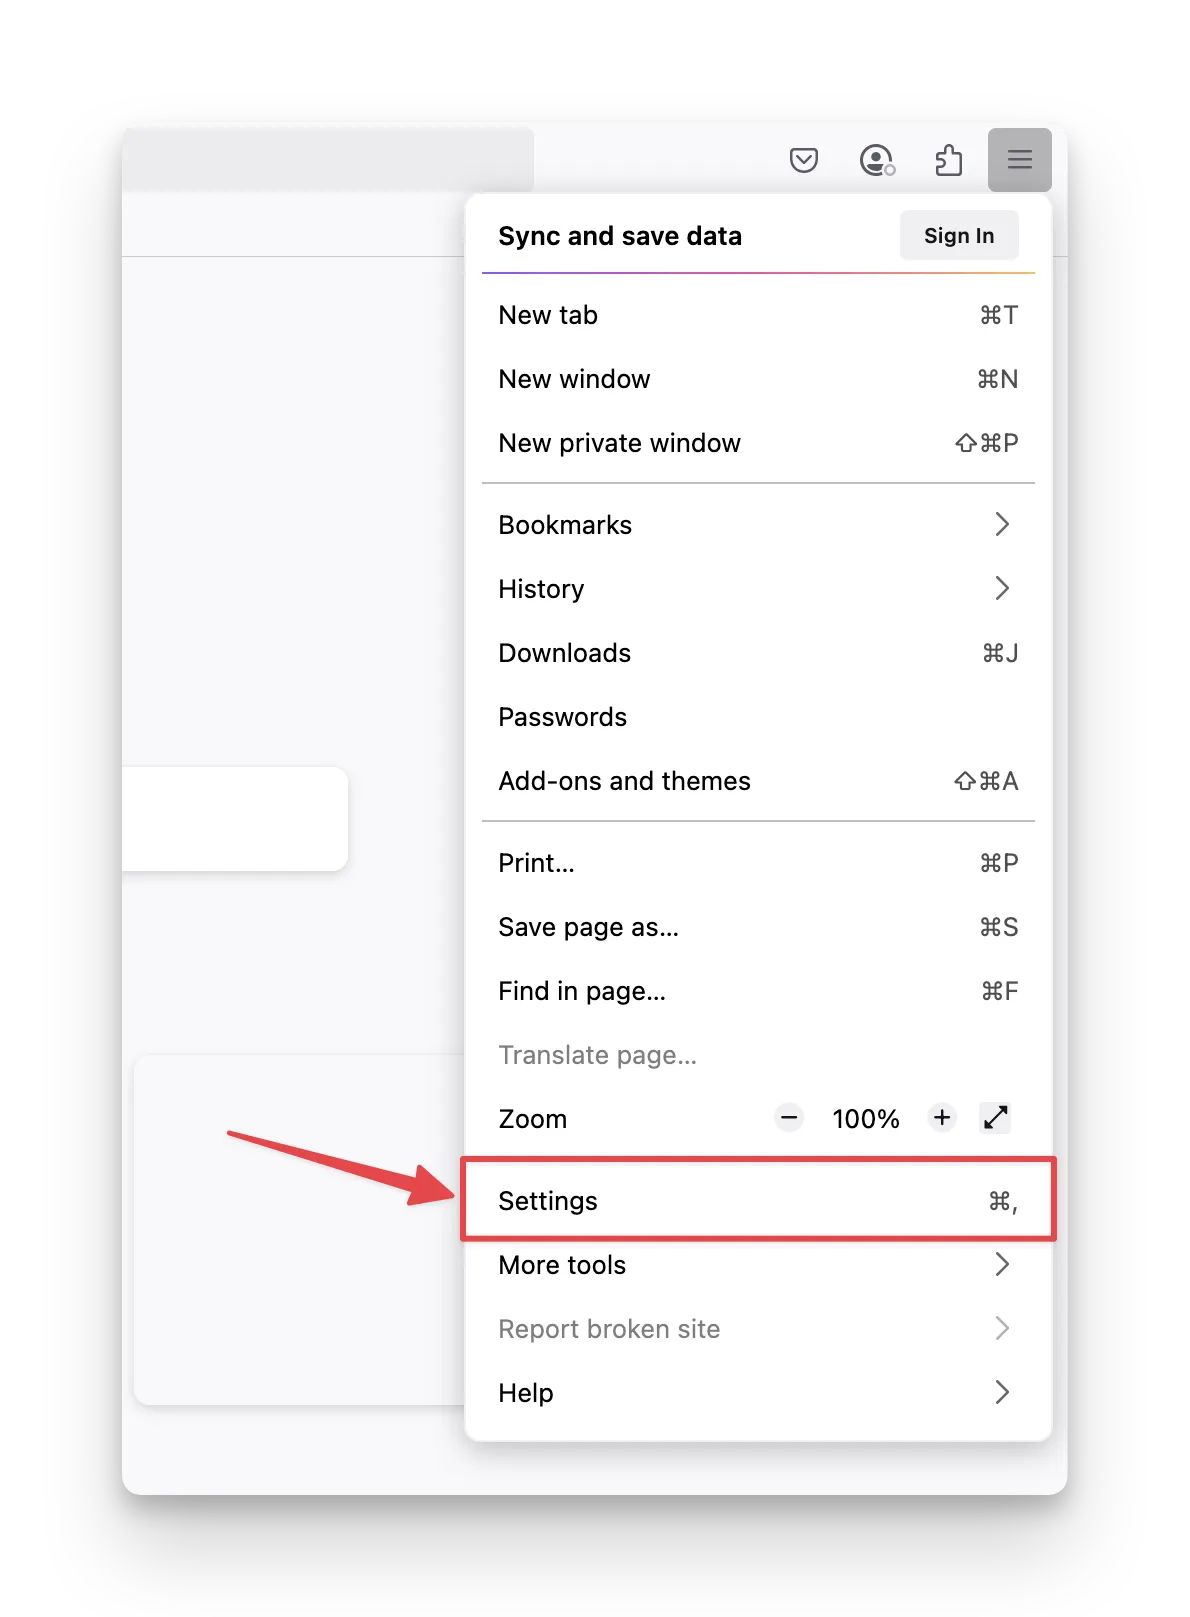
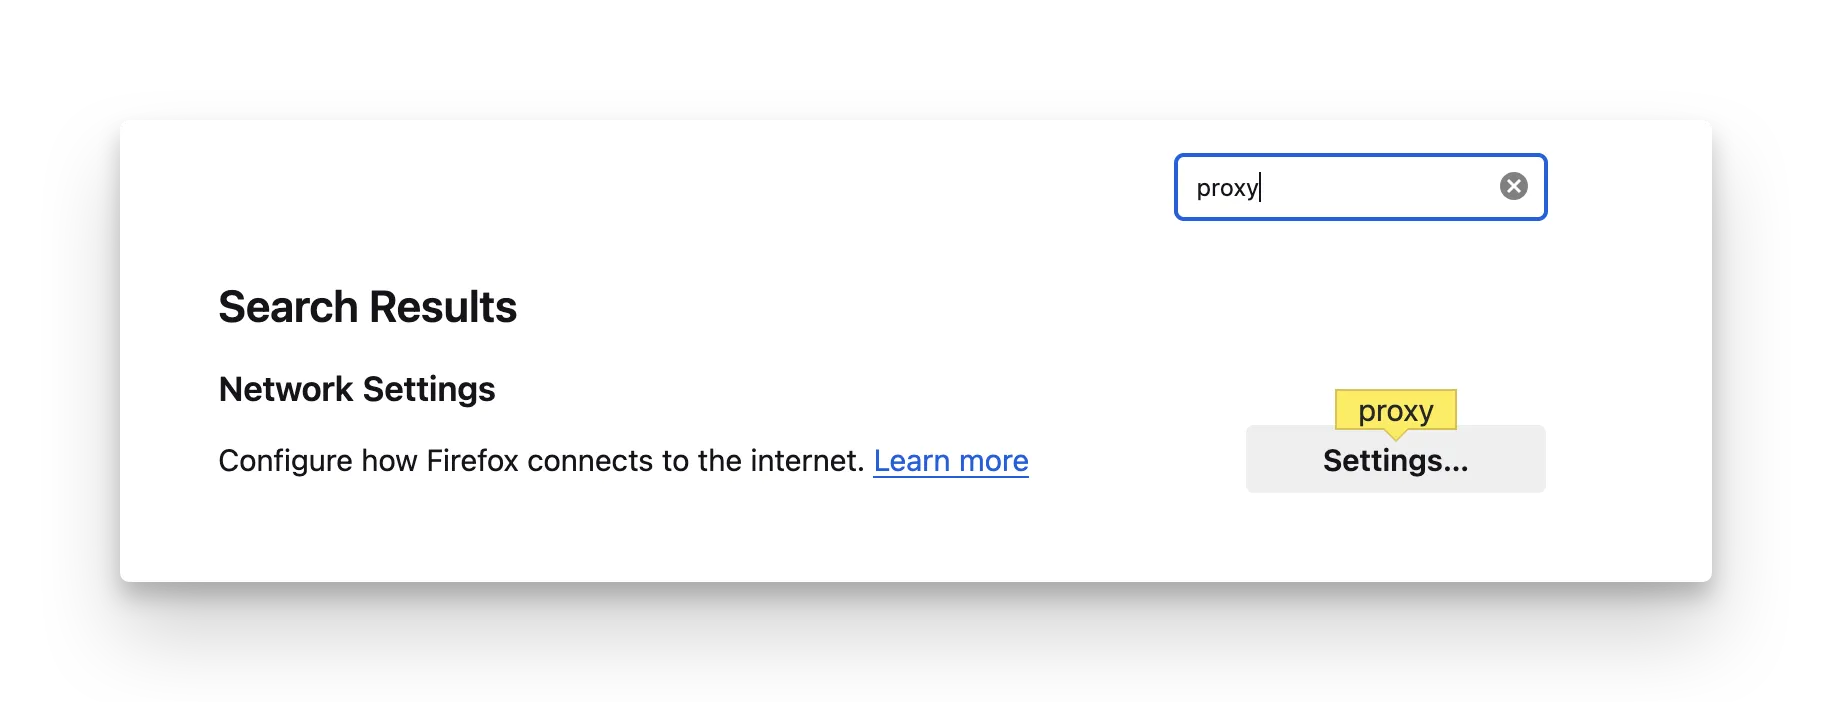
- Search for "proxy" and click on Settings... in the Network Settings section.
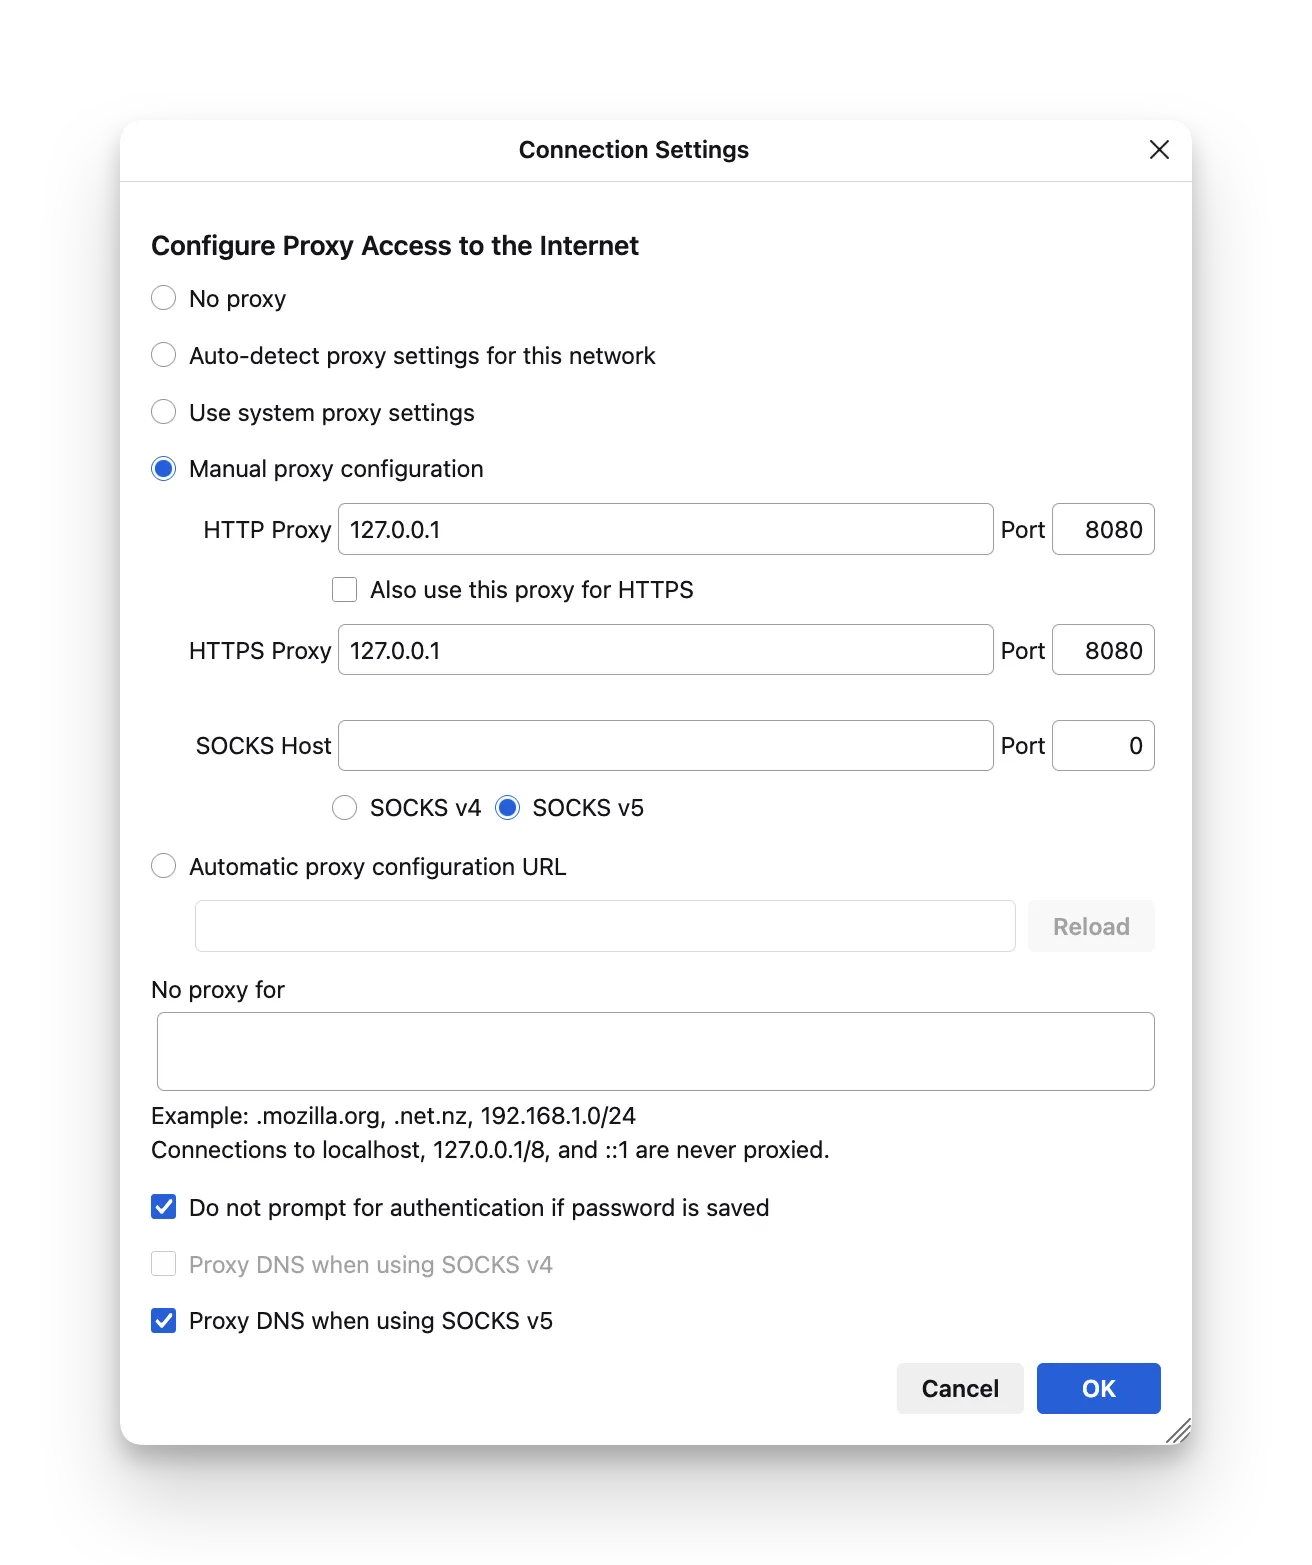
- Choose Manual proxy configuration and enter:
- HTTP Proxy:
127.0.0.1 - Port:
8080
- HTTP Proxy:
- Check "Use this proxy server for all protocols". Make sure “Also use this proxy for HTTPS” is turned OFF (required in newer Firefox versions).
- Install Burp’s CA Certificate in Firefox:
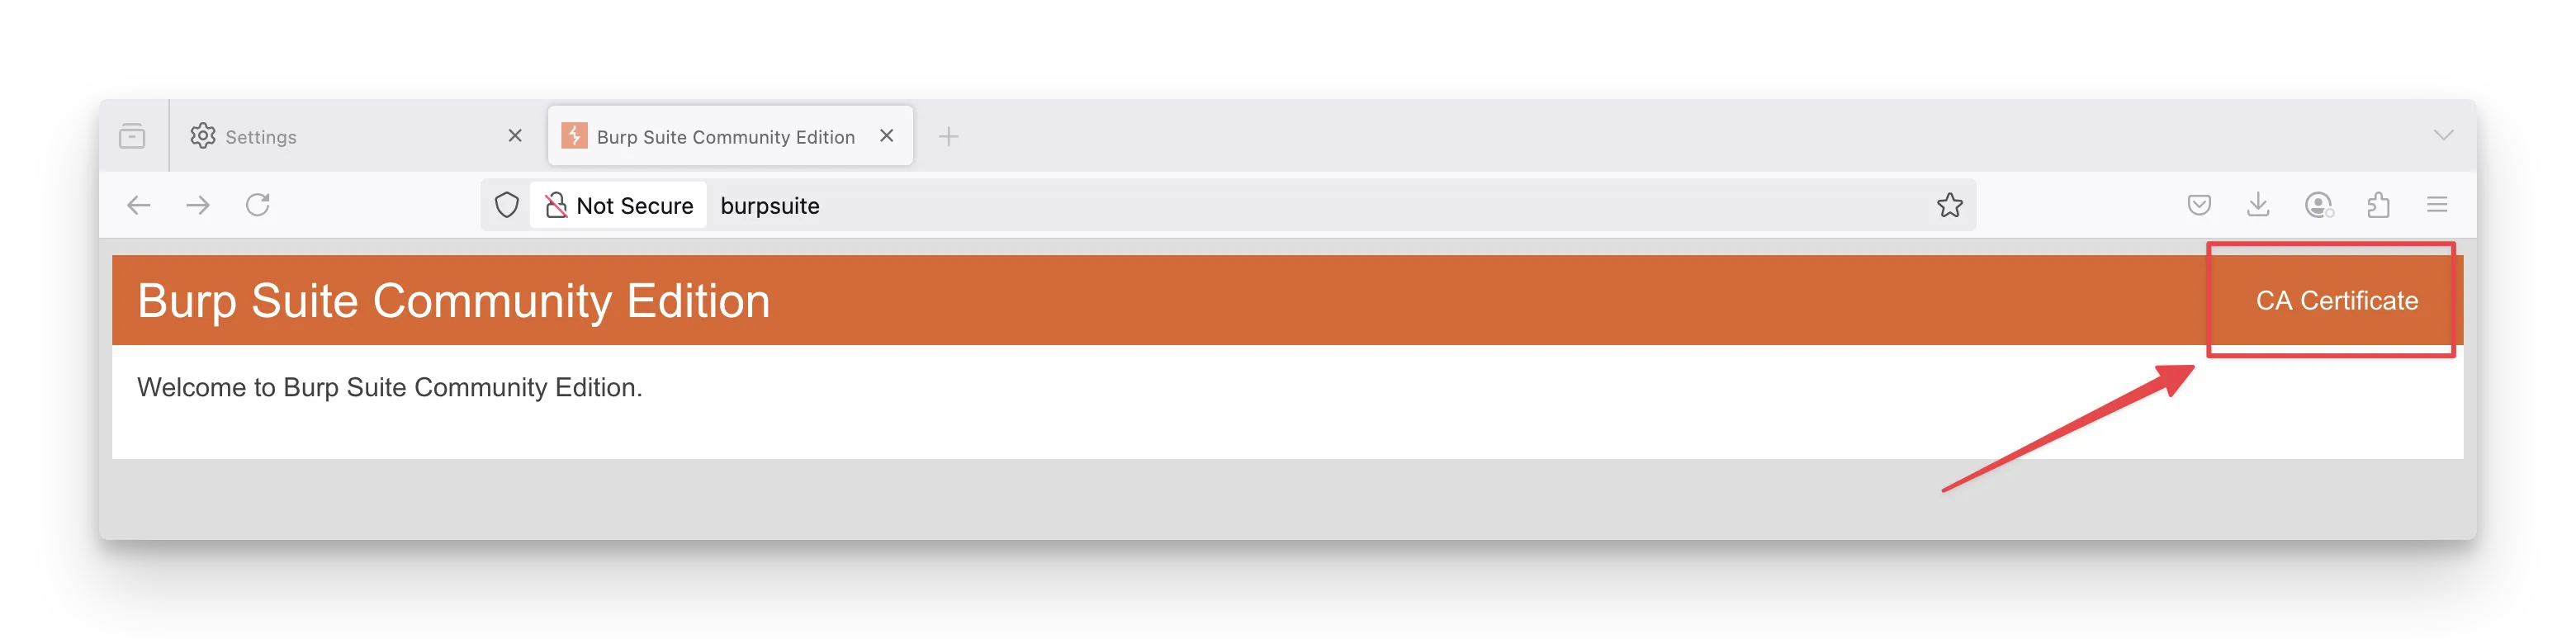
- Visit
http://burpsuite/
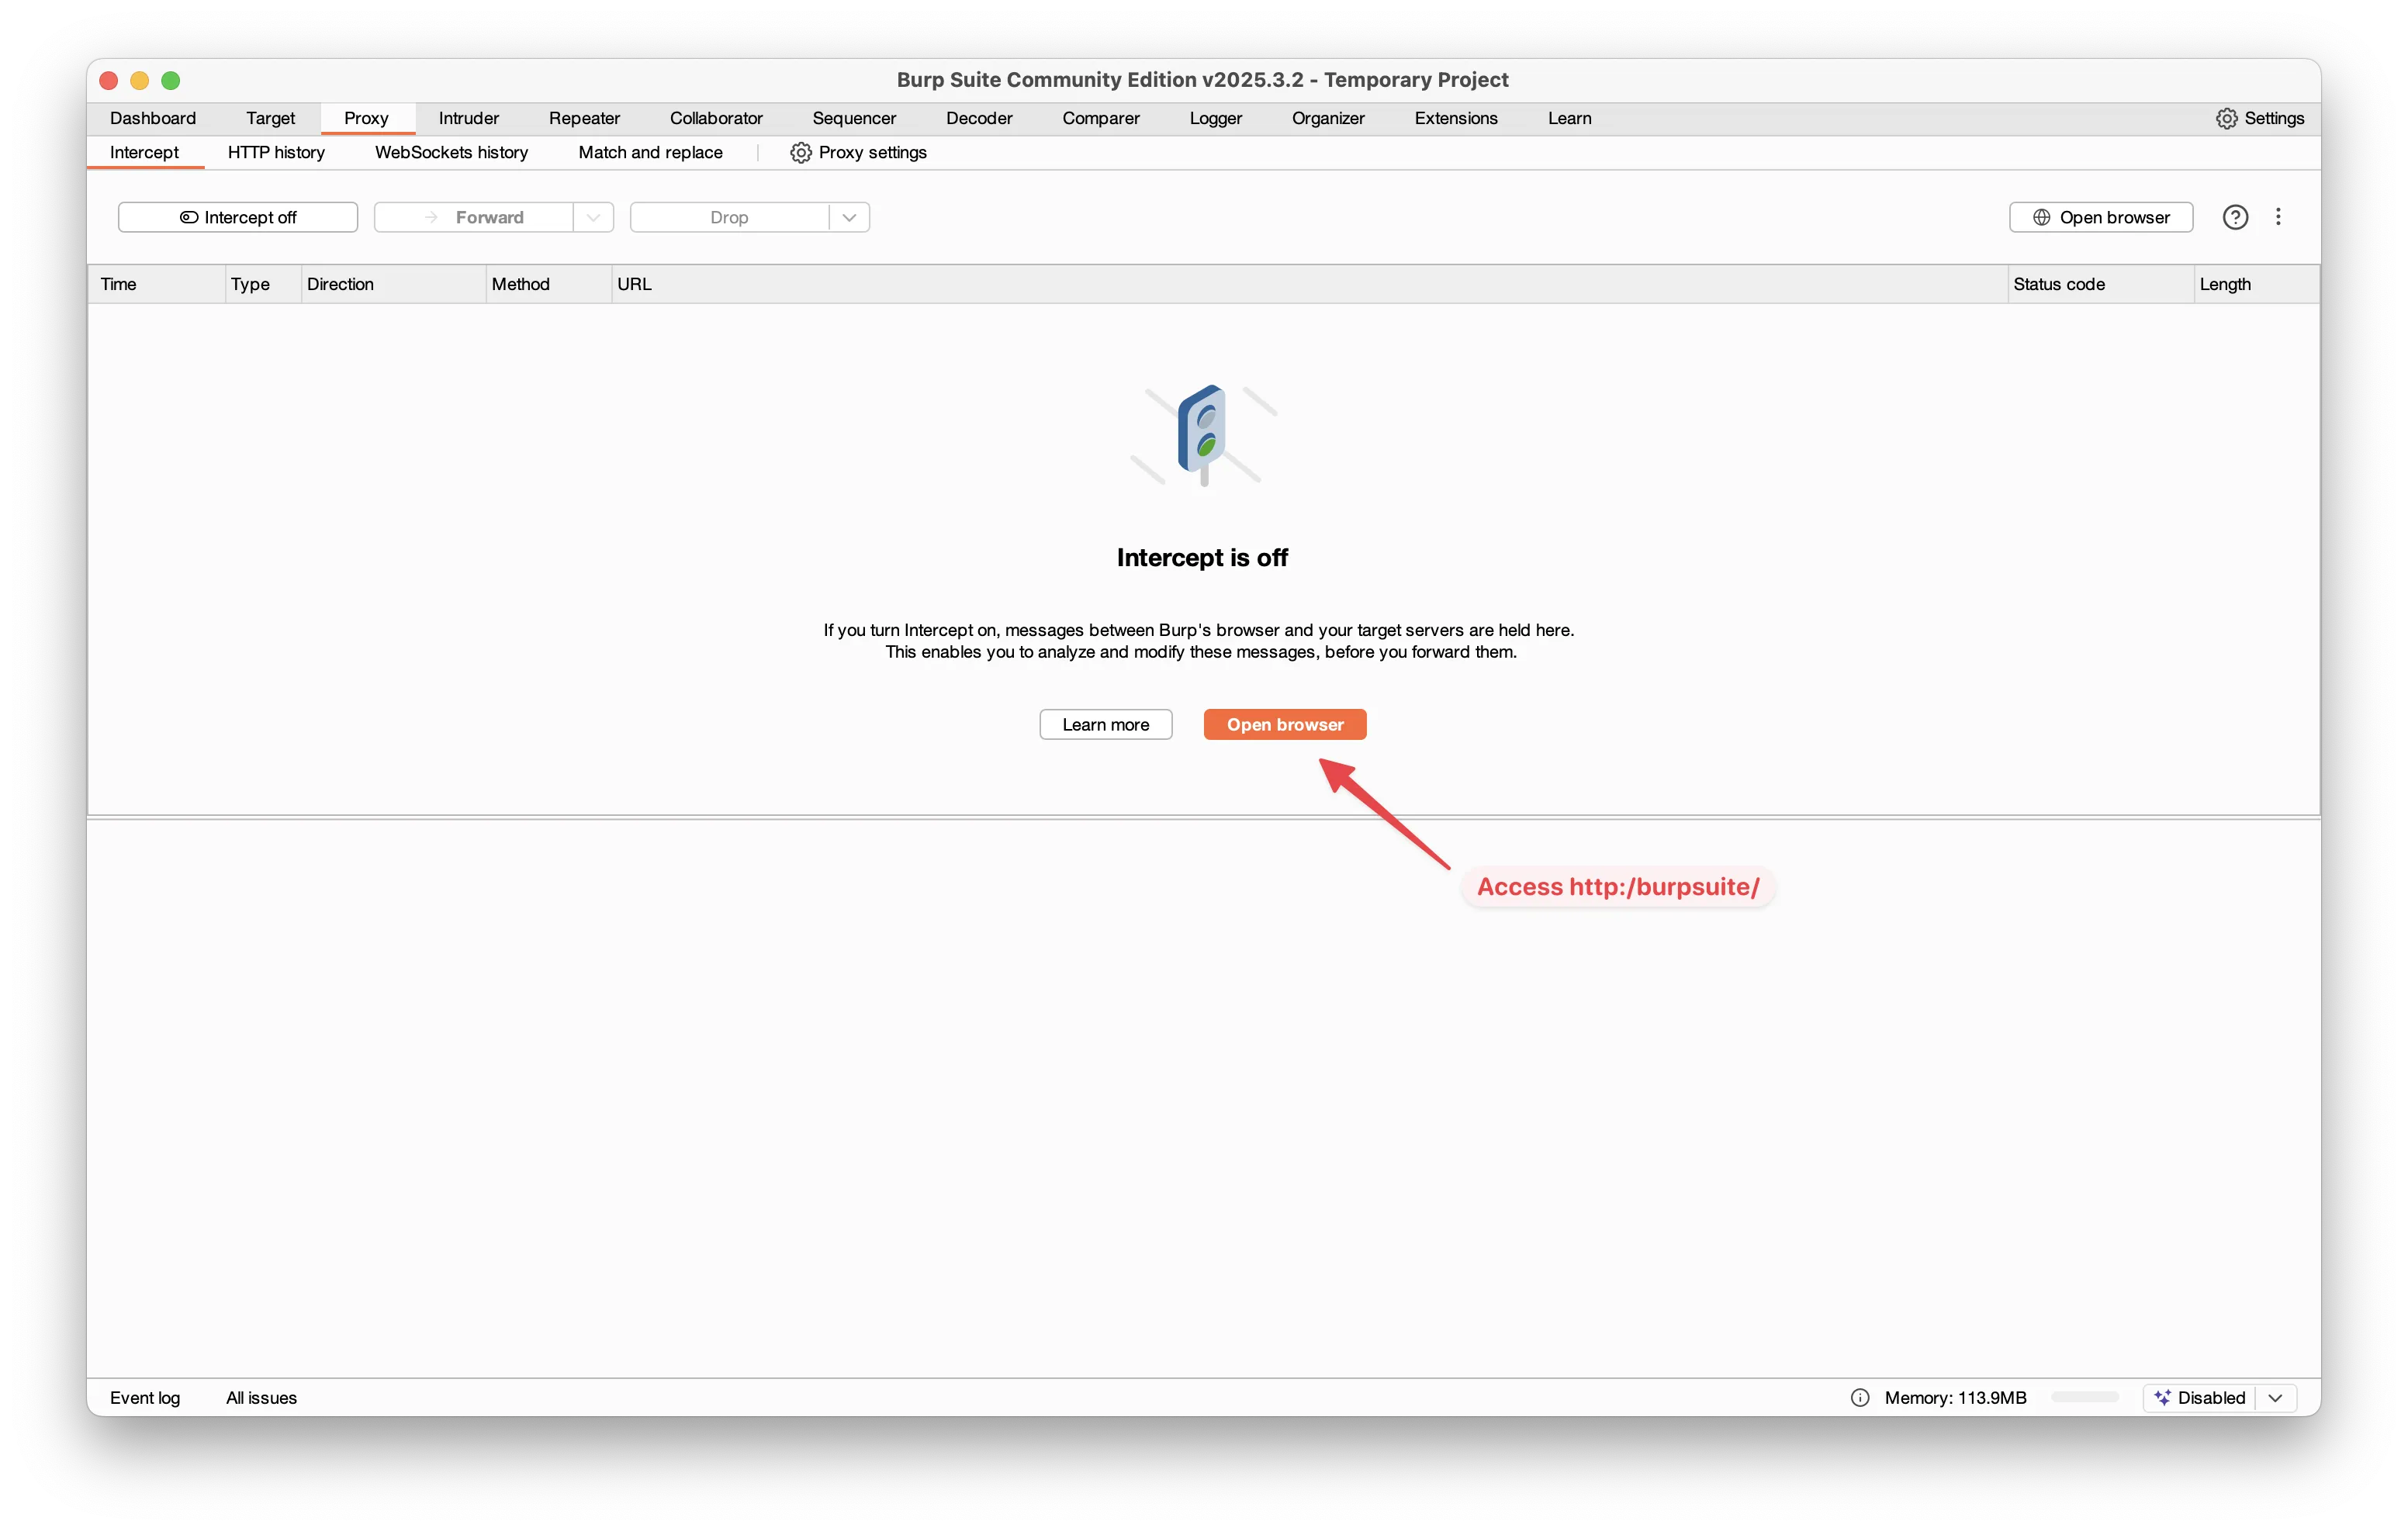
- Generate the CA certificate.
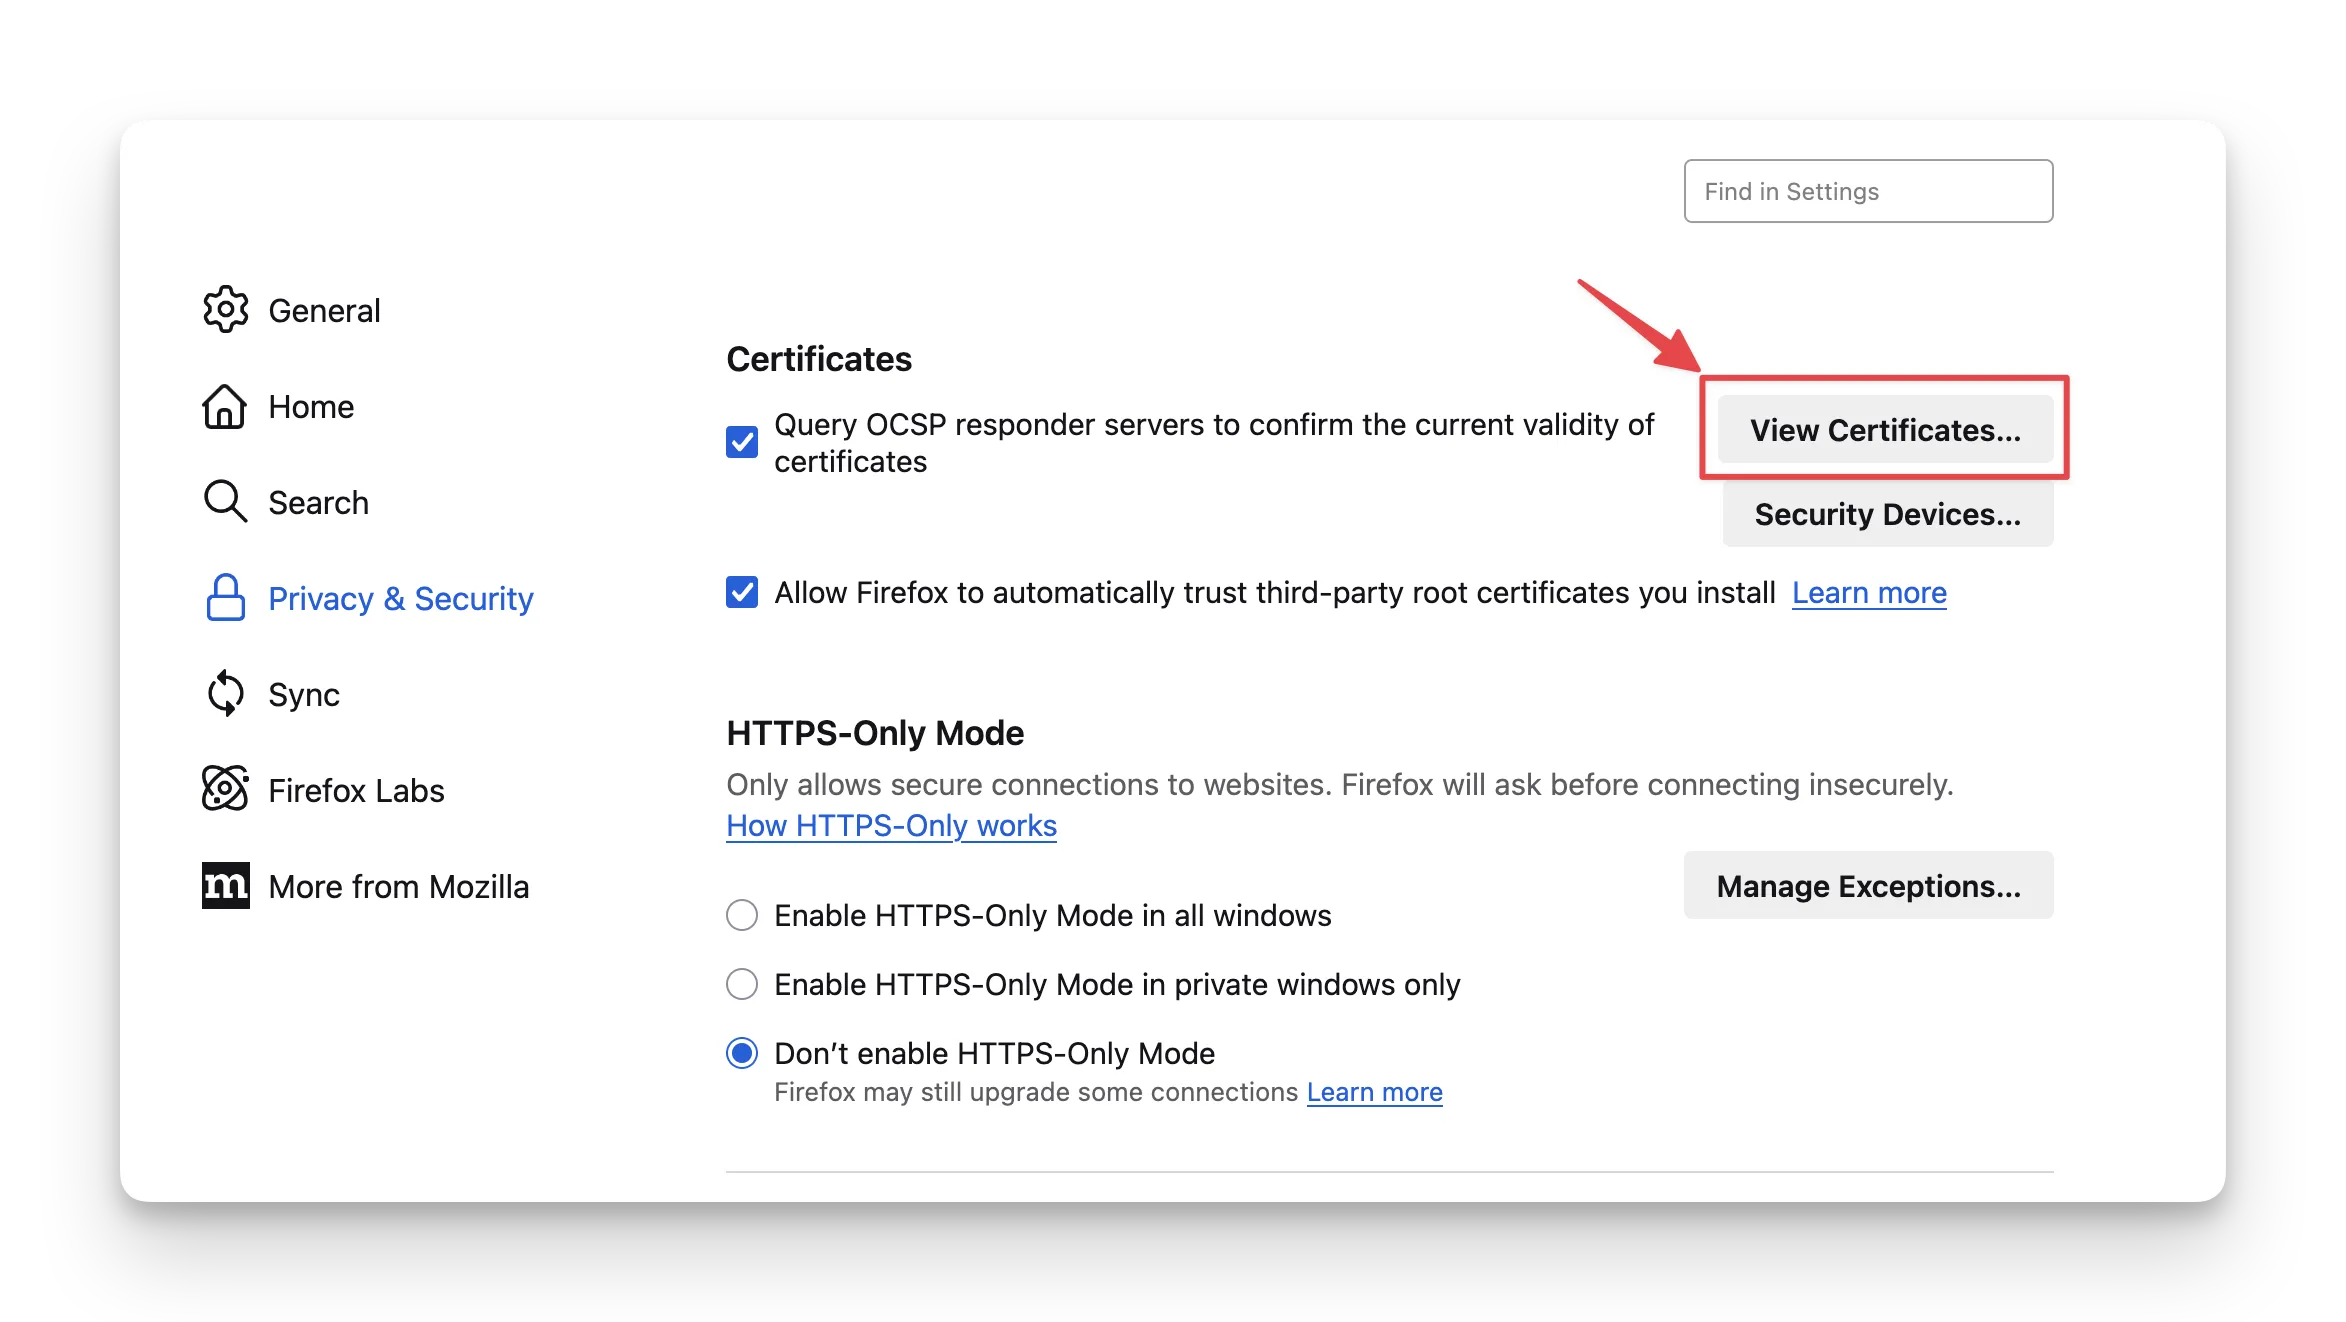
- Go to Firefox settings → Privacy & Security → Certificates → View Certificates. (or Search for “certificates”)
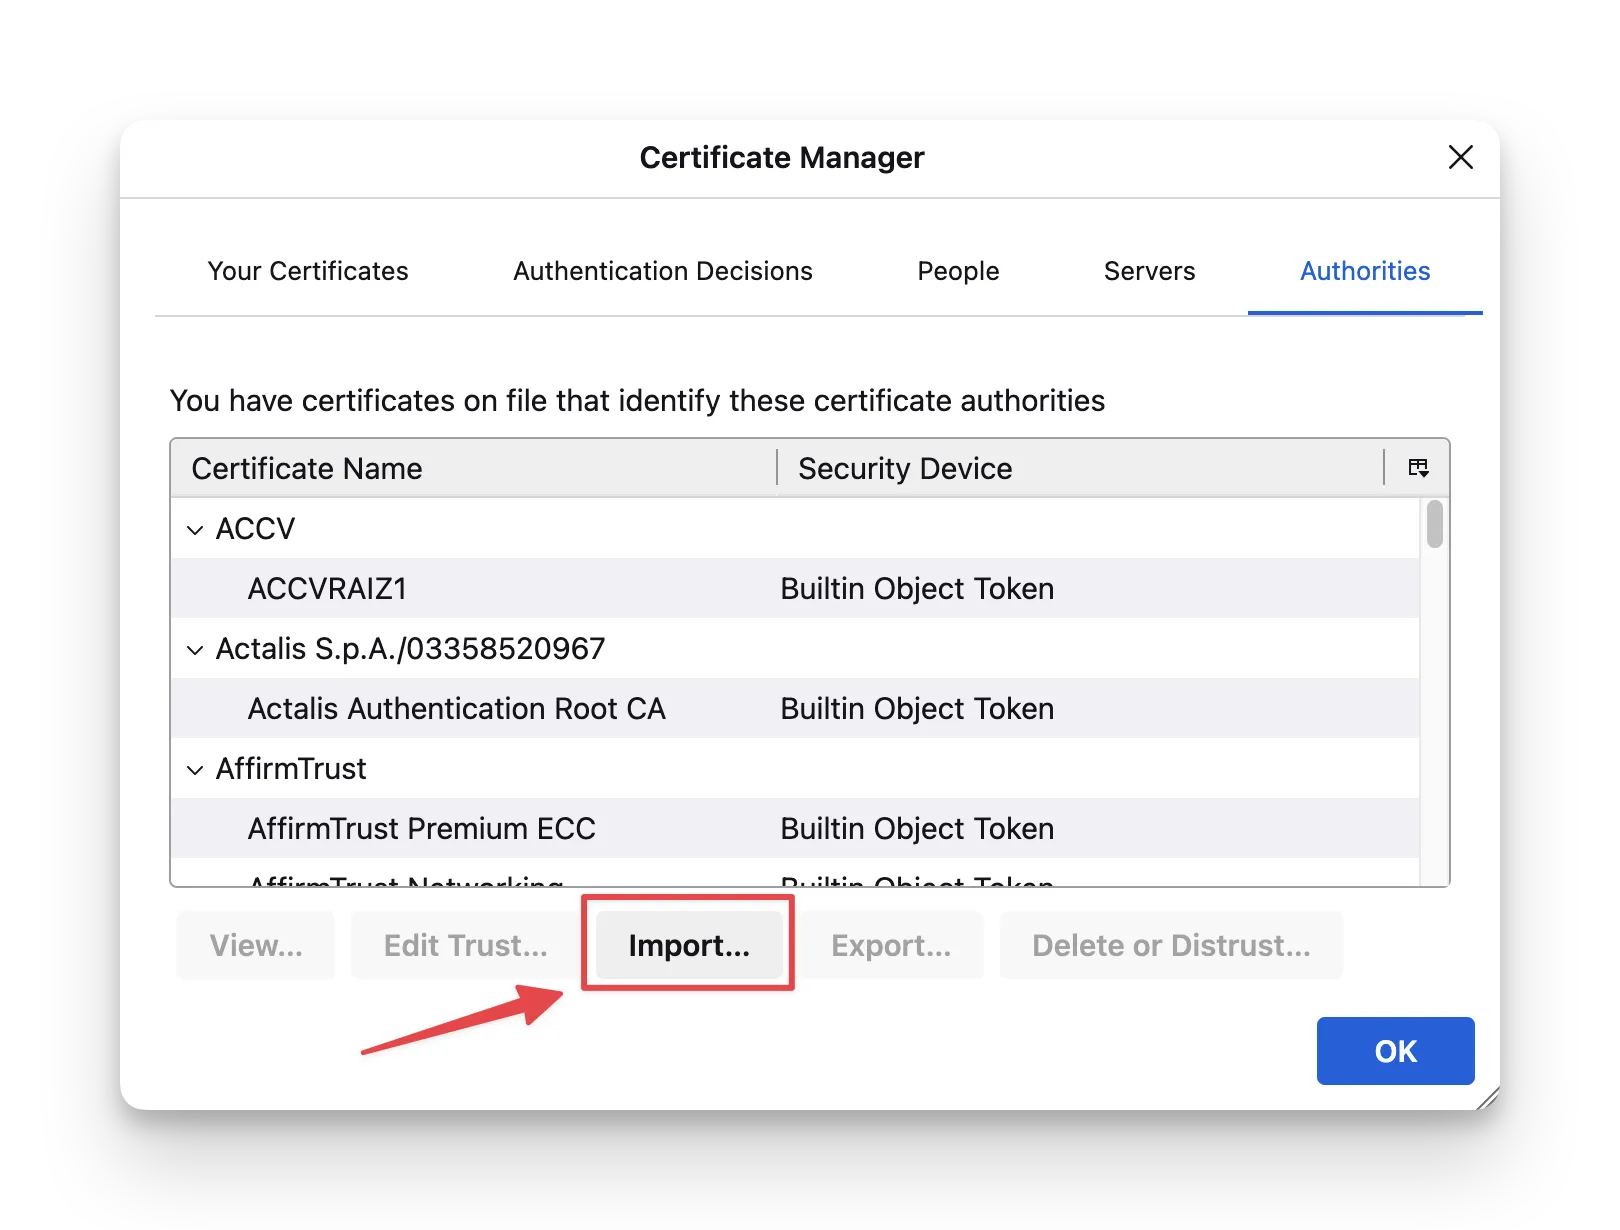
- Import the CA certificate under the Authorities tab and allow it to identify websites.
- Visit
- Open Firefox
4. Test the setup
Open any website in your browser. If Burp Suite is set up correctly, you’ll start seeing HTTP requests appear in the Proxy → HTTP history tab.
Intercepting and Modifying Requests
Once interception is enabled, you can pause and edit HTTP requests before they reach the server—giving you full control over what gets sent.
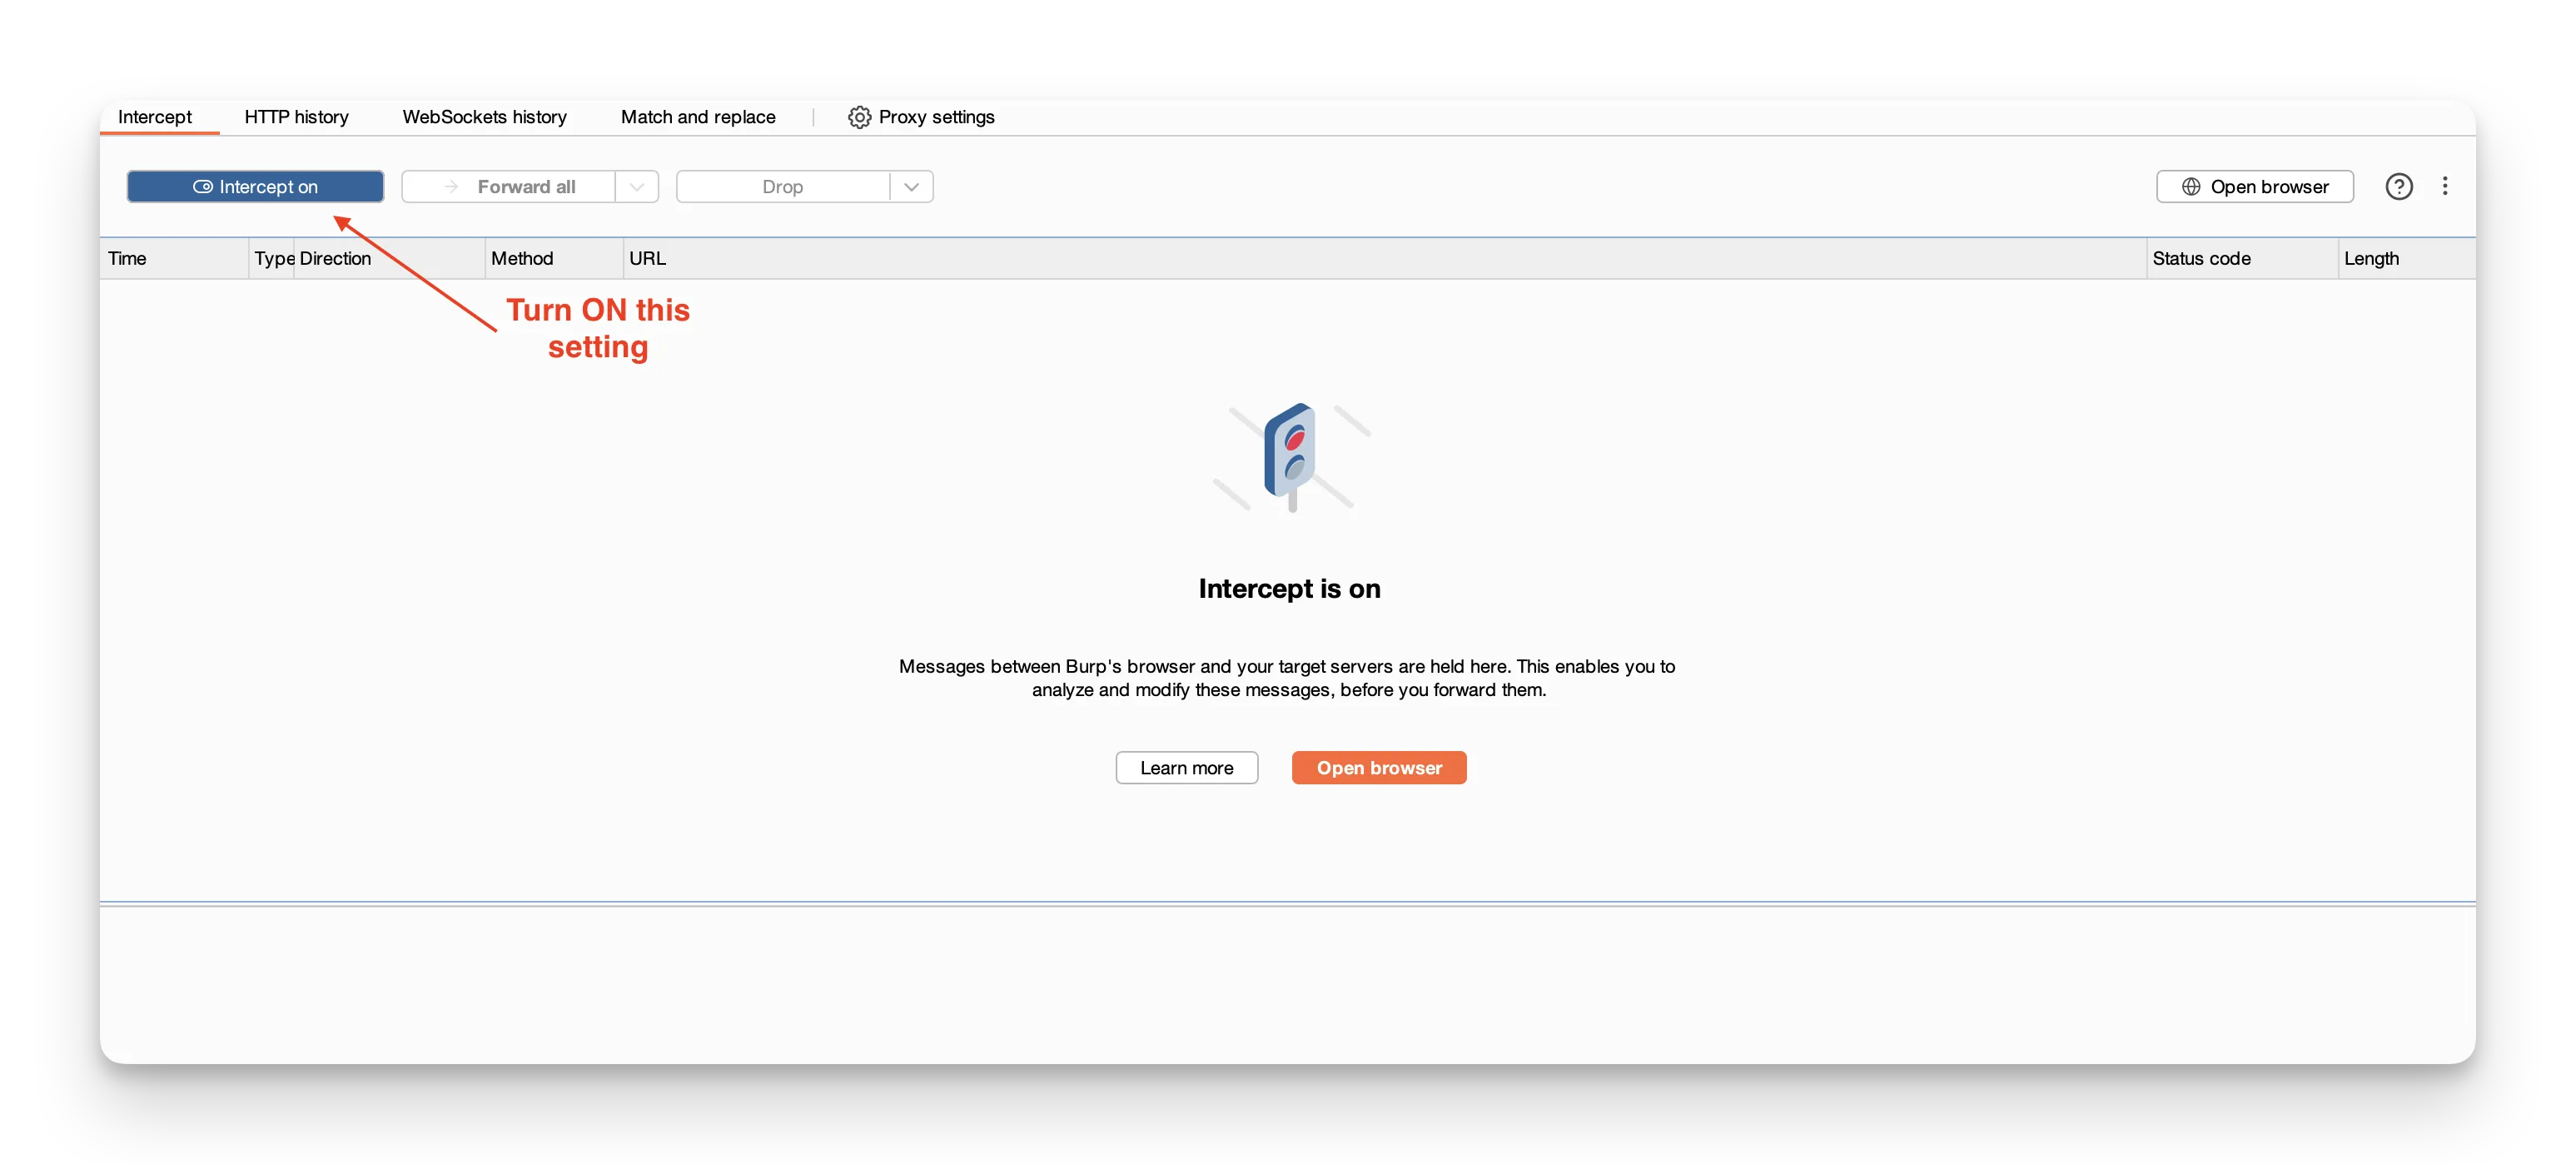
1. Make sure "Intercept is on"
Check that the Intercept is on button in Burp’s Proxy tab is highlighted.
2. Use the browser to interact with the web app
Perform an action—like submitting a form, searching, or navigating to another page.
- Burp will catch the request before it reaches the server.
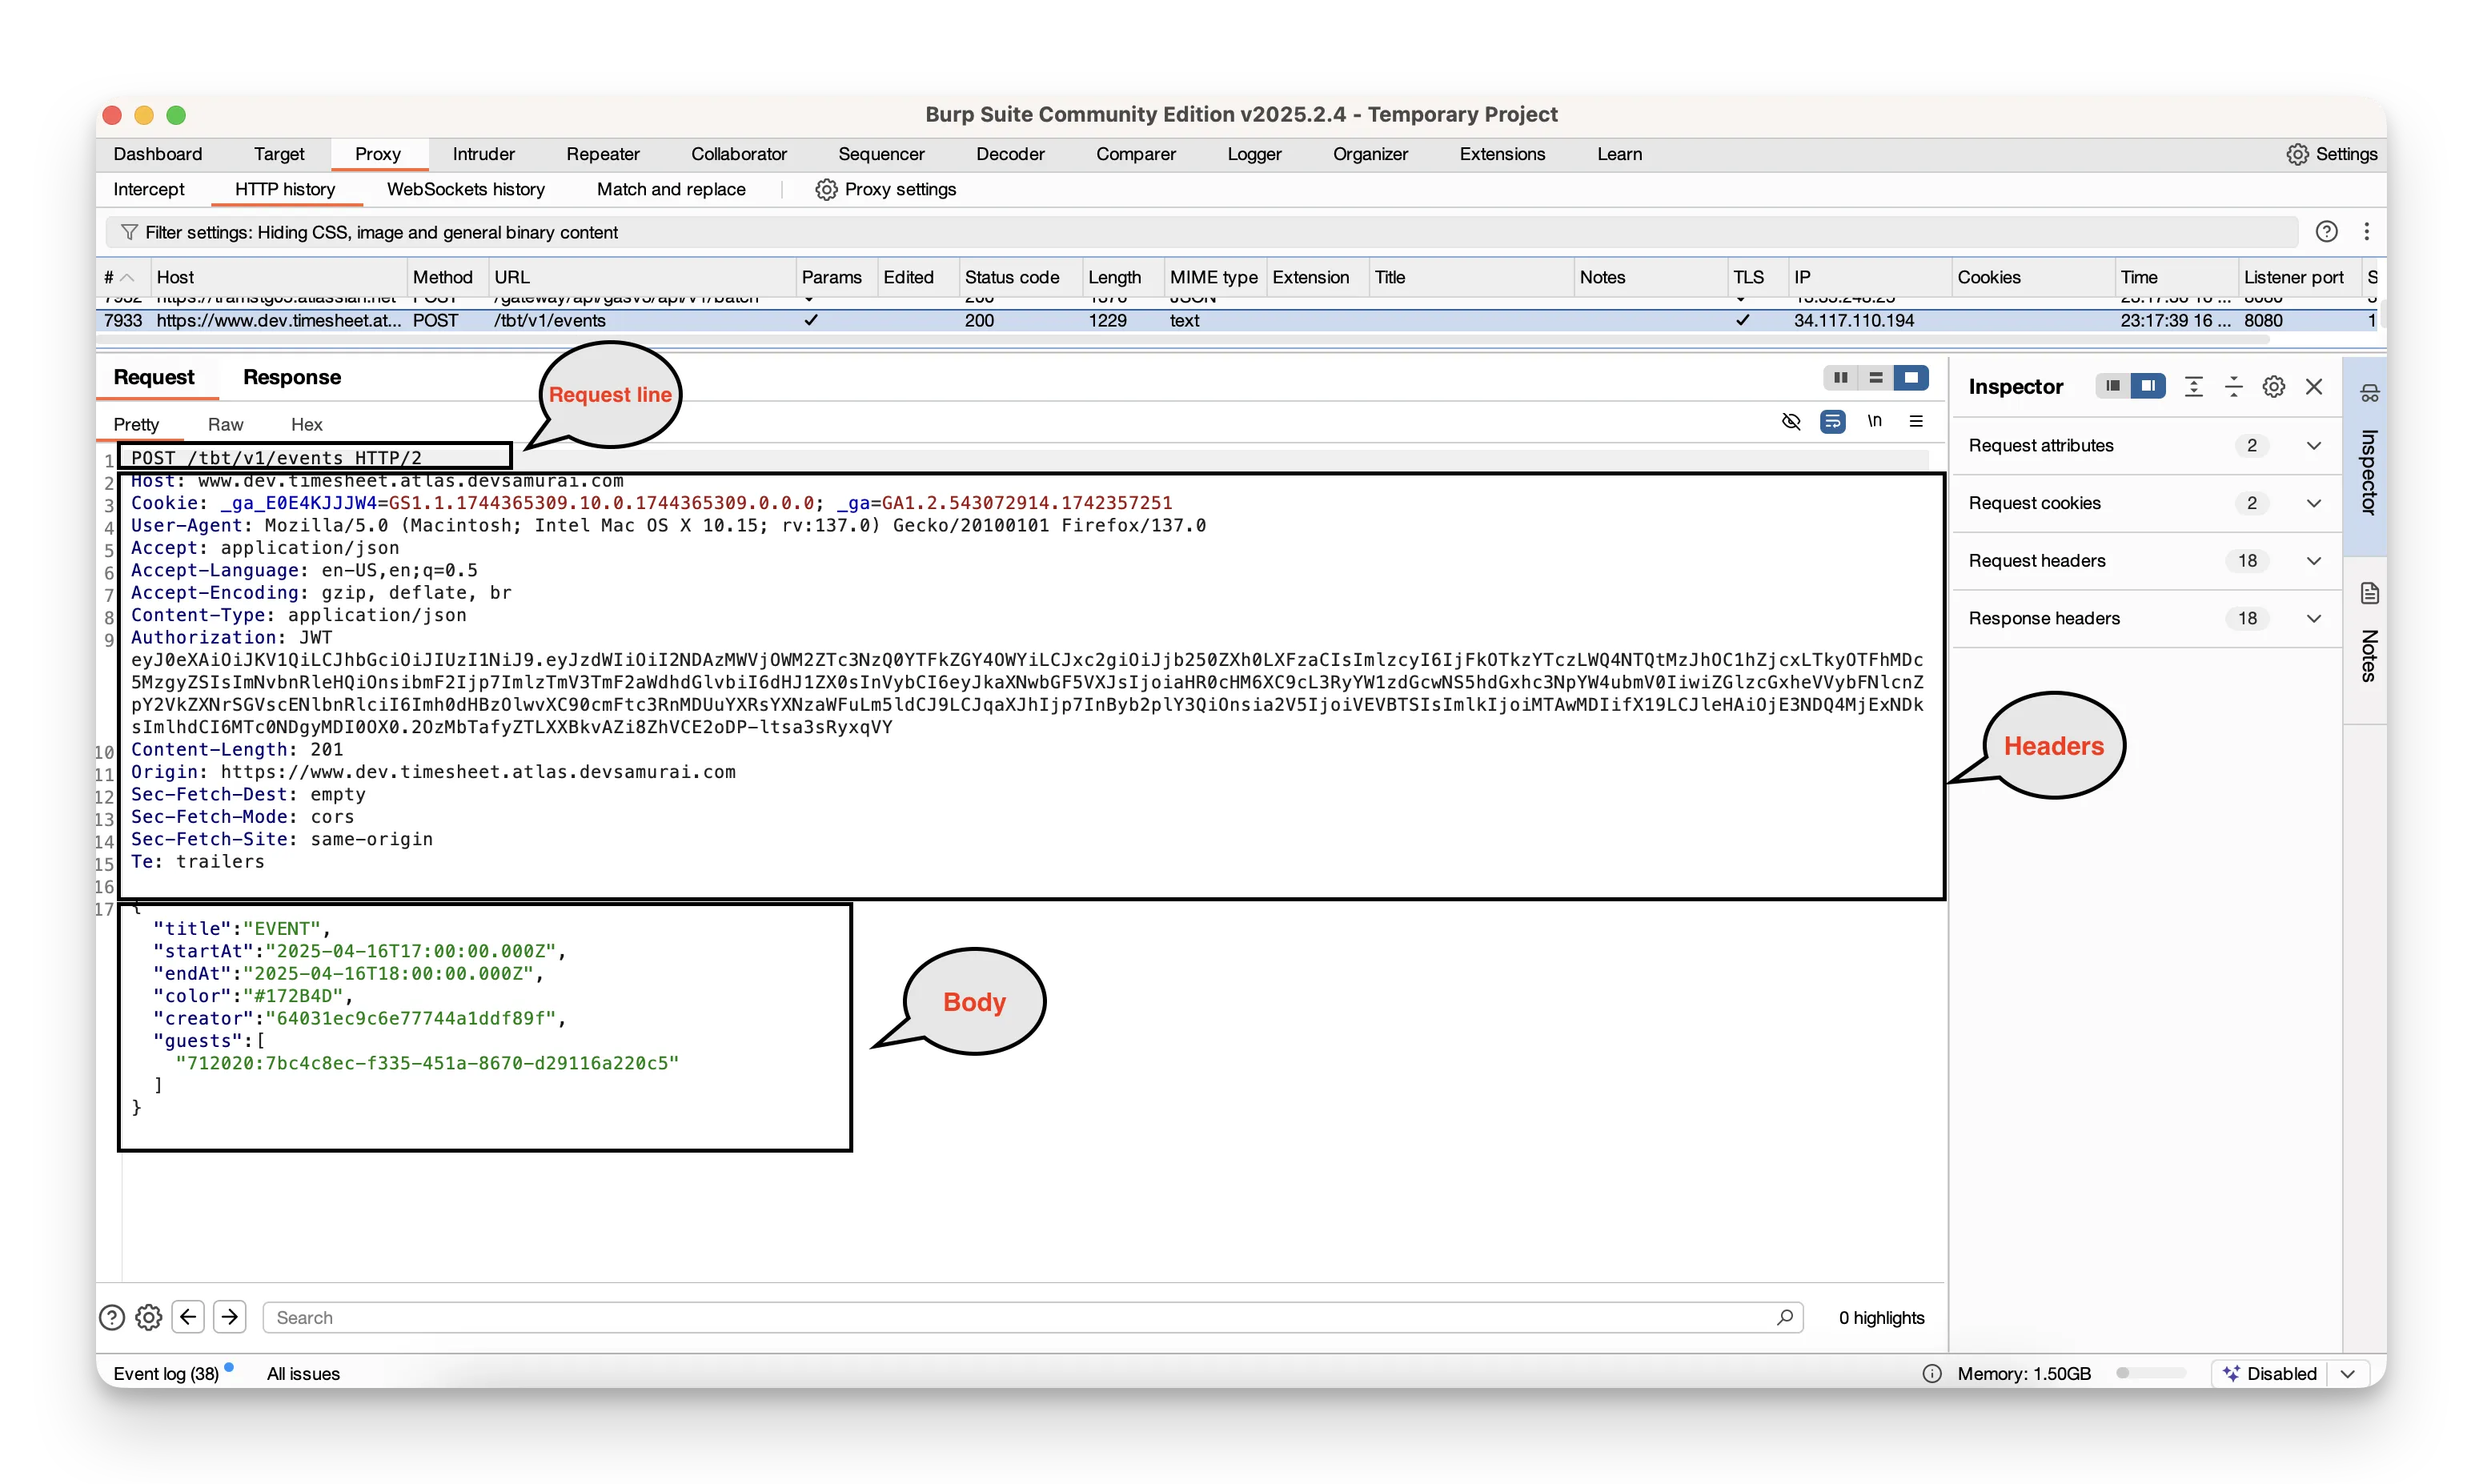
- You’ll see the raw HTTP request appear in the Request panel.
- This request typically includes:
- Request Line: The method (e.g., GET or POST), the endpoint URL, and the HTTP version.
- Headers: Details like
User-Agent,Accept, and any cookies included. - Body (for POST requests): Data submitted via forms.
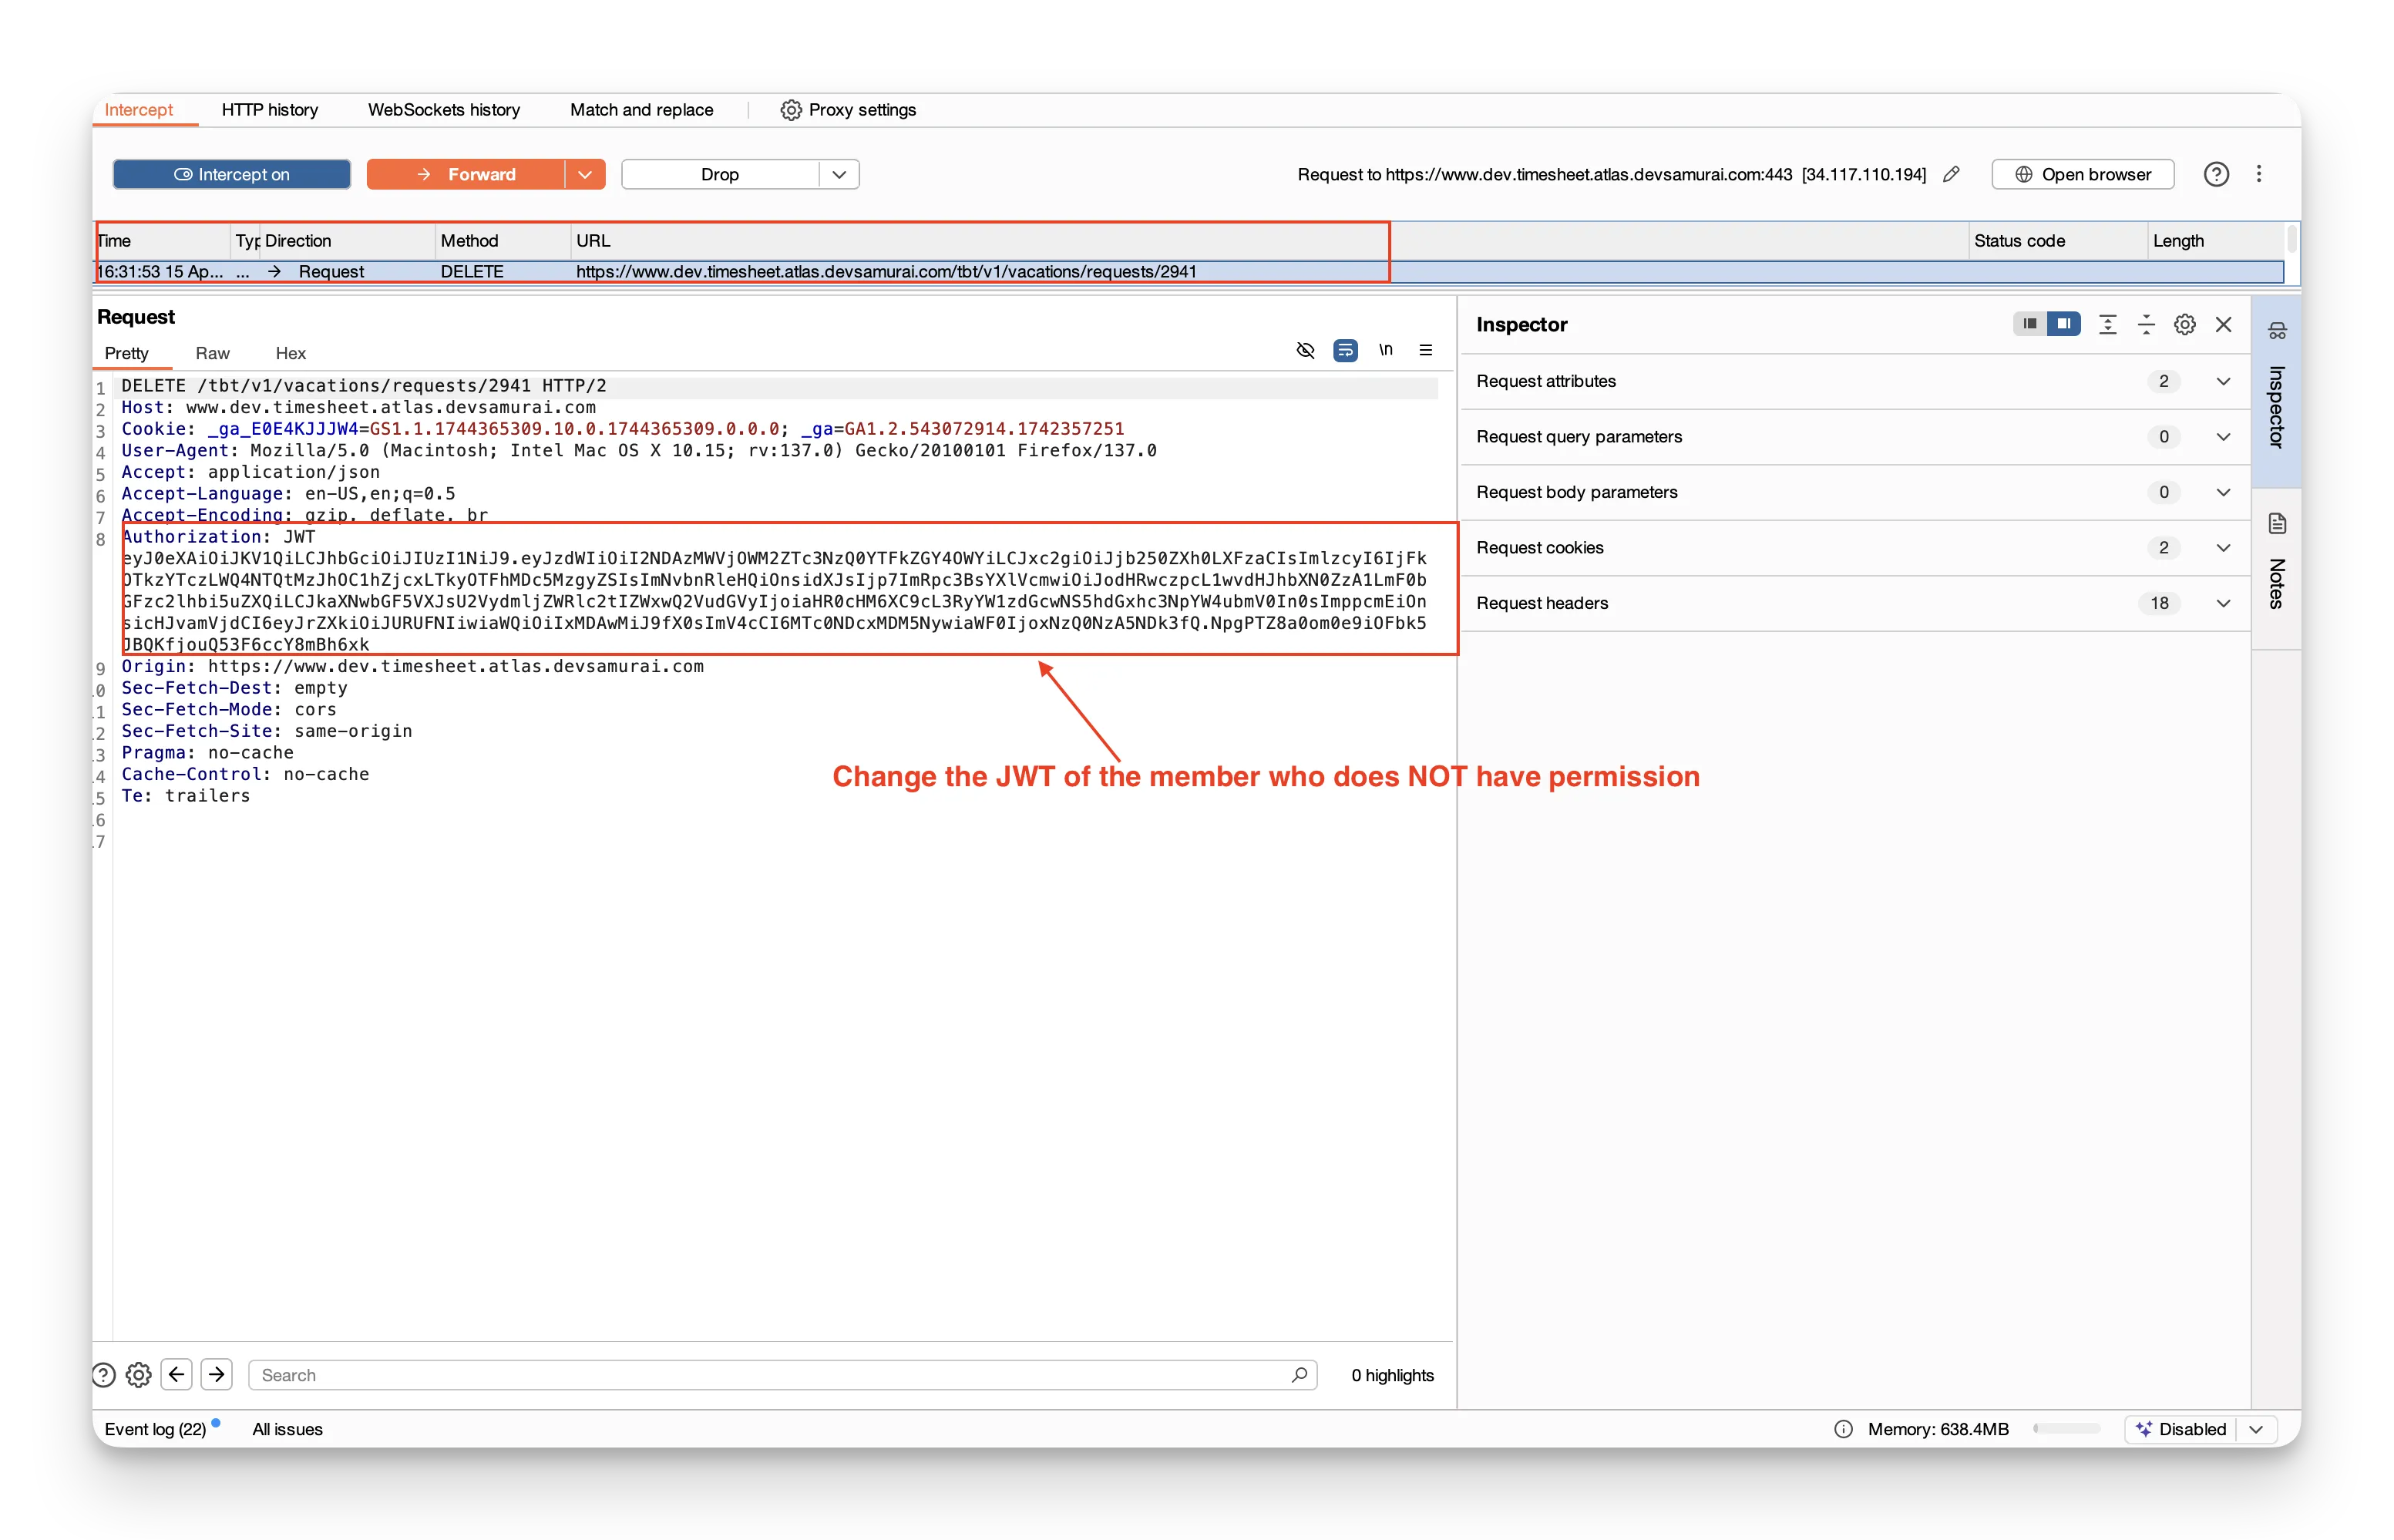
3. Modify the request
You can change form parameters, tweak headers, or tamper with cookies directly in the editor.
4. Click "Forward"
This sends the (possibly altered) request to the server.
5. Observe the result
See how the server responds to your modified input.
Example: Endpoint → DELETE /tbt/v1/vacations/requests/2941
Repeat the Requests
What if you want to resend a particular request over and over, each time tweaking something? That’s exactly what Repeater is for.
The Repeater is invaluable for:
- Testing input validation: Send invalid or unexpected data (e.g. special characters, long strings) to form fields or API endpoints. Does your server sanitize inputs or return clear error messages?
- Analyzing API interactions: Craft custom API calls by changing parameters, headers, or JSON payloads. See exactly how the API behaves under different conditions.
- Replaying and comparing: After fixing code or updating security, replay the same request to confirm the issue is resolved—and verify that no new vulnerabilities slipped in.
What Repeater can do:
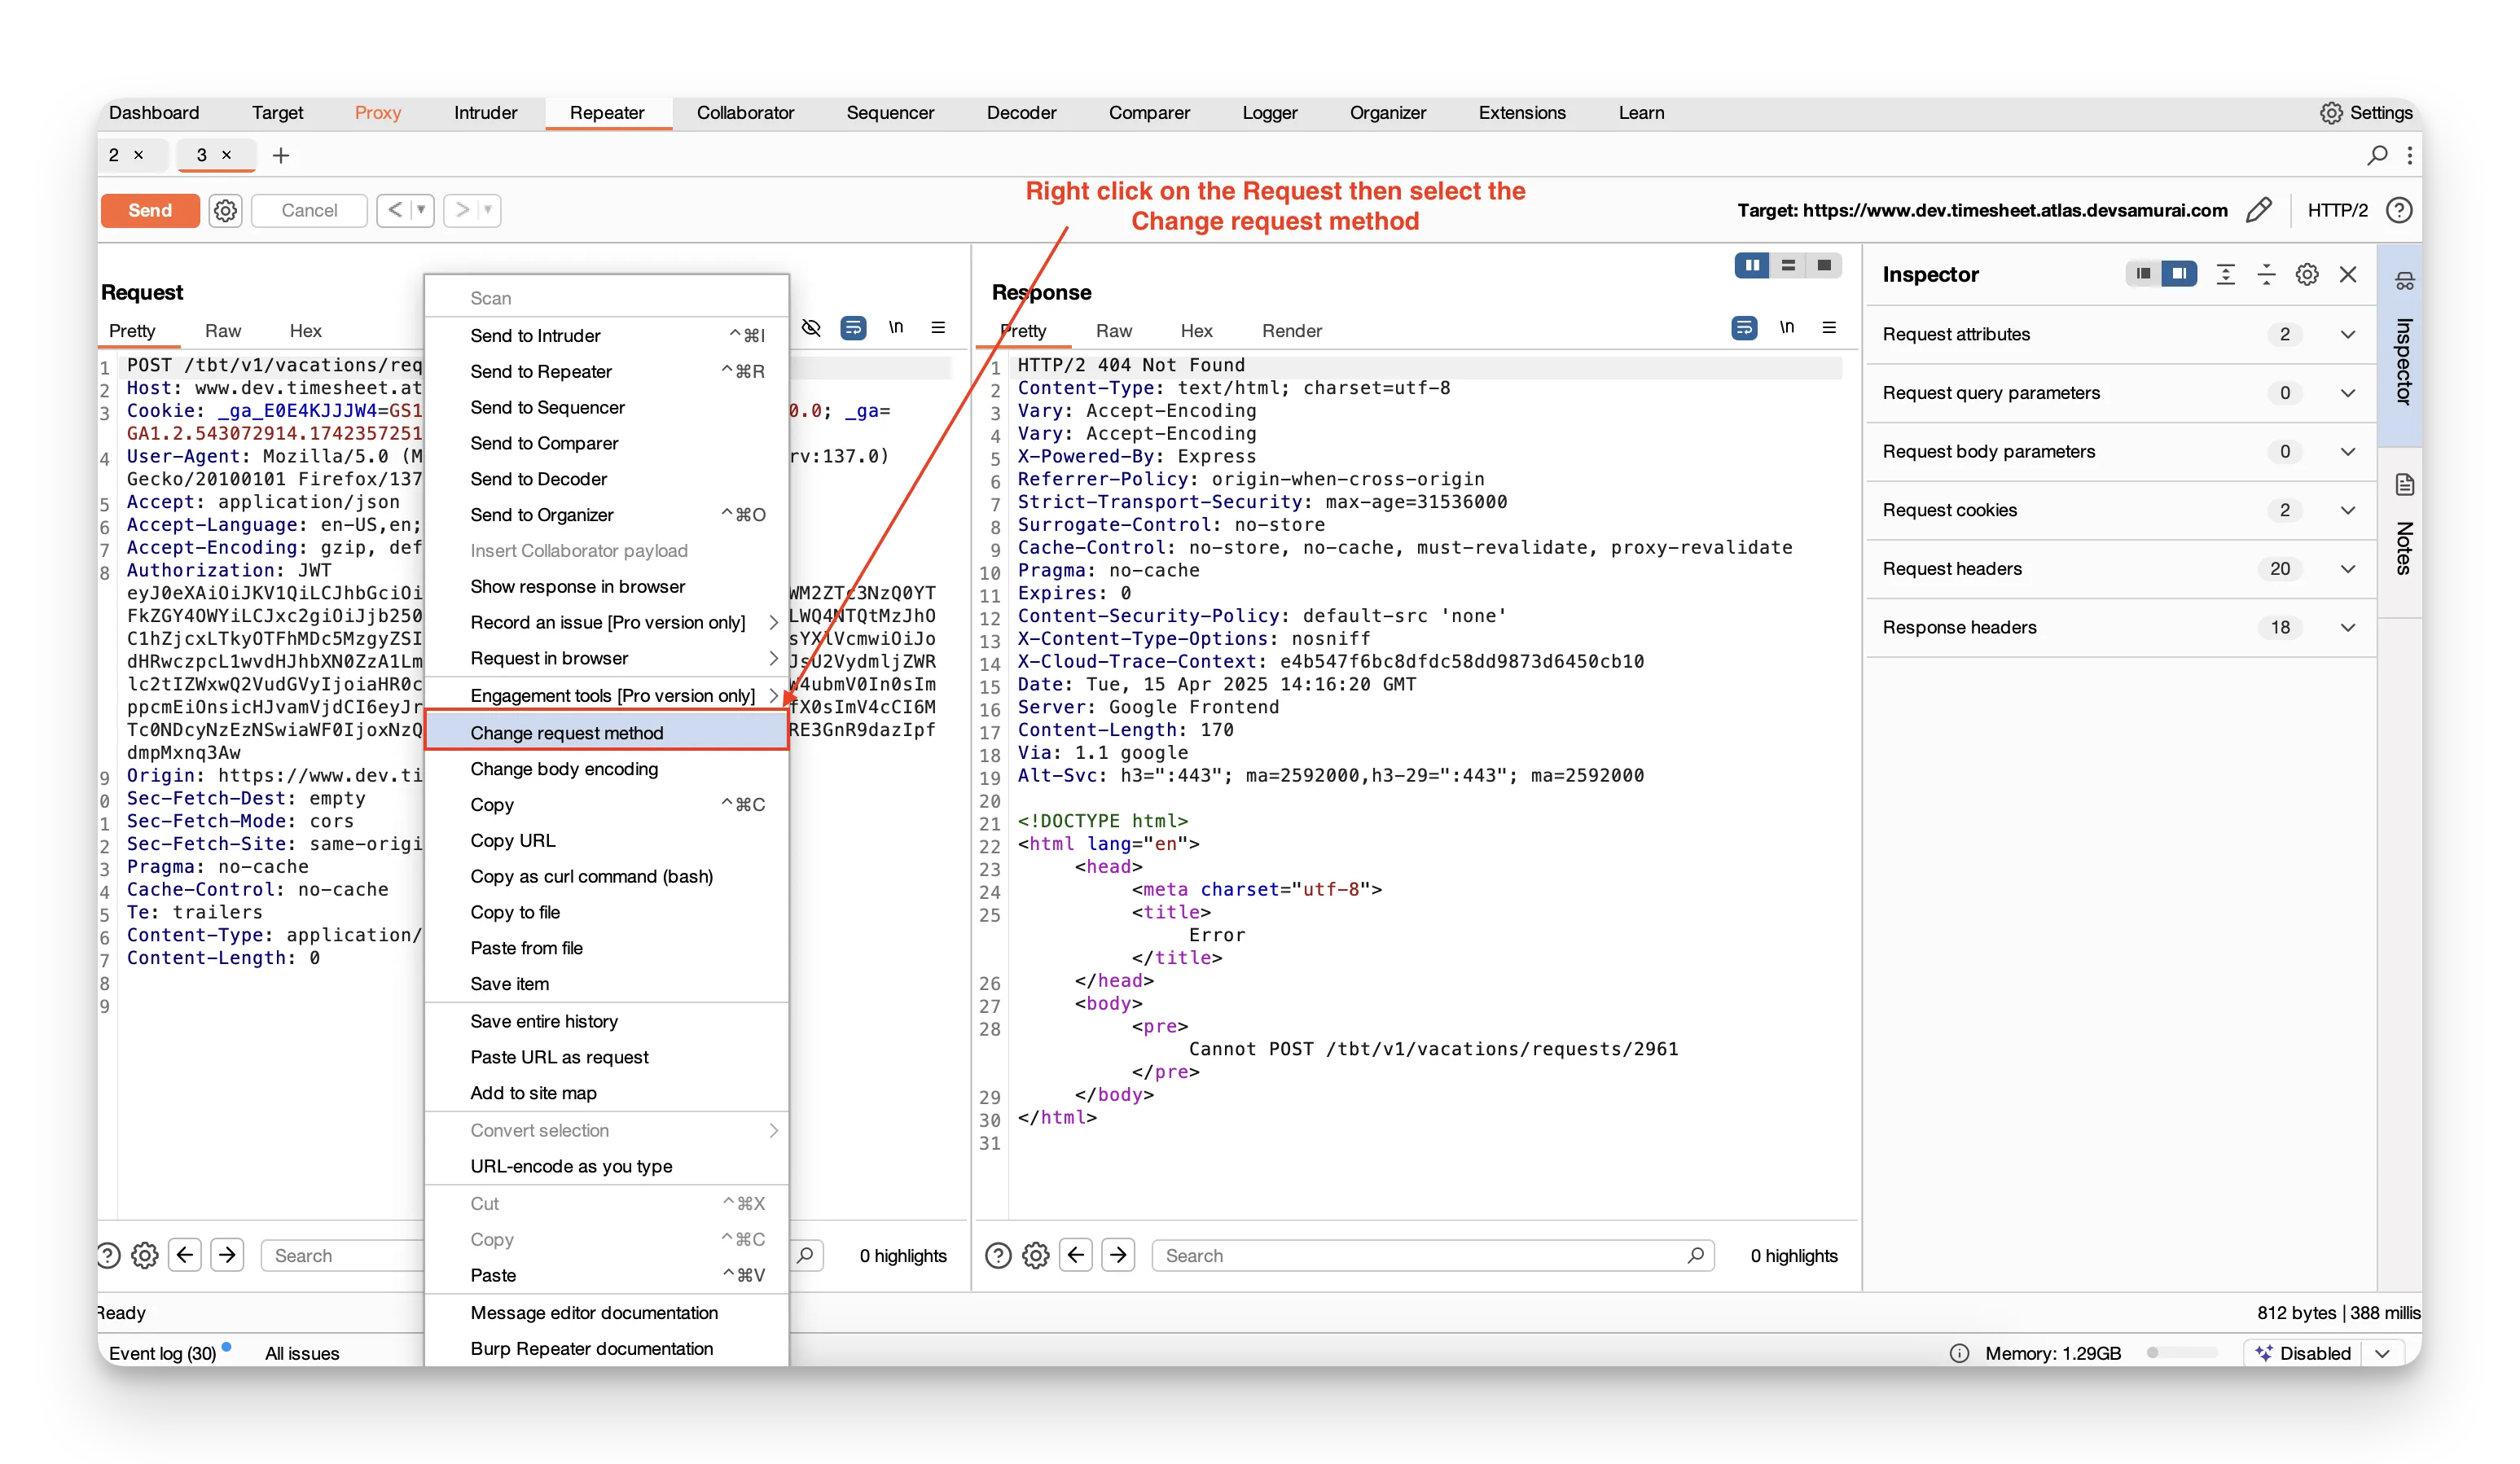
- Change the request method (GET, POST, PUT, DELETE, etc.)
- Copy the full URL as a new request
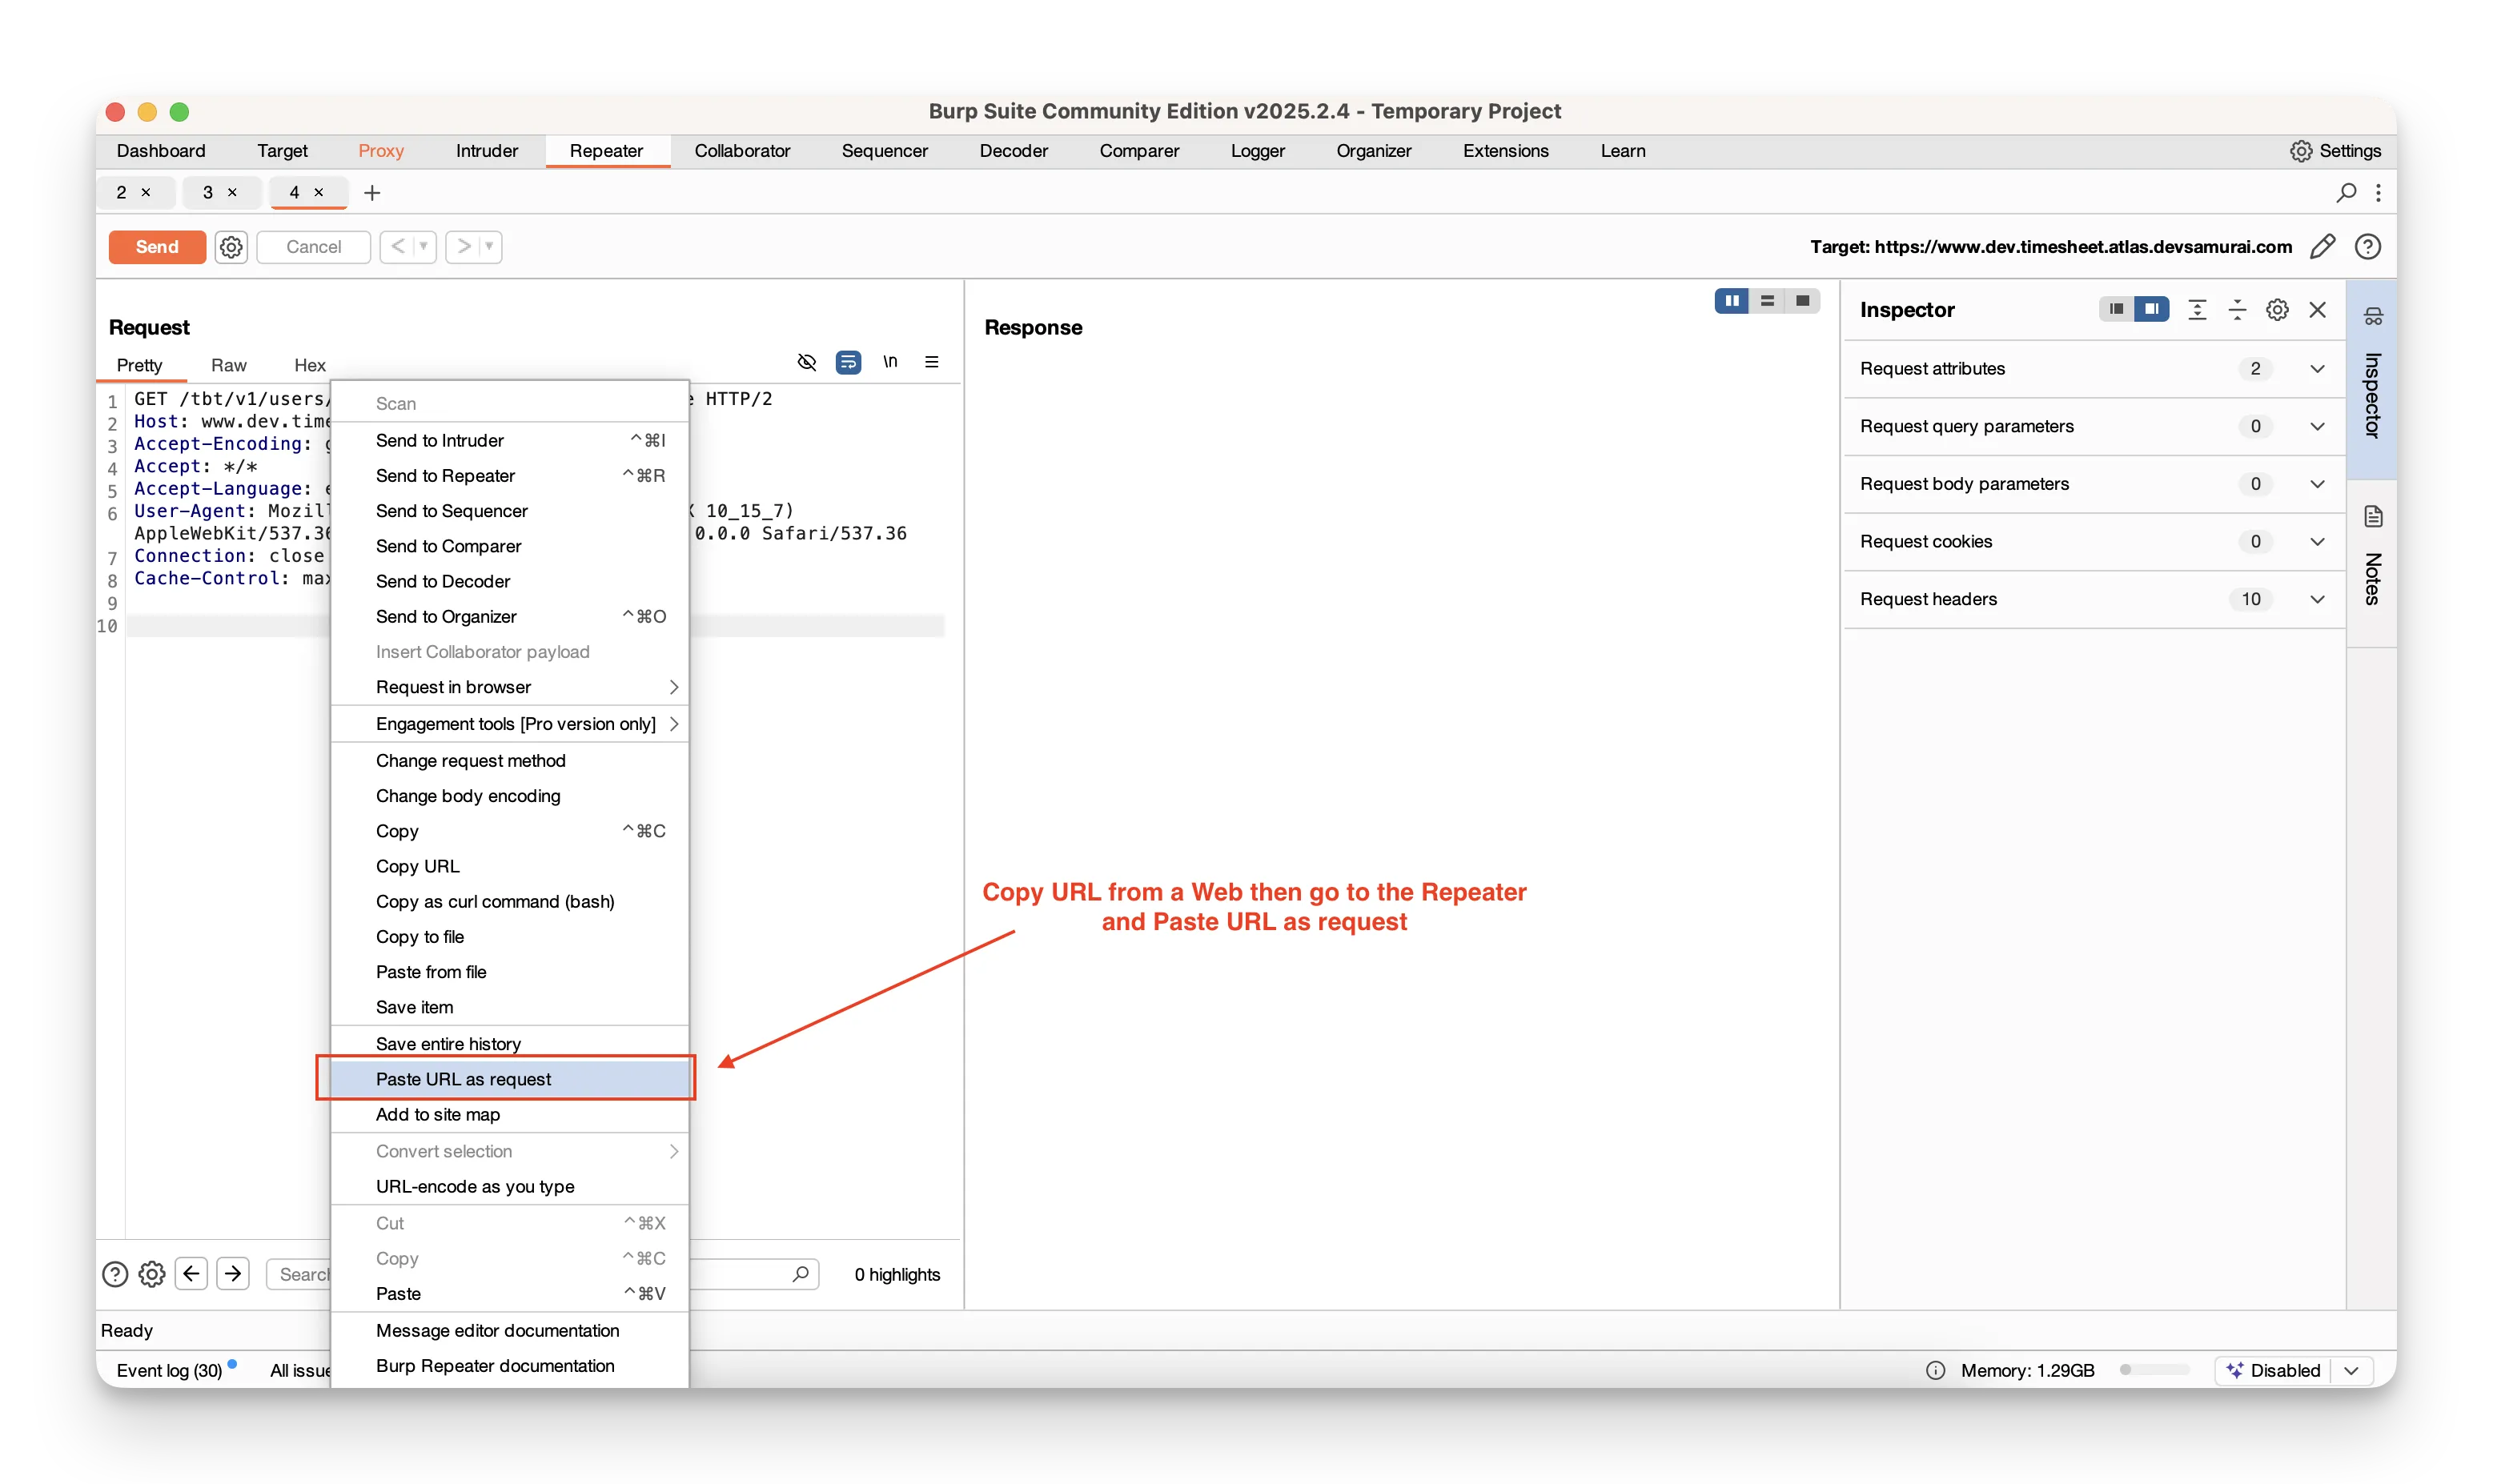
- Adjust URL‑encoding on the fly as you type
- Offer additional options when following redirects
How to use Repeater:
- In Proxy → HTTP history, right‑click the request you want to explore and choose Send to Repeater.
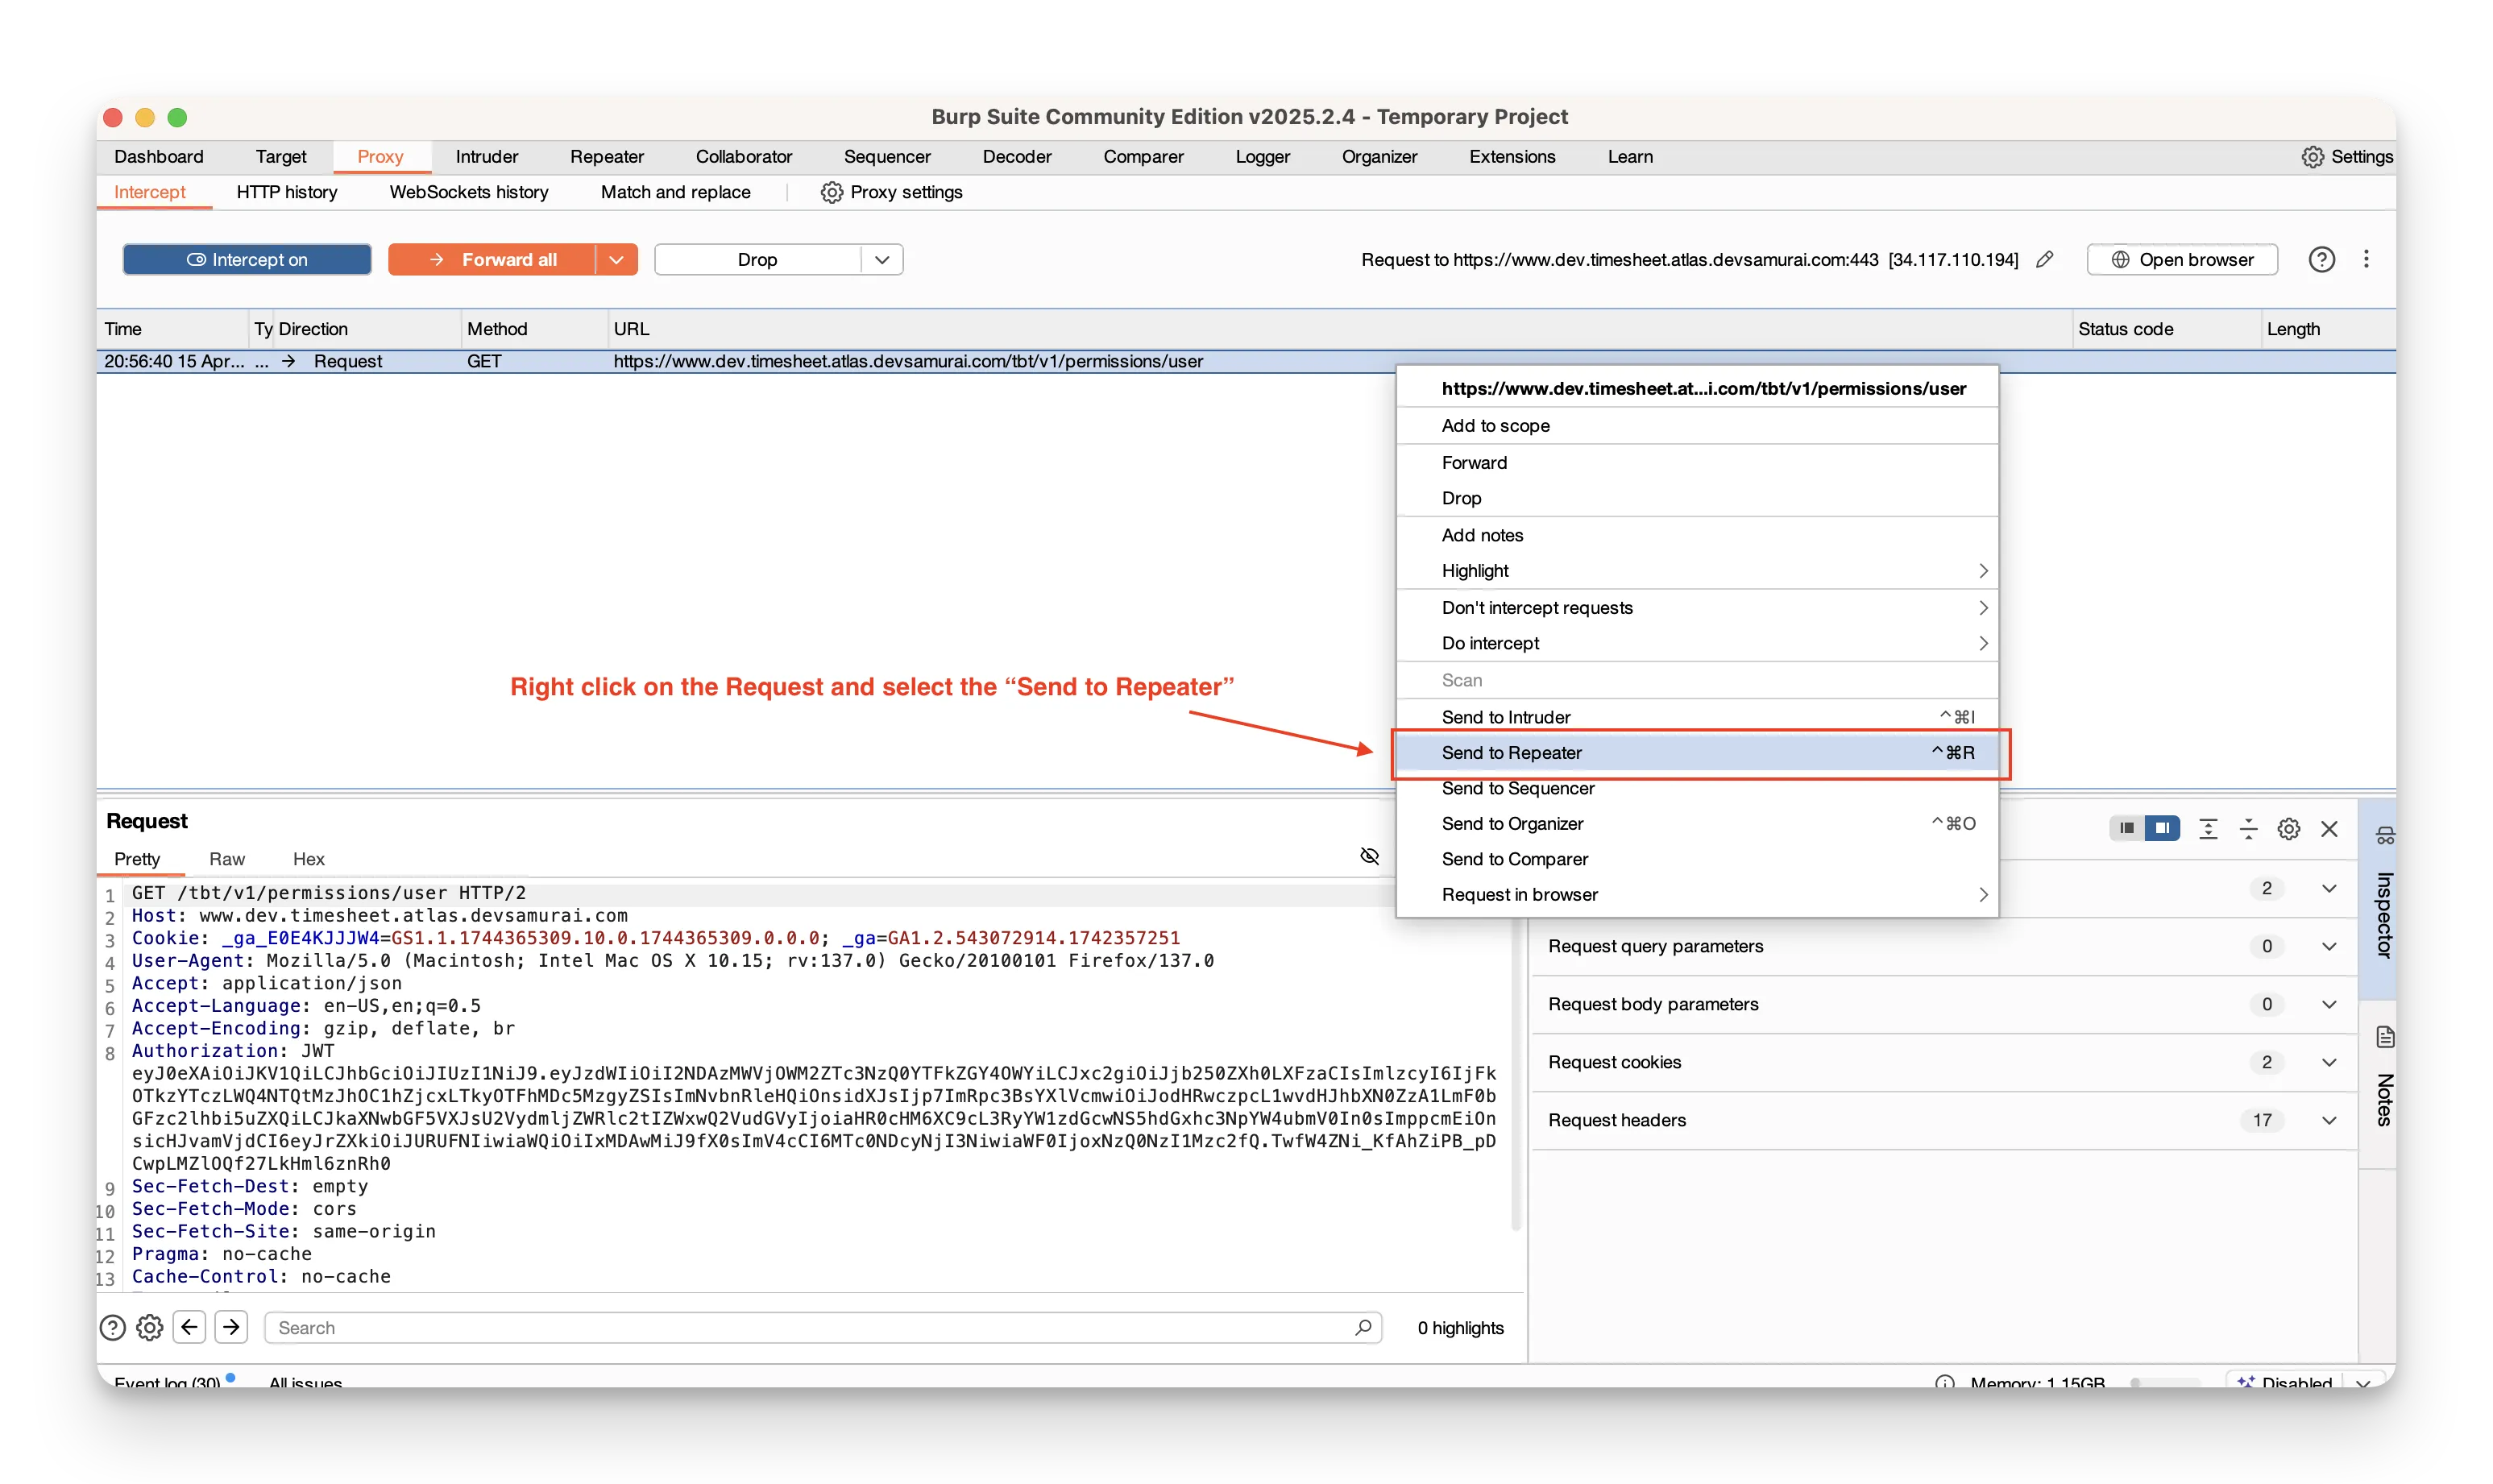
- Switch to the Repeater tab.
- Modify any part of the request—URL, headers, body, or method.
- Click Send to forward your edited request to the server.
- Review the response in the right‑hand panel.
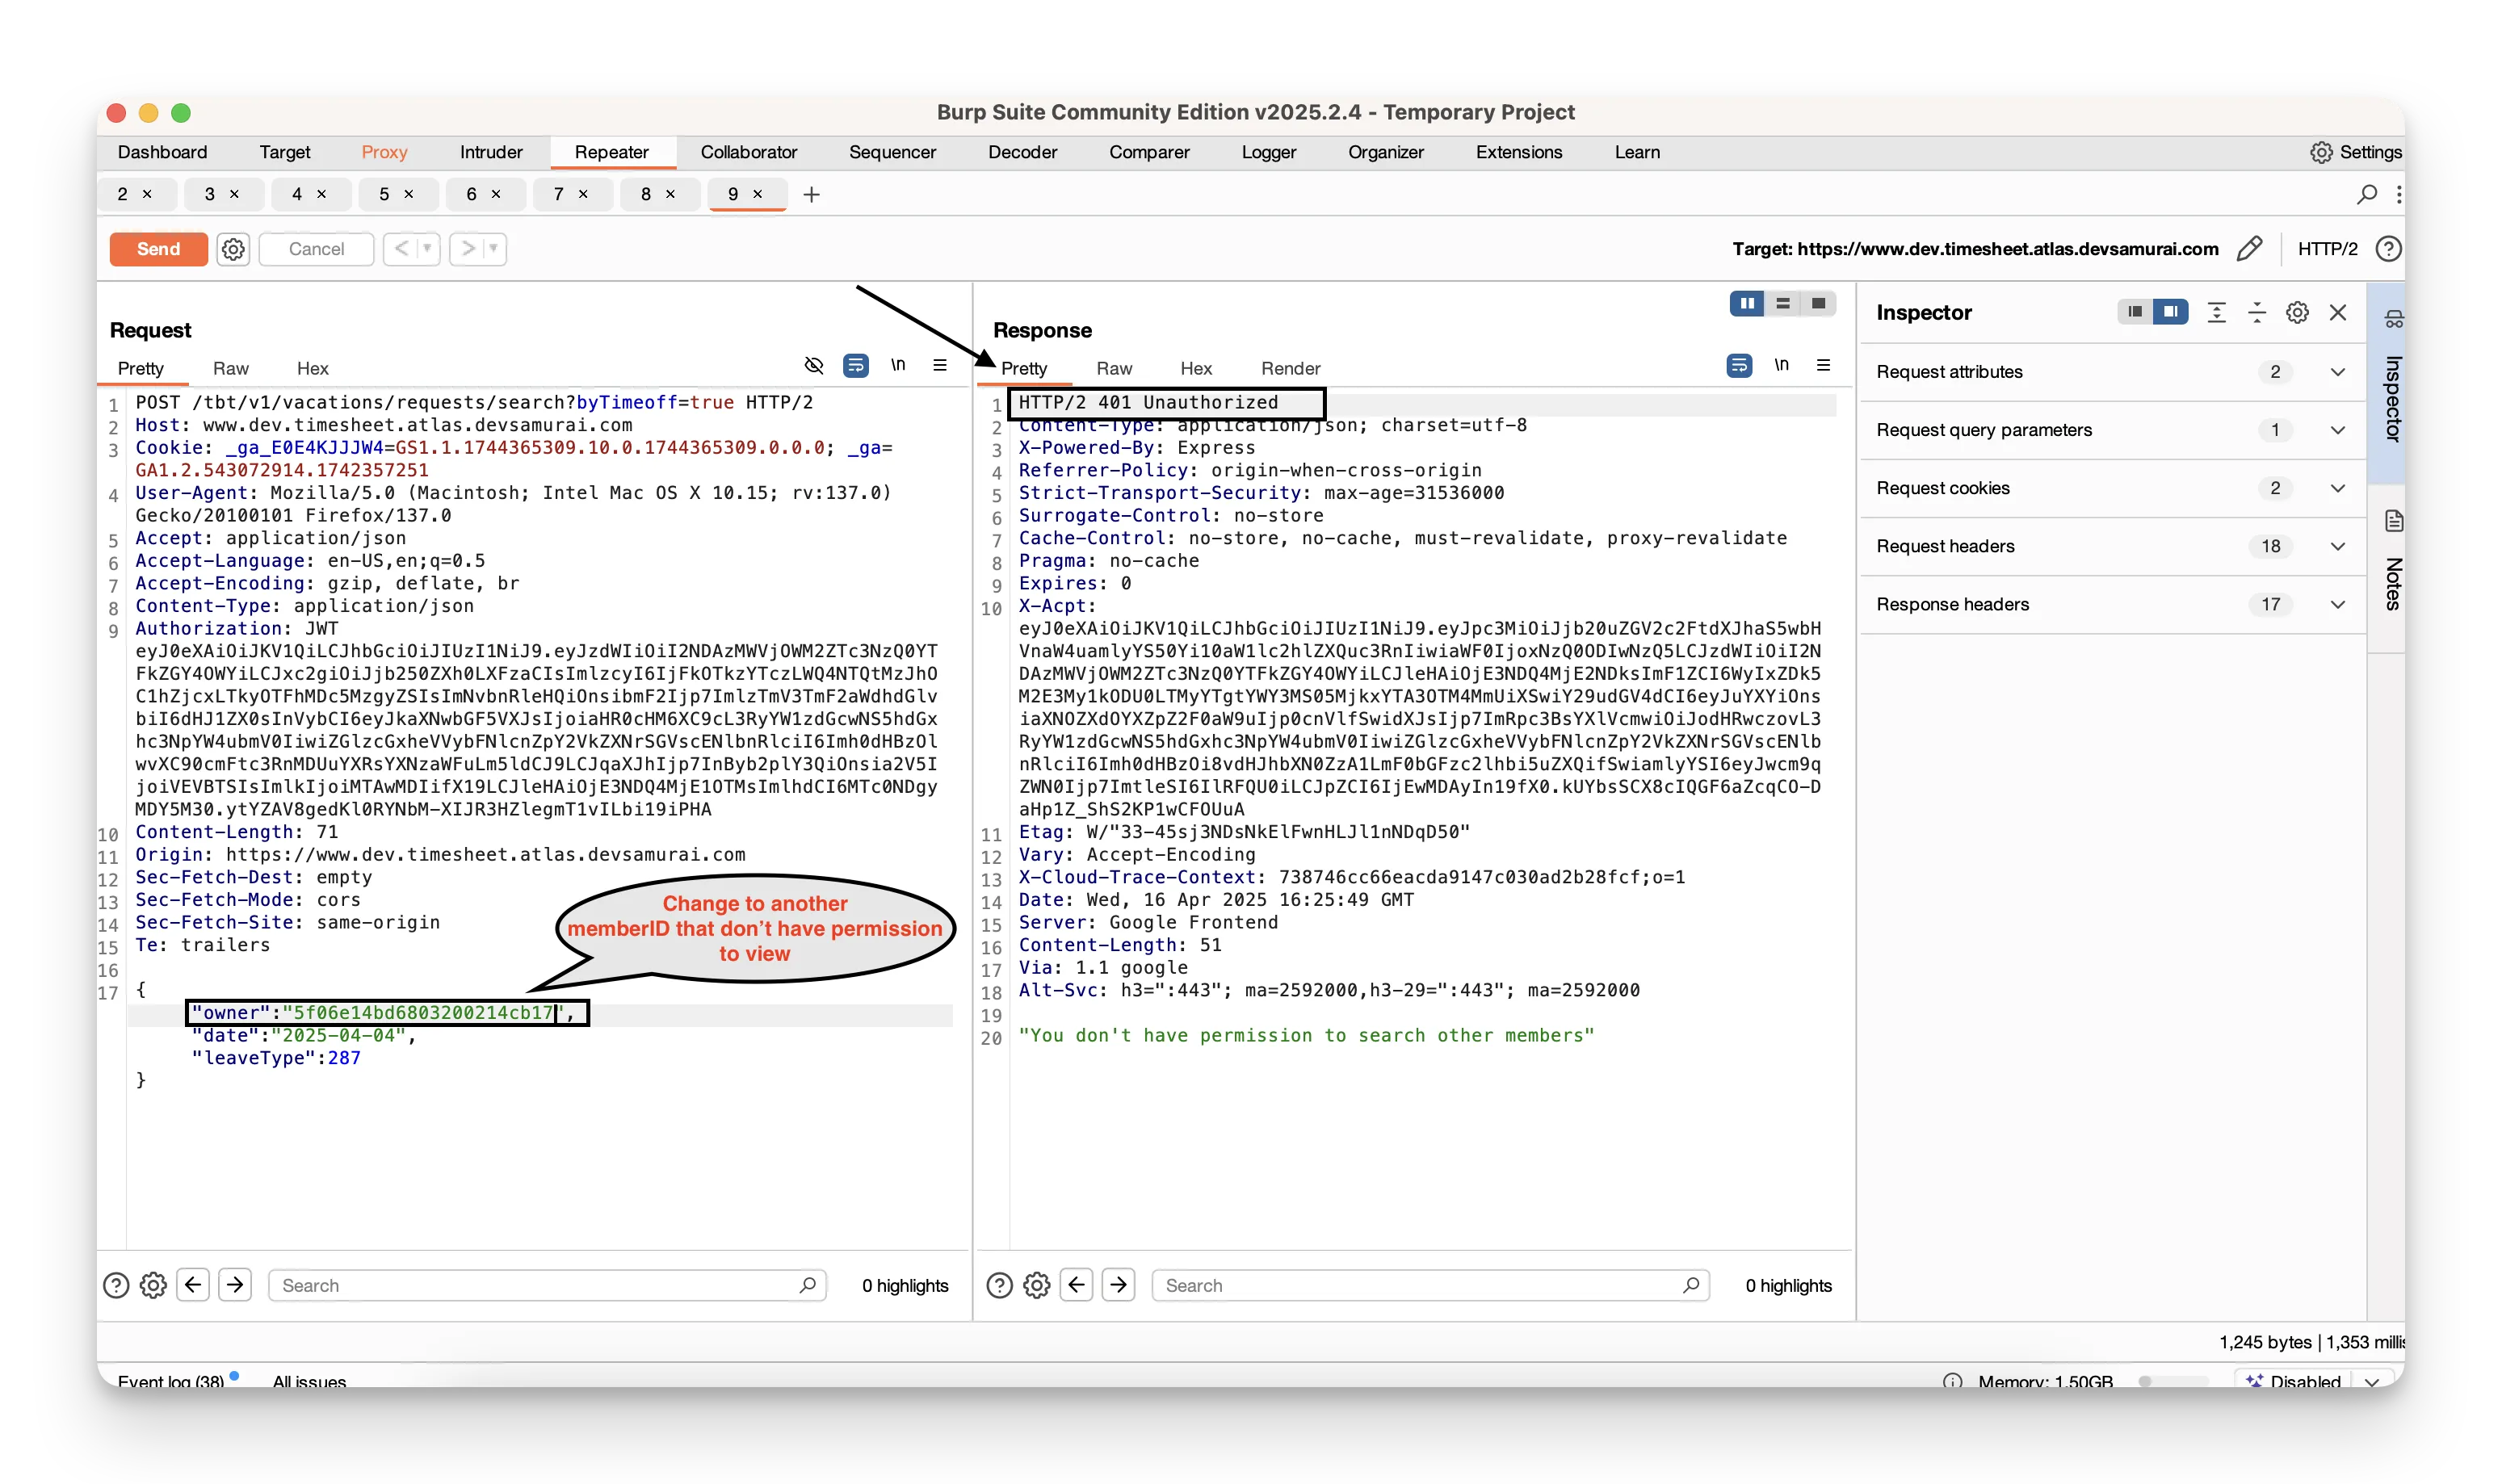
Example:
Start with
Endpoint GET /tbt/v1/vacations/requests/search?byTimeoff=true
then change the memberID value in the query string to an ID you shouldn’t normally access. Observe whether the server blocks the request or leaks data.
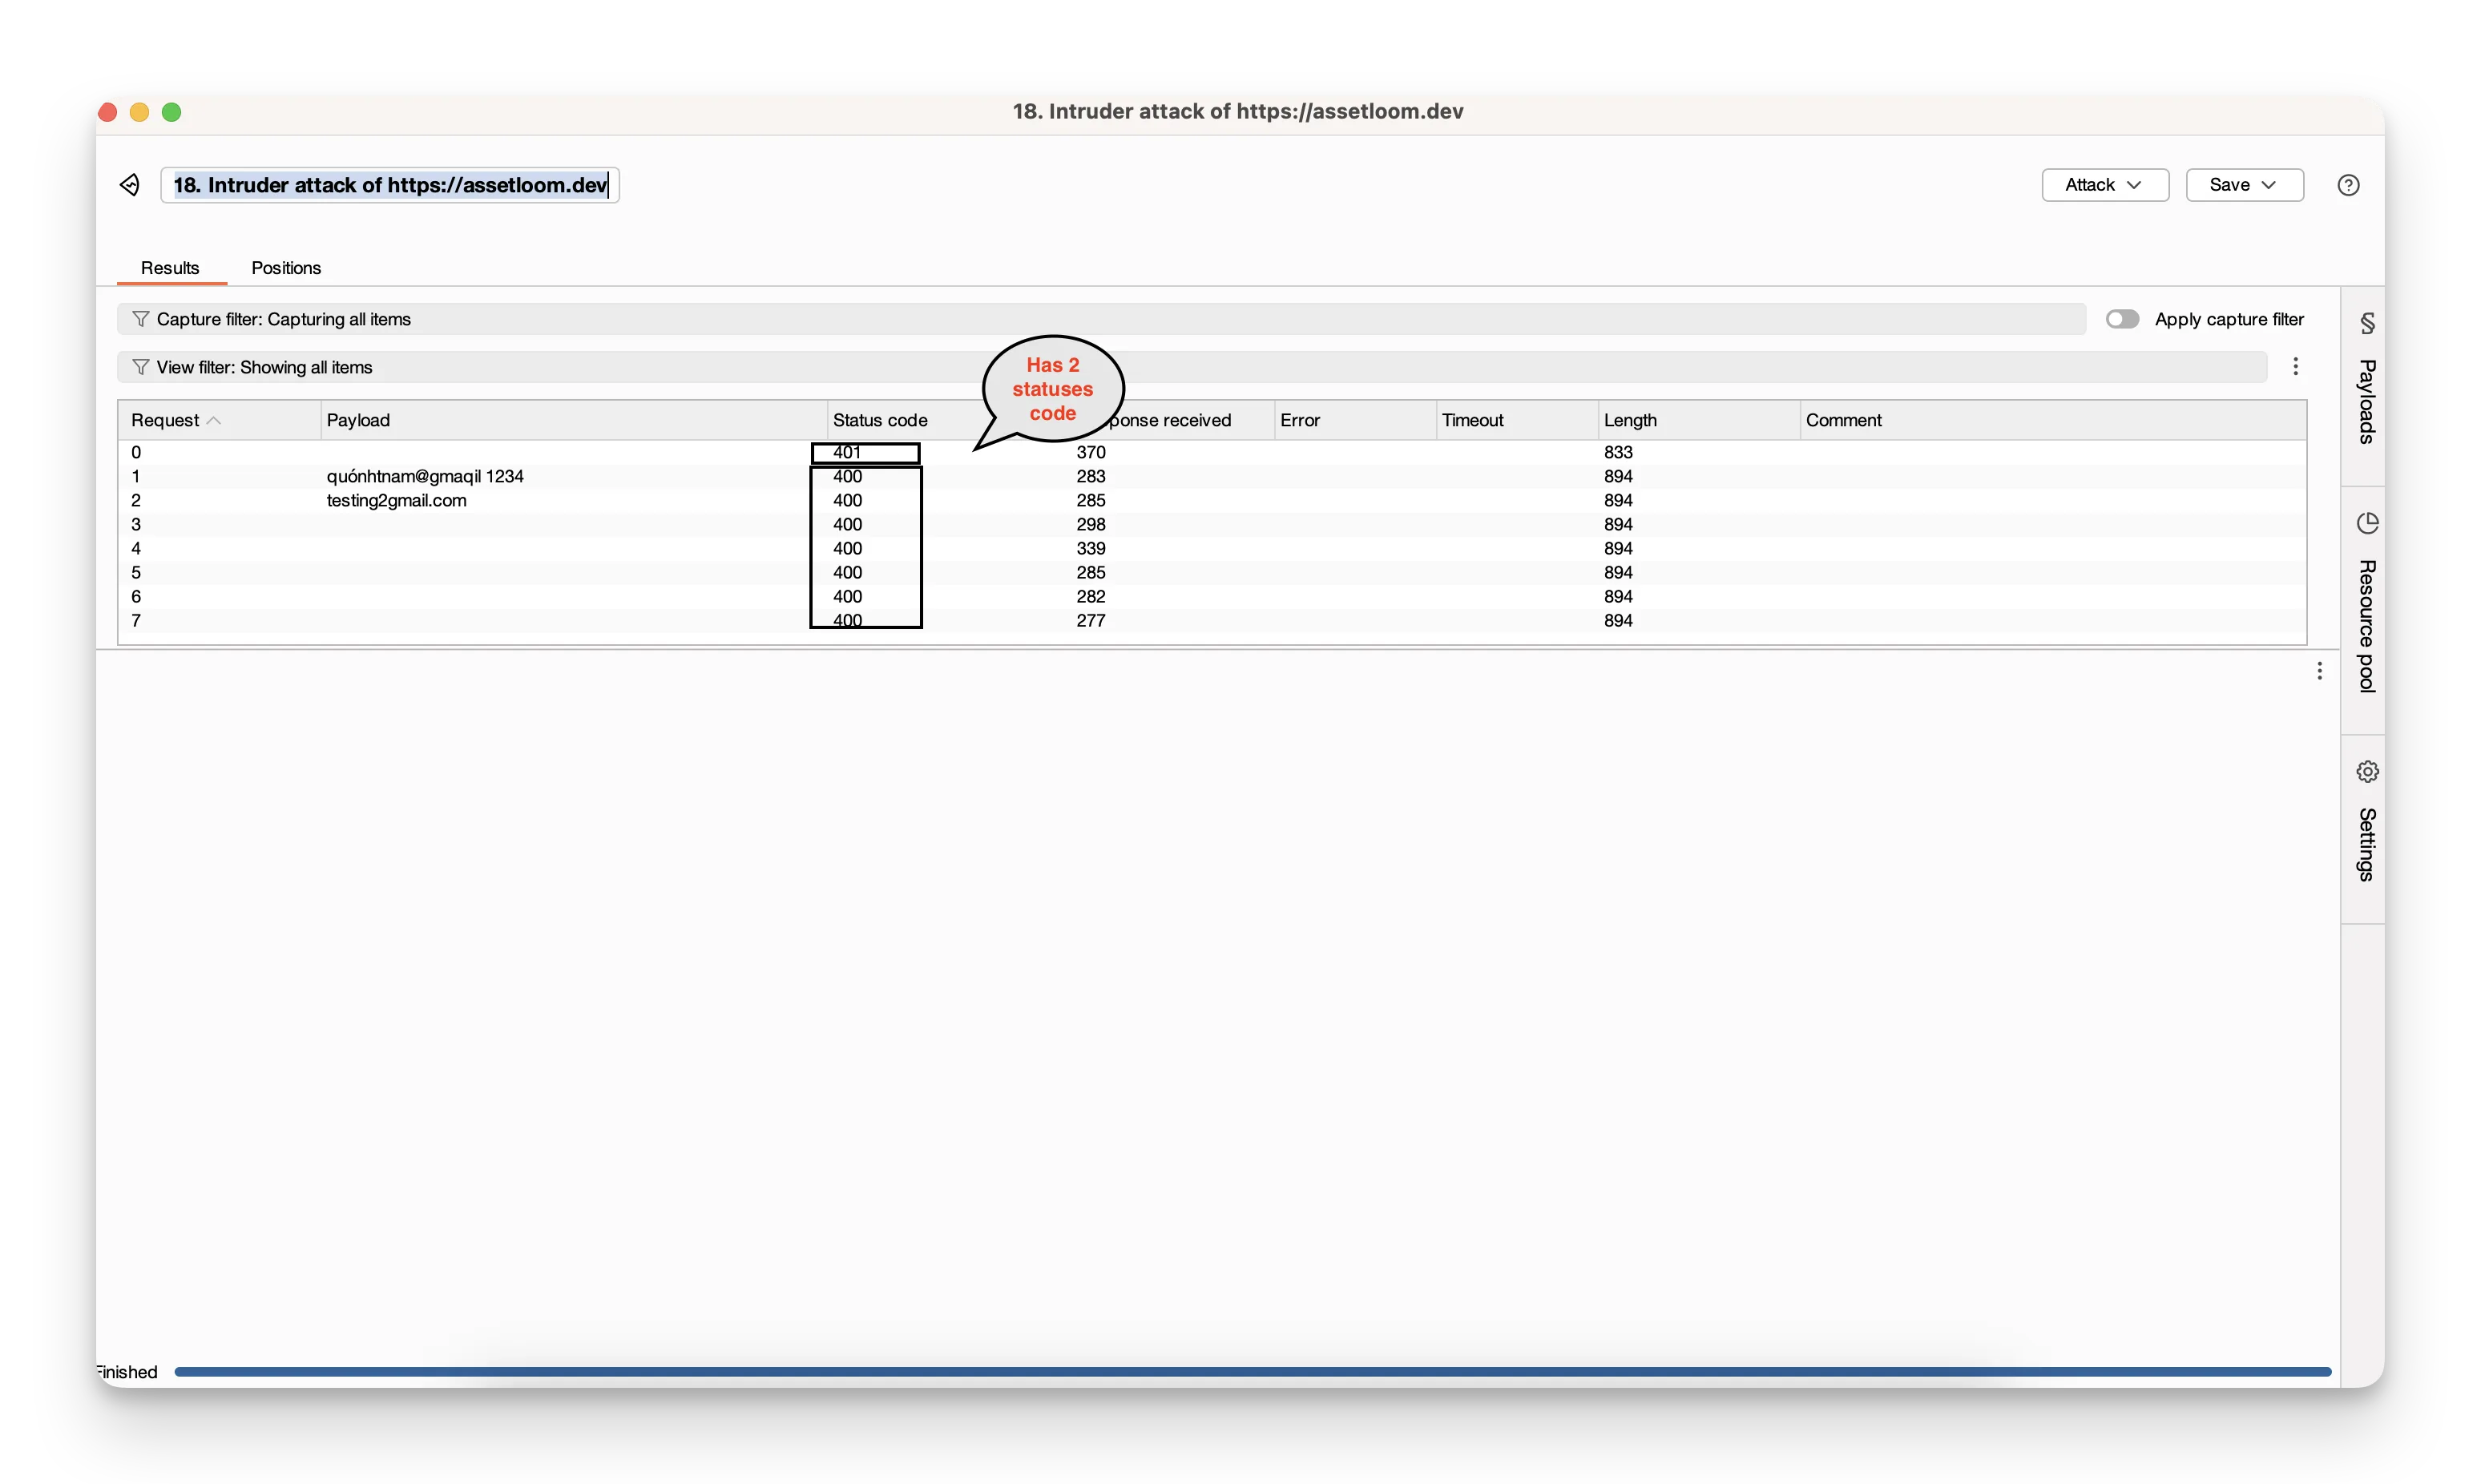
Introducing the Intruder
Intruder automates customized attacks by taking a base request and systematically swapping in values from lists of payloads. It’s your go‑to tool when you need to test many inputs quickly.
Common scenario: Testing a login form
- In Proxy → HTTP history, locate the login request.
- Right‑click it and choose Send to Intruder.
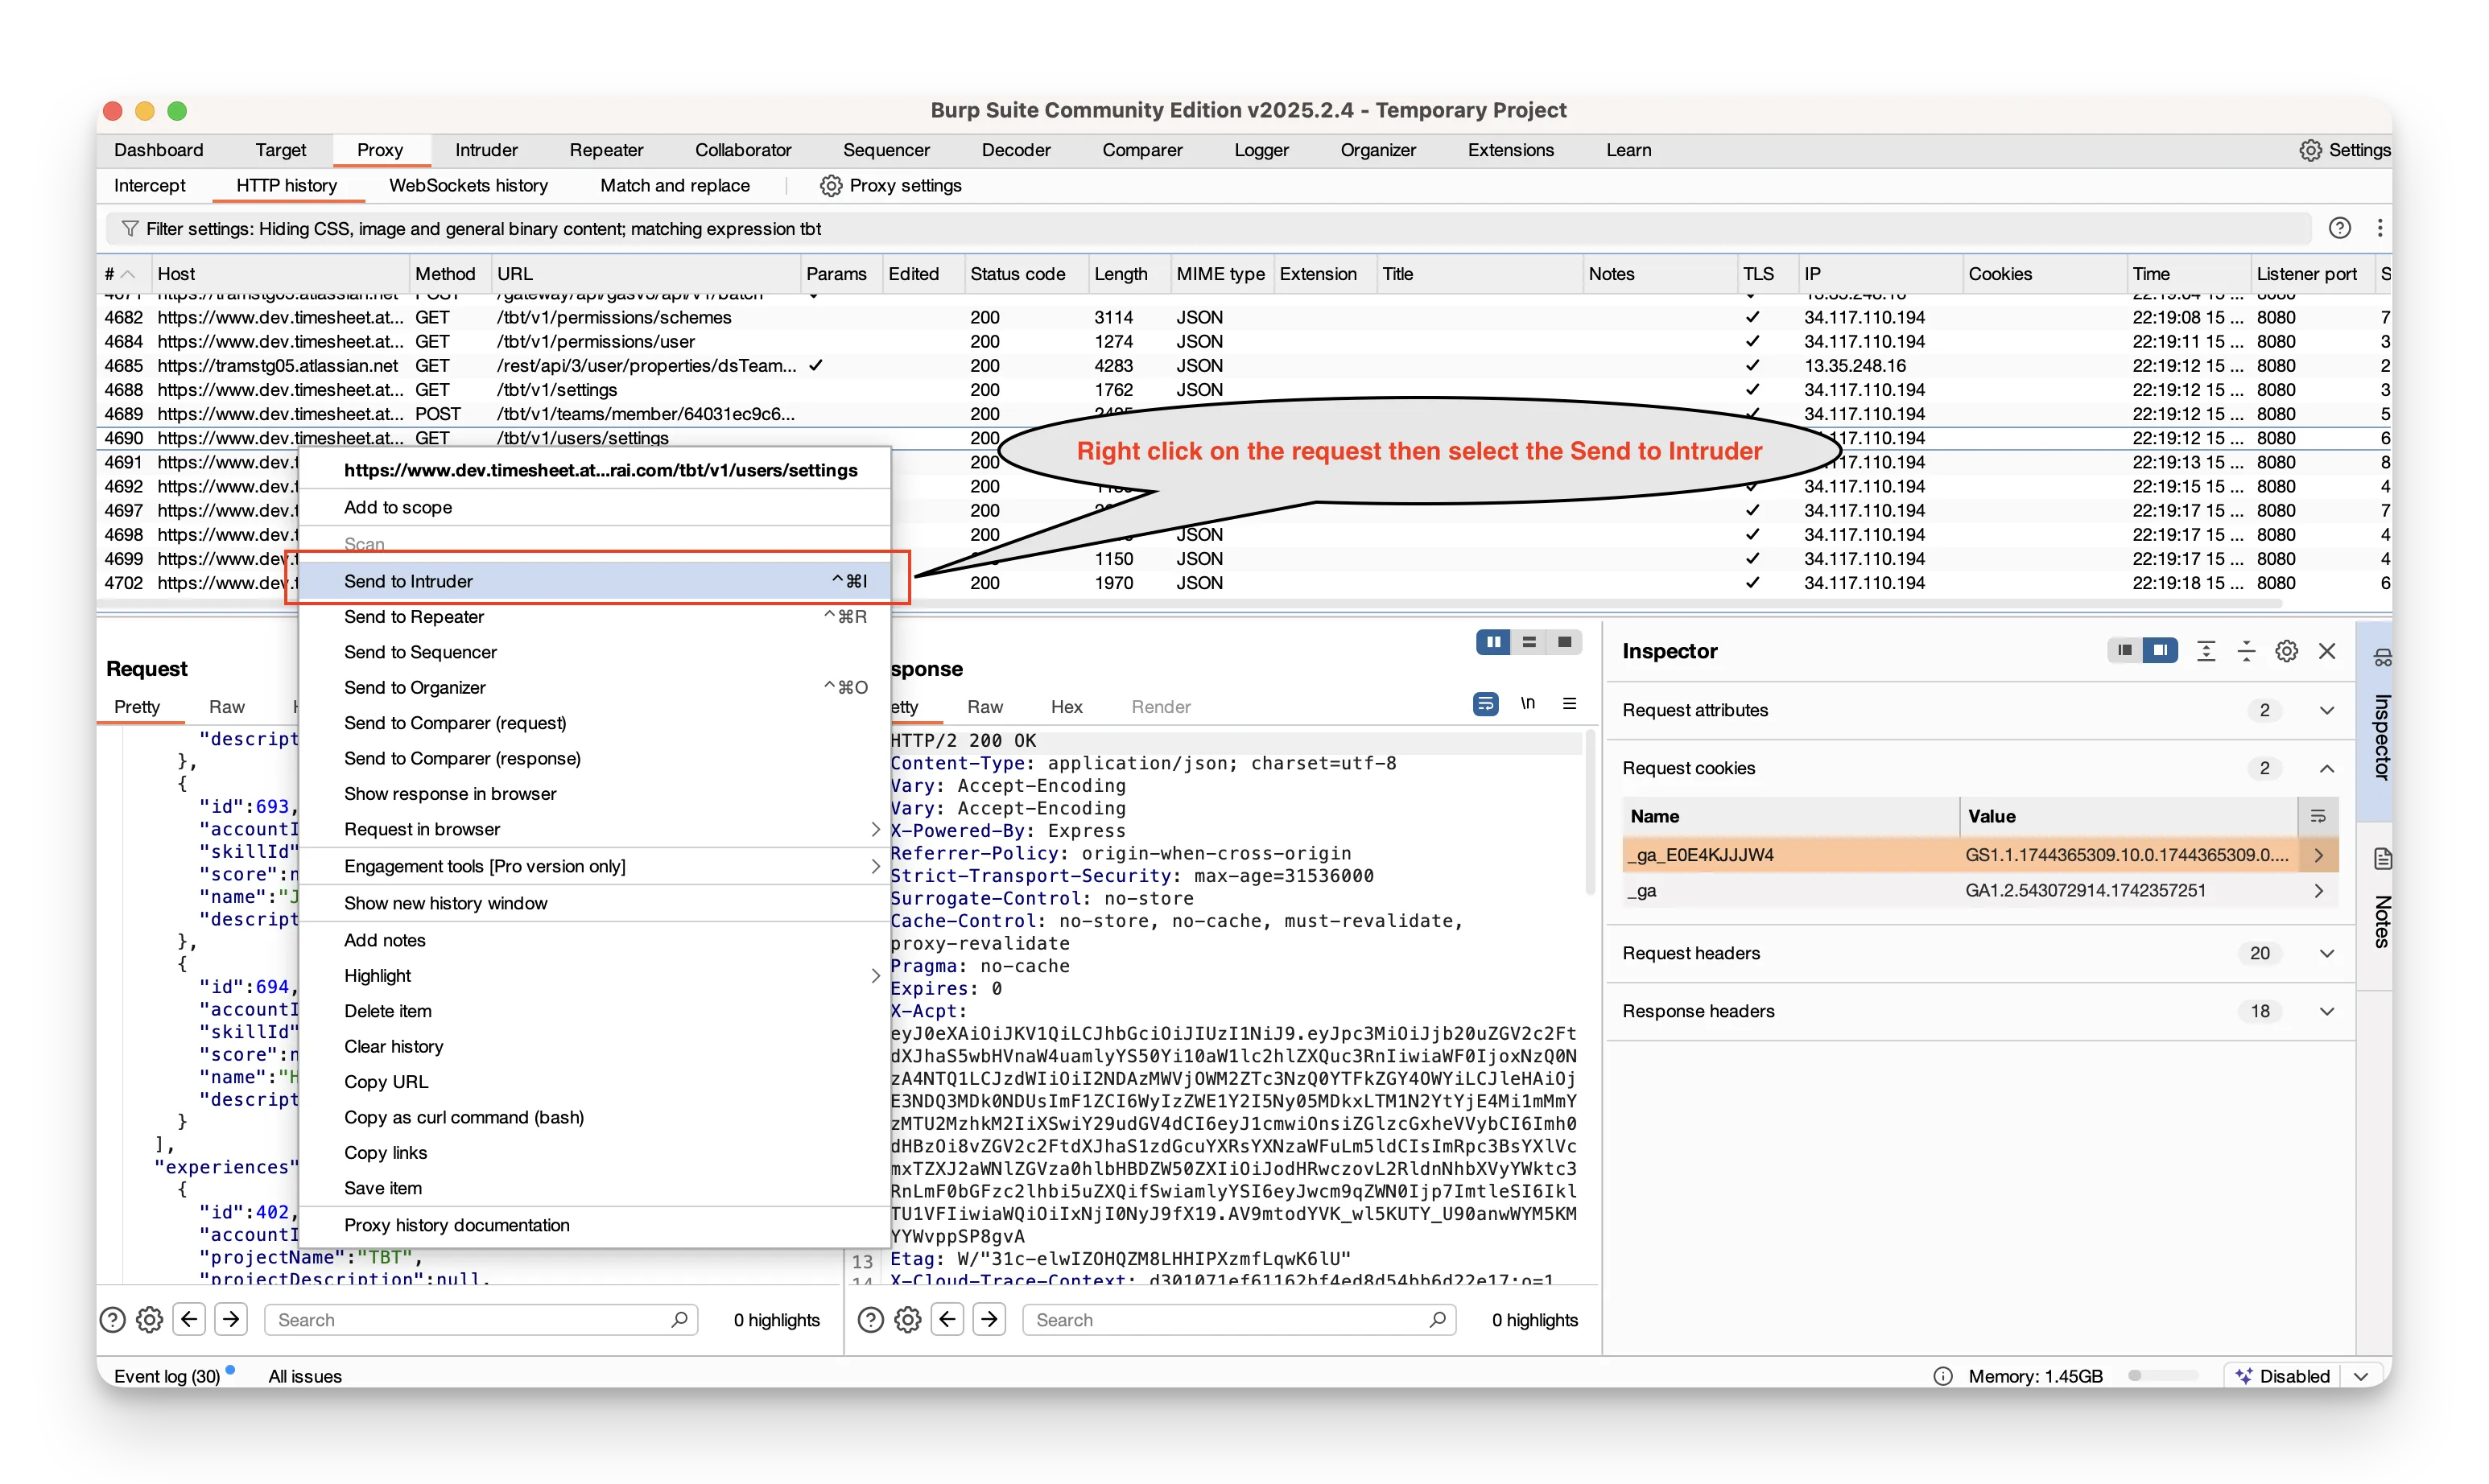
- Switch to the Intruder tab. In Positions, highlight the parts you want to vary—usually the username and password fields—and click Add around them.
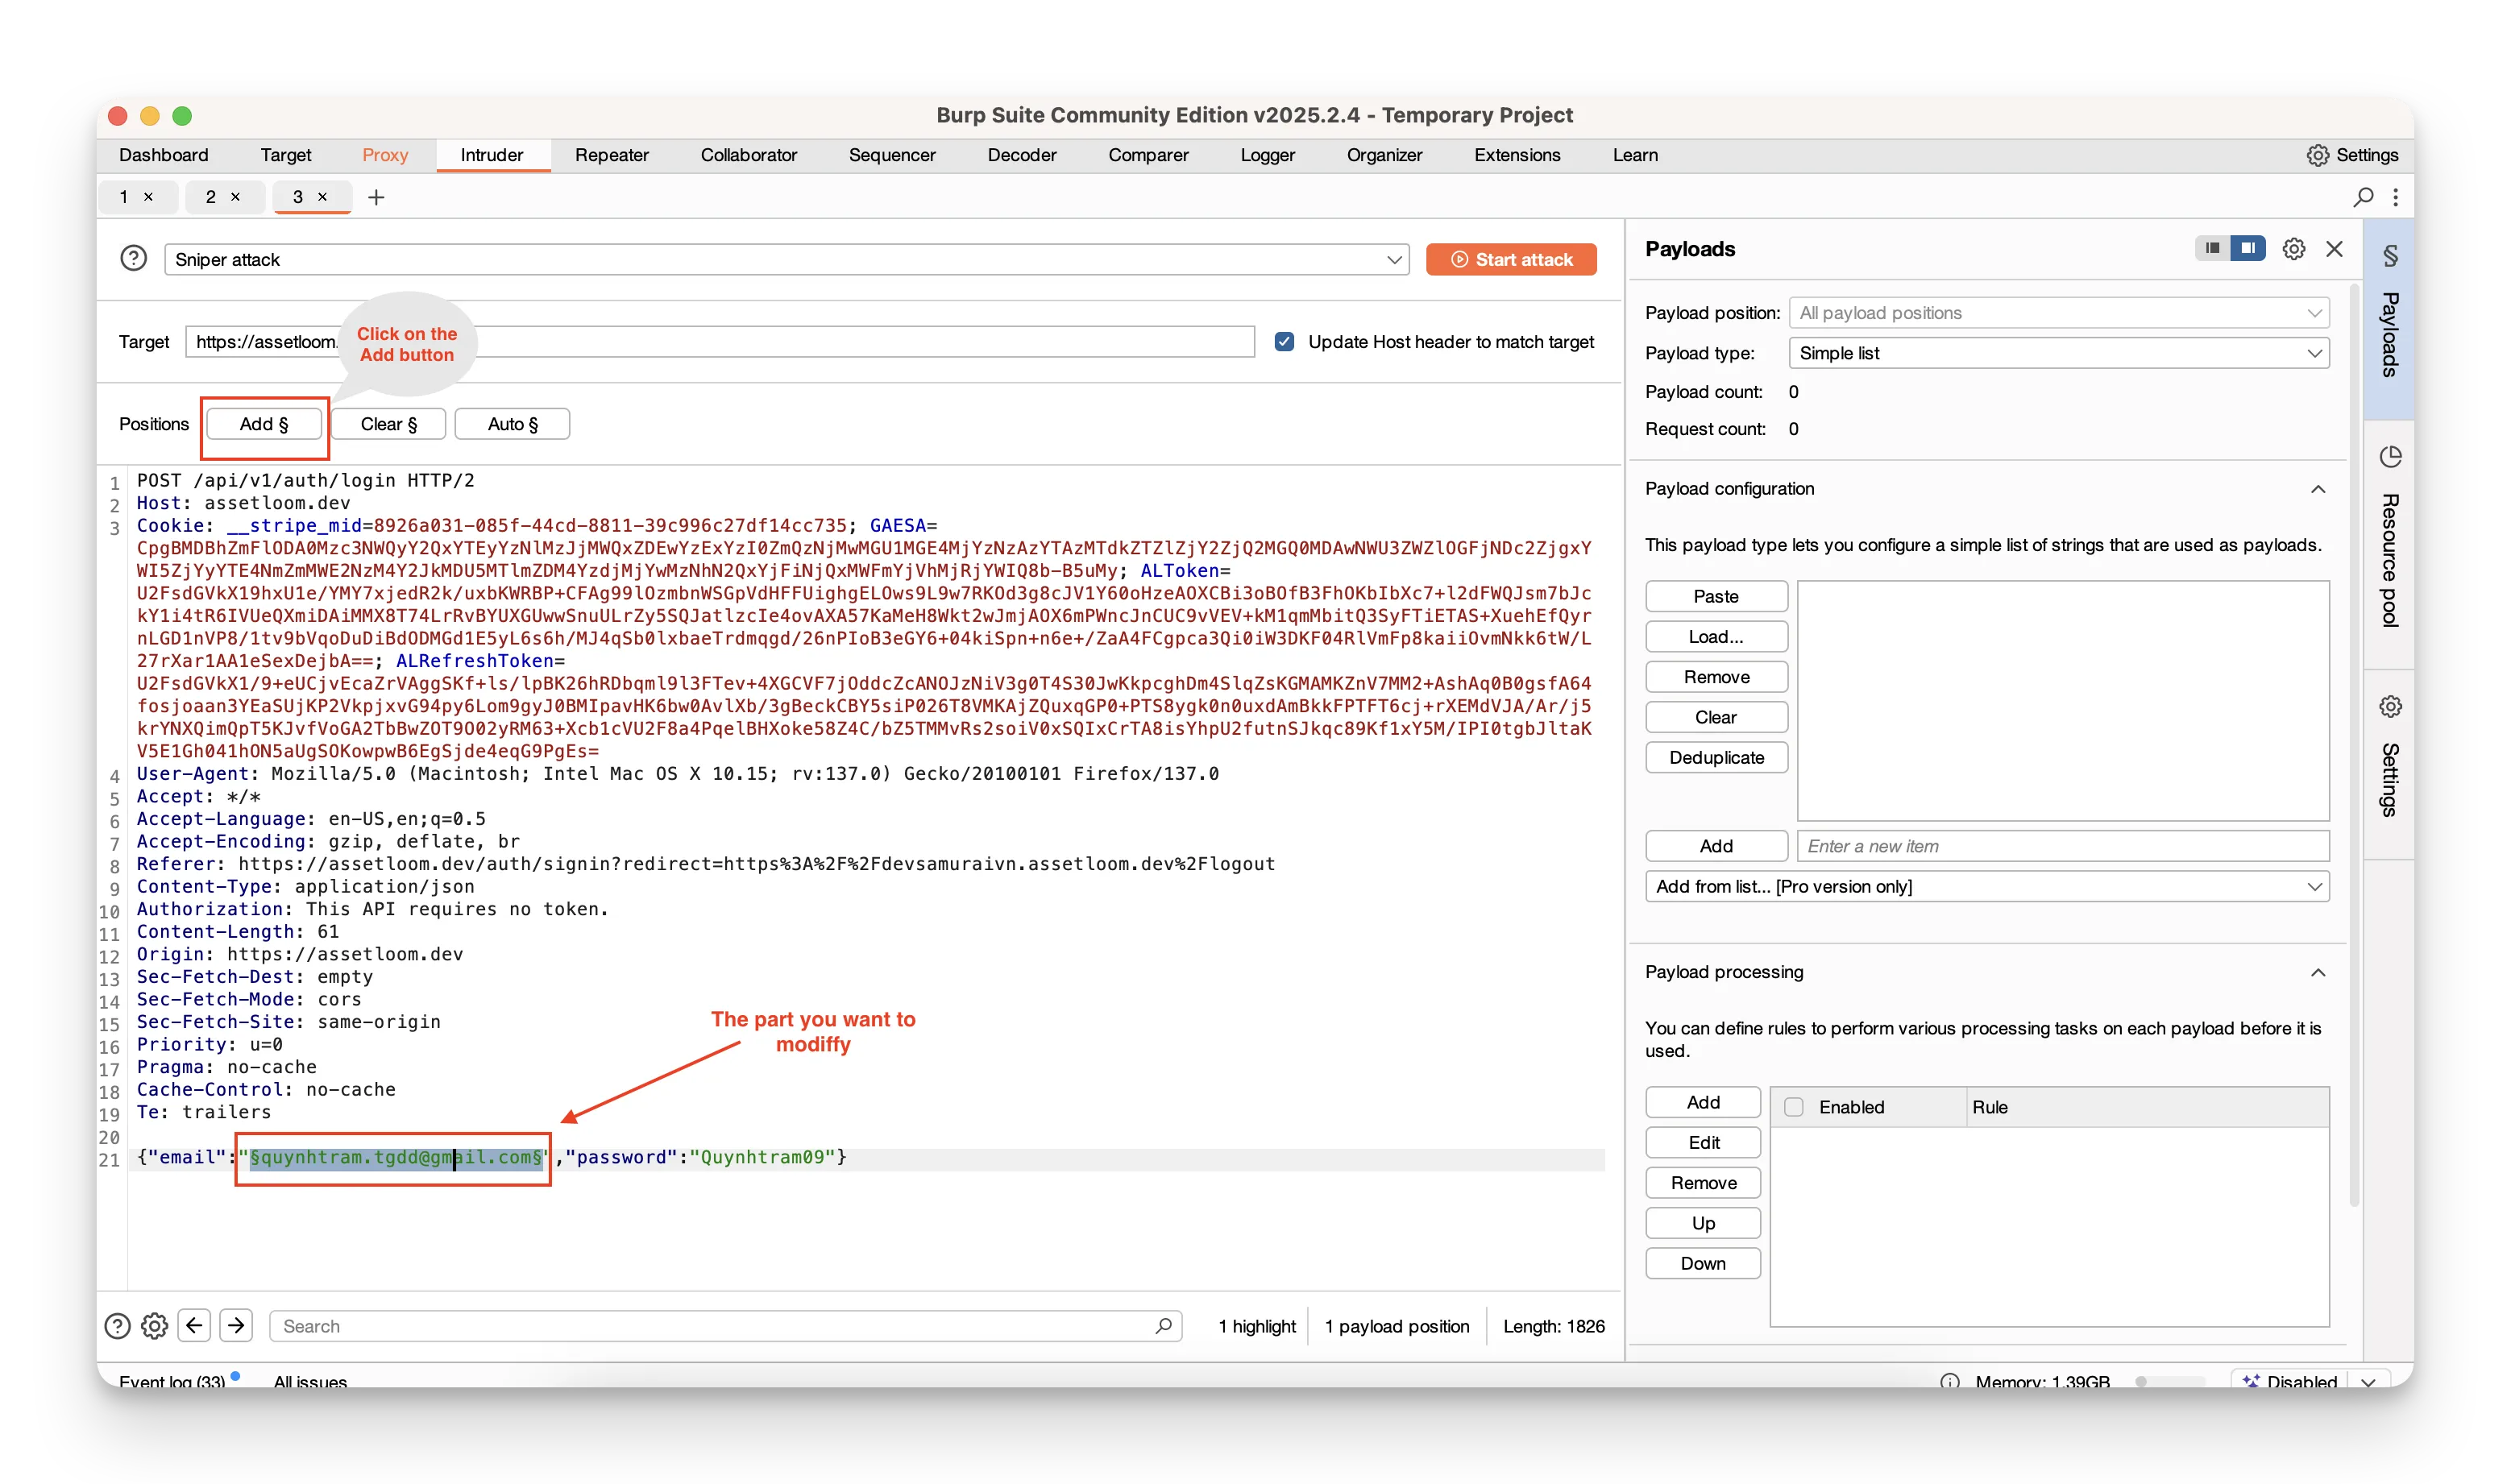
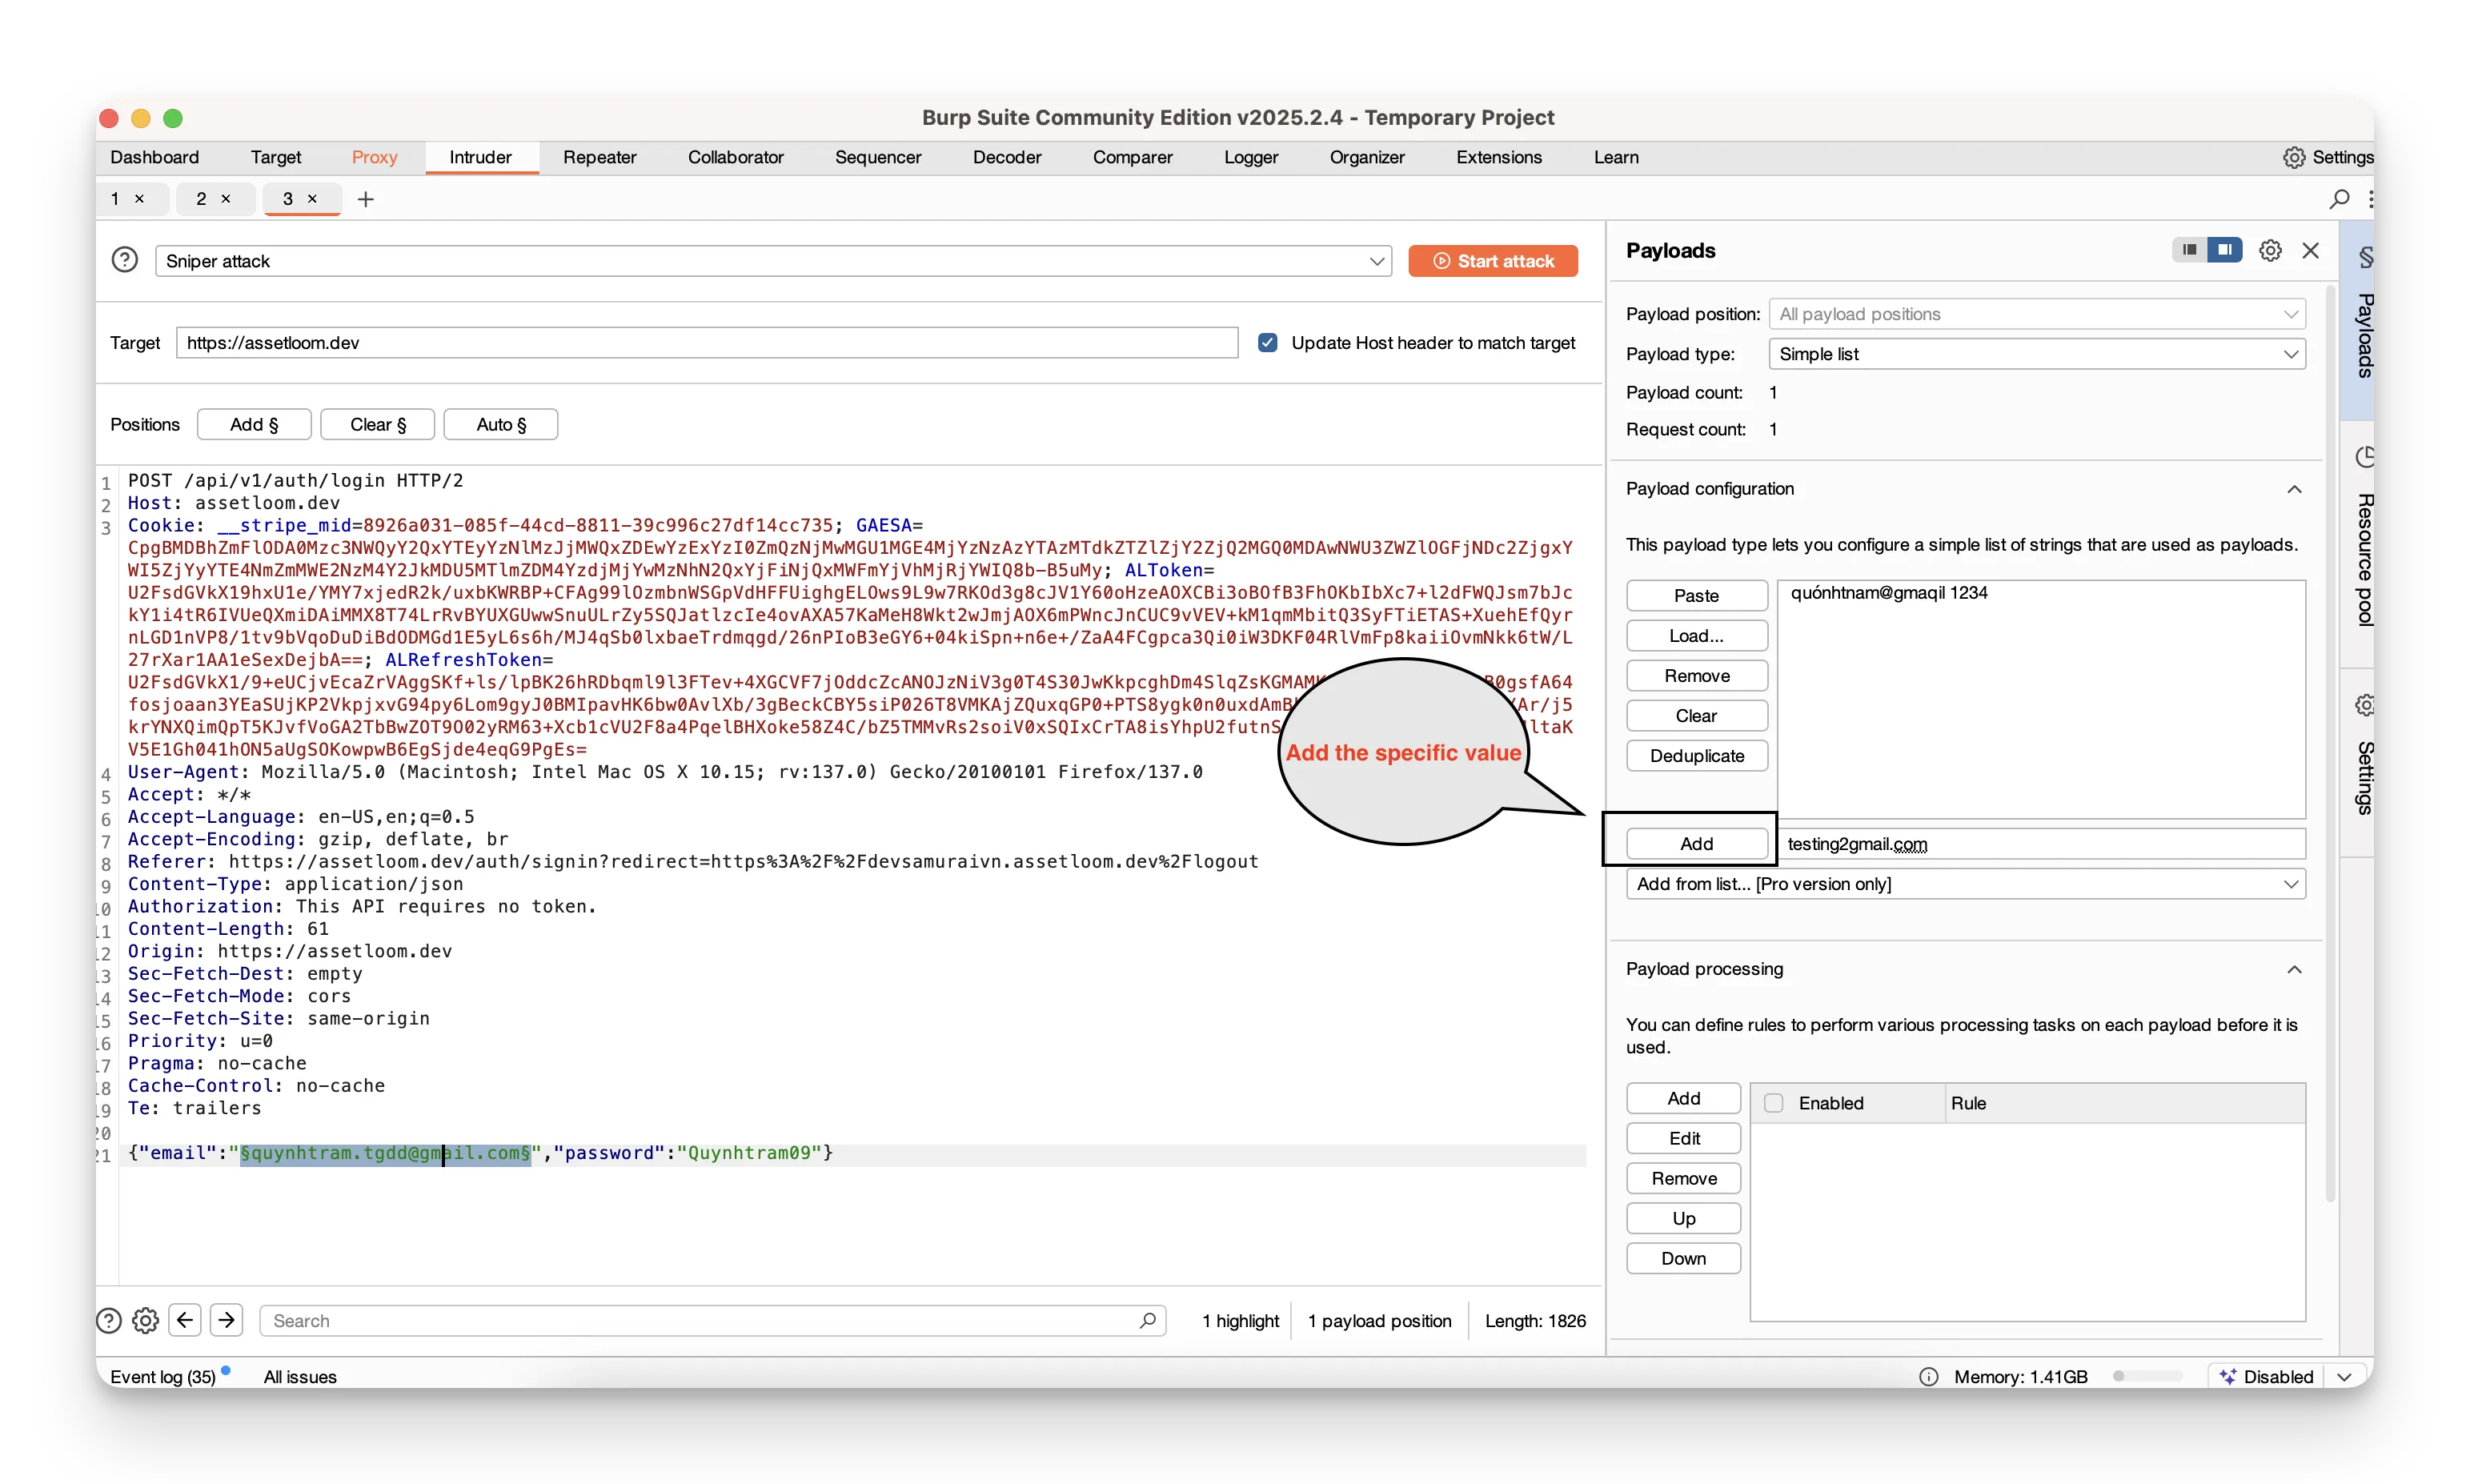
- Go to Payloads.
Select an attack type (Sniper, Battering Ram, Pitchfork, or Cluster Bomb).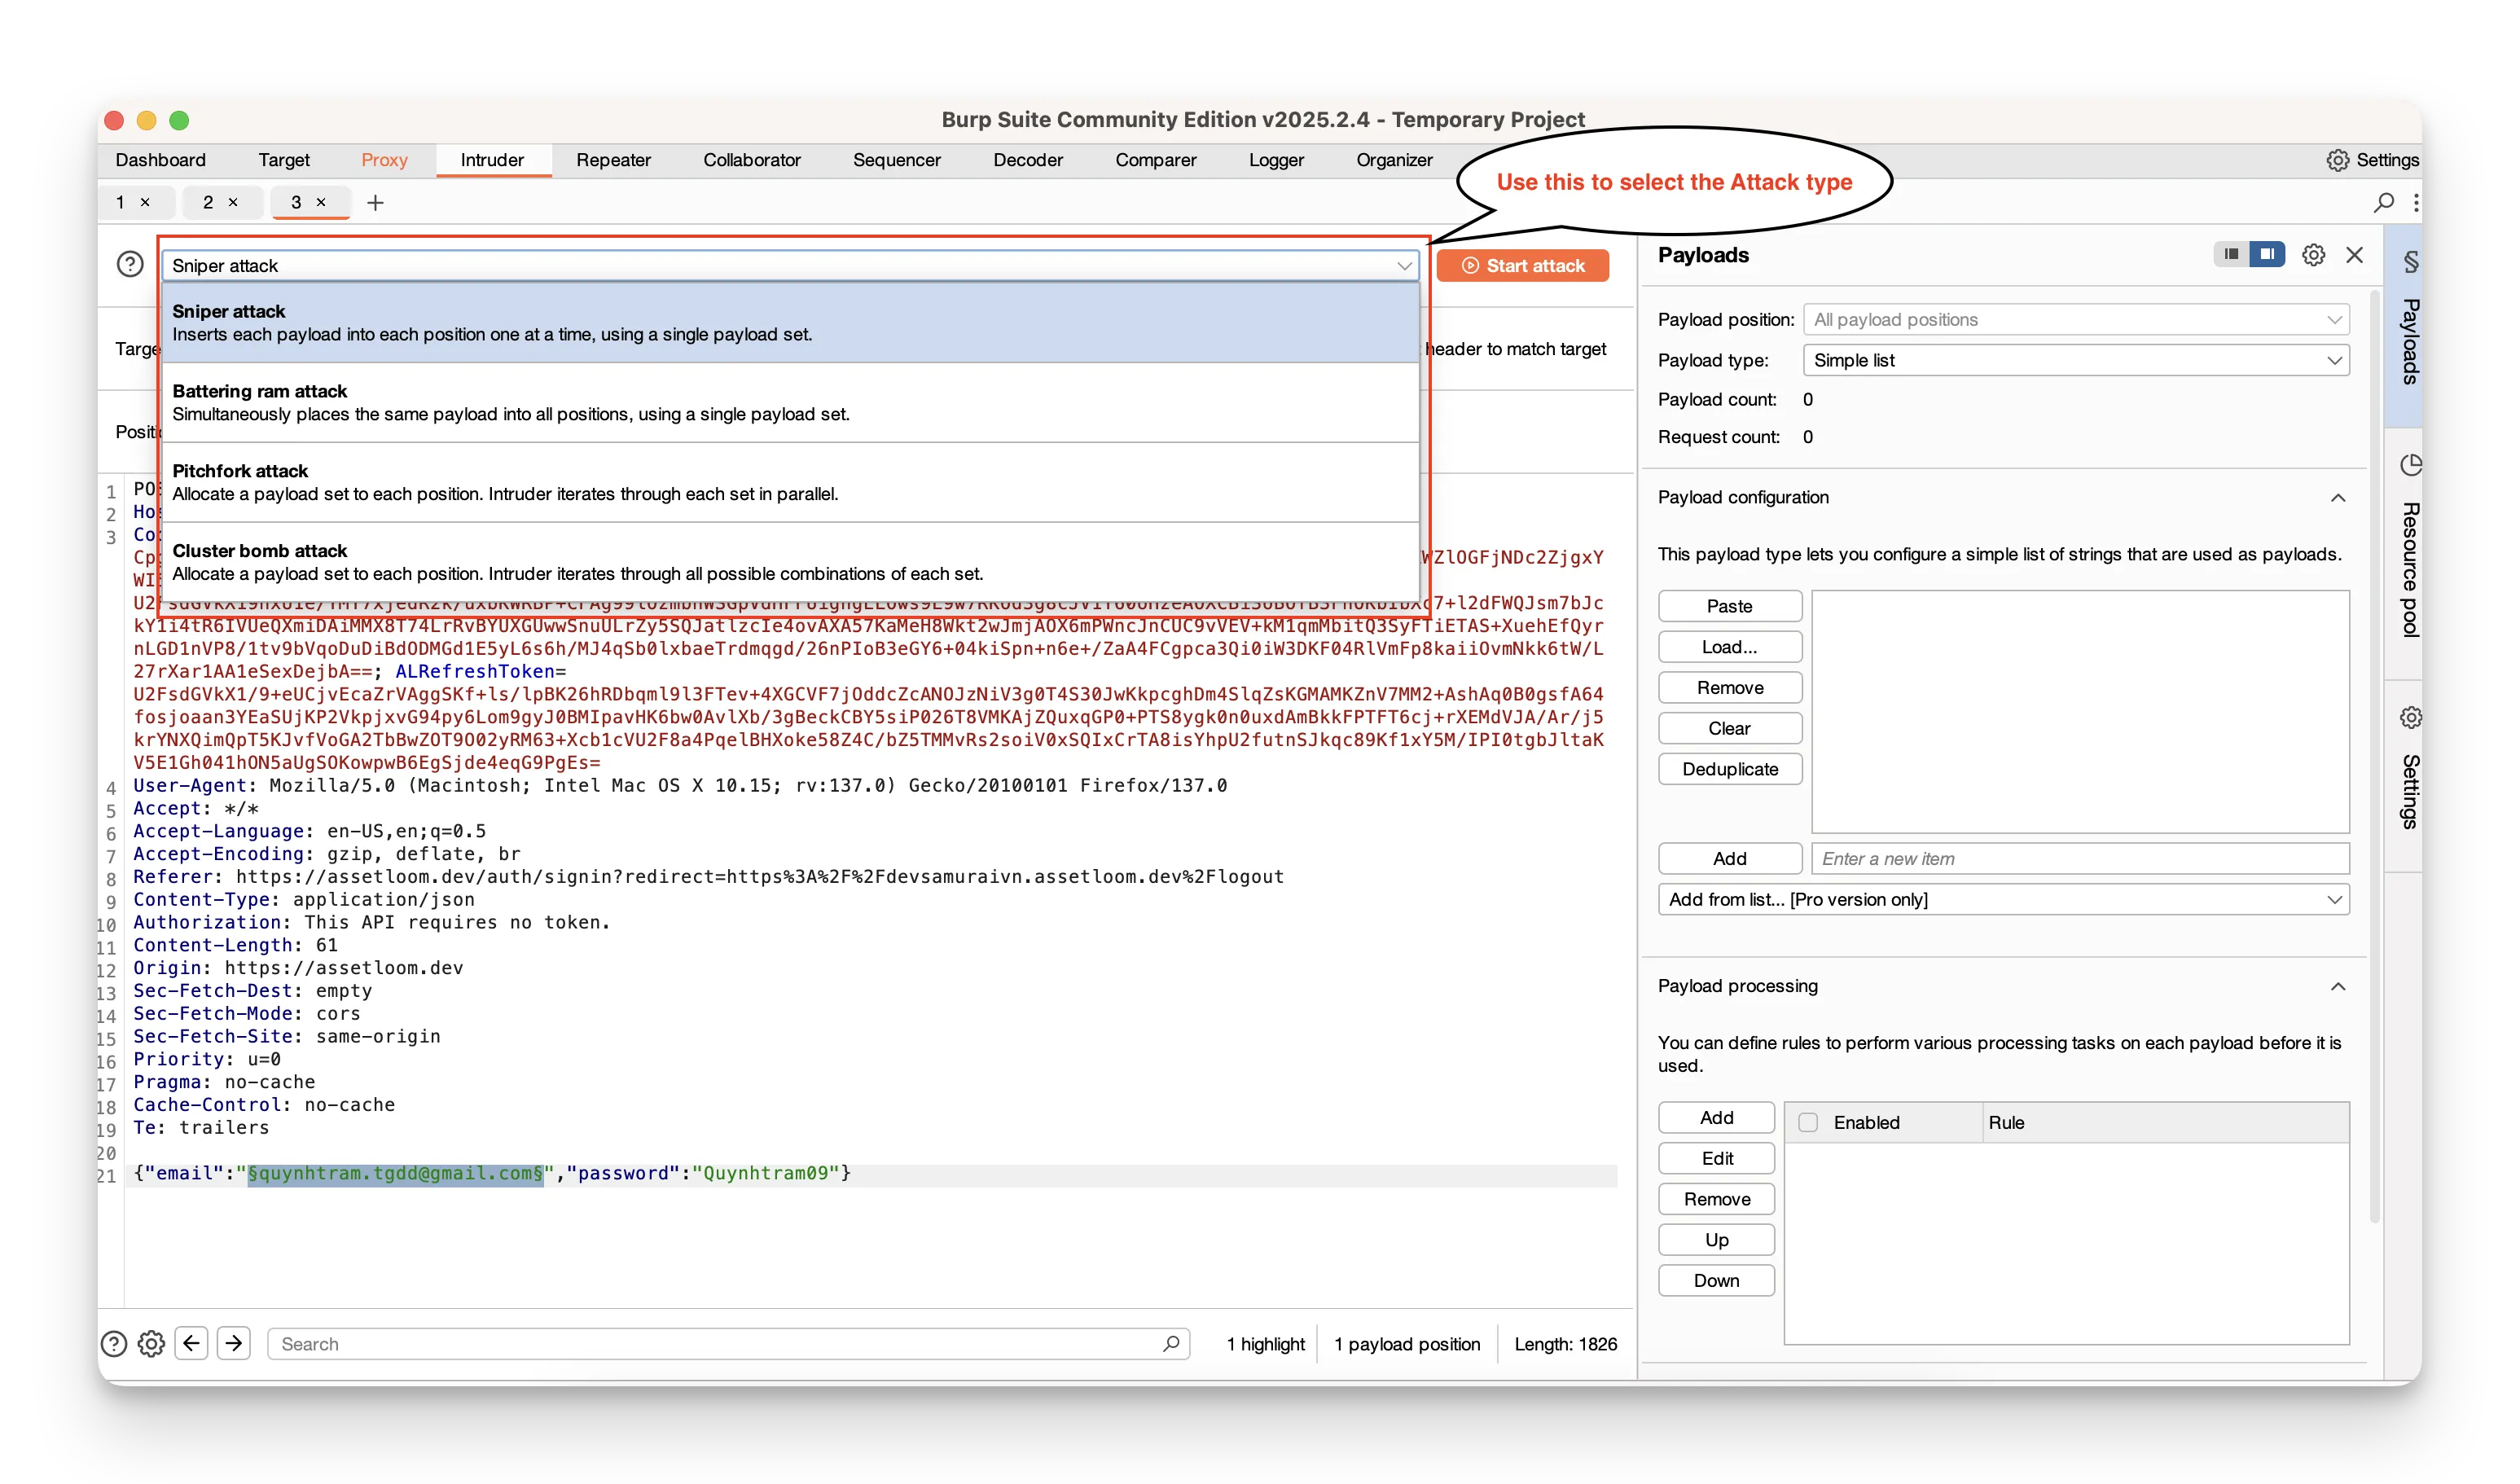 Load your payload lists (usernames, passwords, or any values you want to try).
- Click Start attack. Burp will fire off all your combinations automatically.
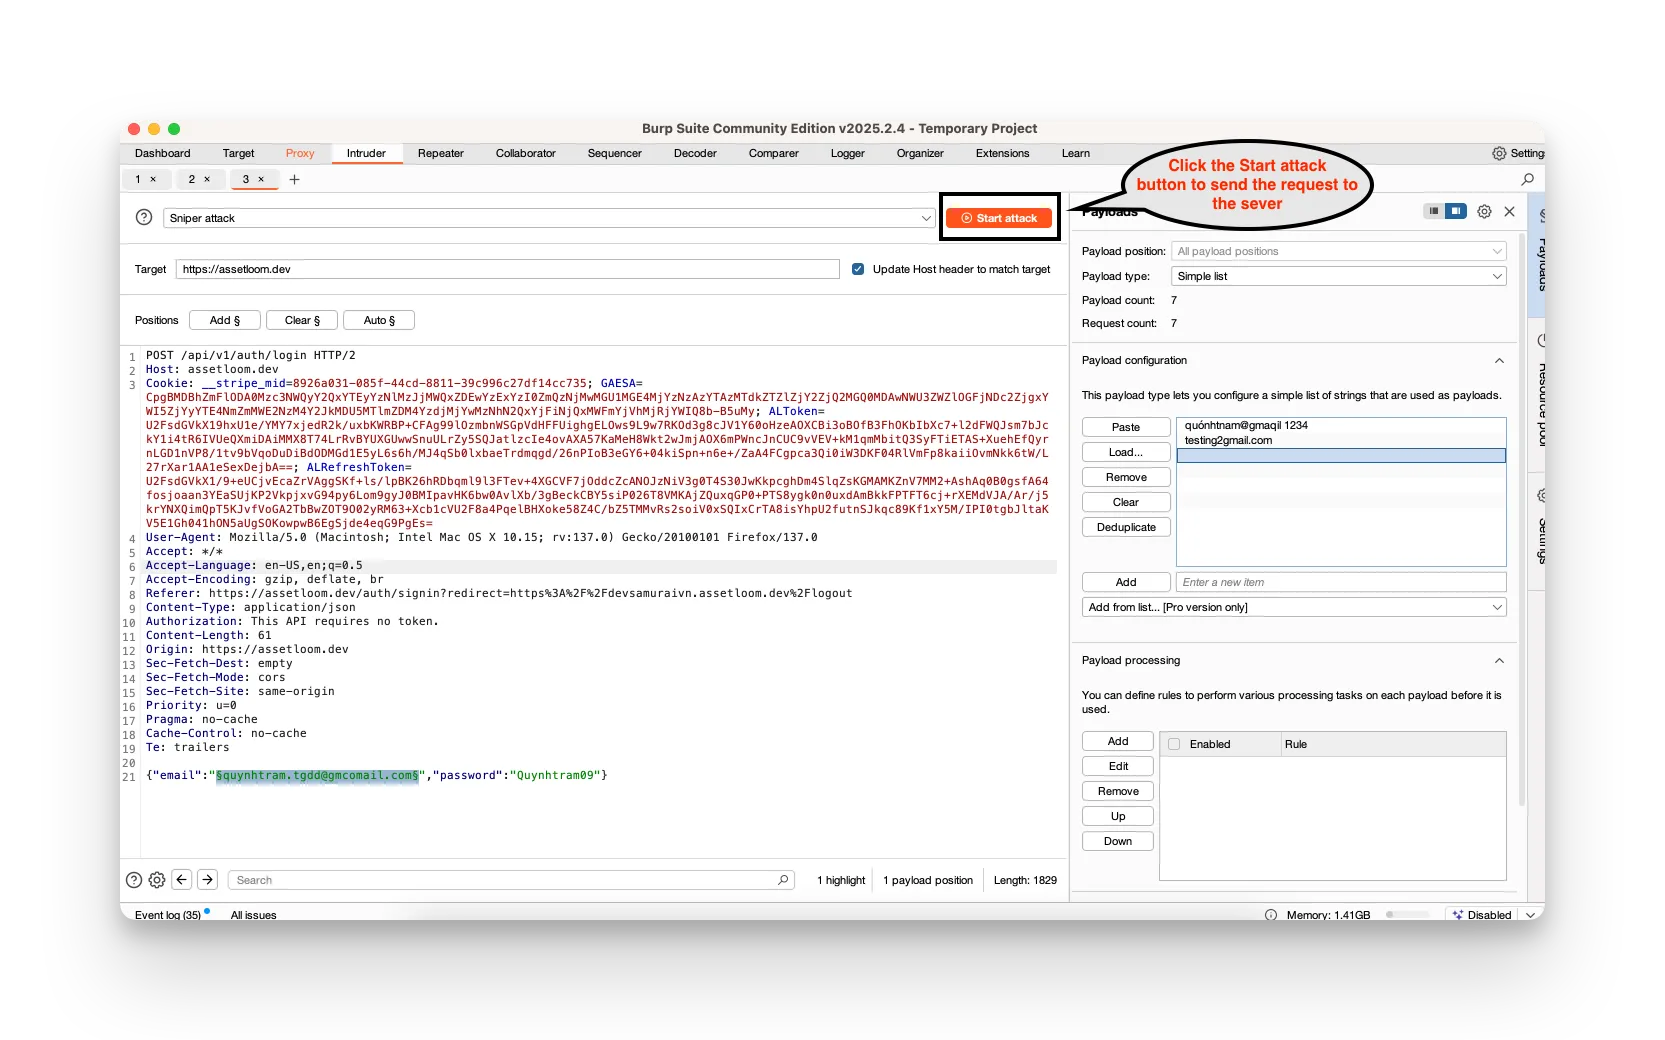
- Watch the results: look for changes in HTTP status codes, response lengths, or error messages to spot successful or interesting responses.
Beyond simple brute‑force:
- Fuzzing: Feed unexpected or malformed strings (long inputs, special characters) to uncover buffer overflows, format‑string bugs, or injection points.
- Parameter tampering: Try different IDs or flags in URLs or form fields to see if you can bypass security checks or access data you shouldn’t.
Decoding and Comparing: Essential Utilities
Burp Suite includes two handy tools—Decoder and Comparer—that help you understand encoded data and spot even subtle differences between messages.
Decoder
When you encounter encoded data (URL‑encoded strings, Base64 blobs, HTML entities, etc.), Decoder makes it easy to translate back and forth.
- Manually decode data.
- Automatically detect and decode common formats like URL‑encoding.
- Transform raw data into various encoded or hashed formats for crafting payloads.
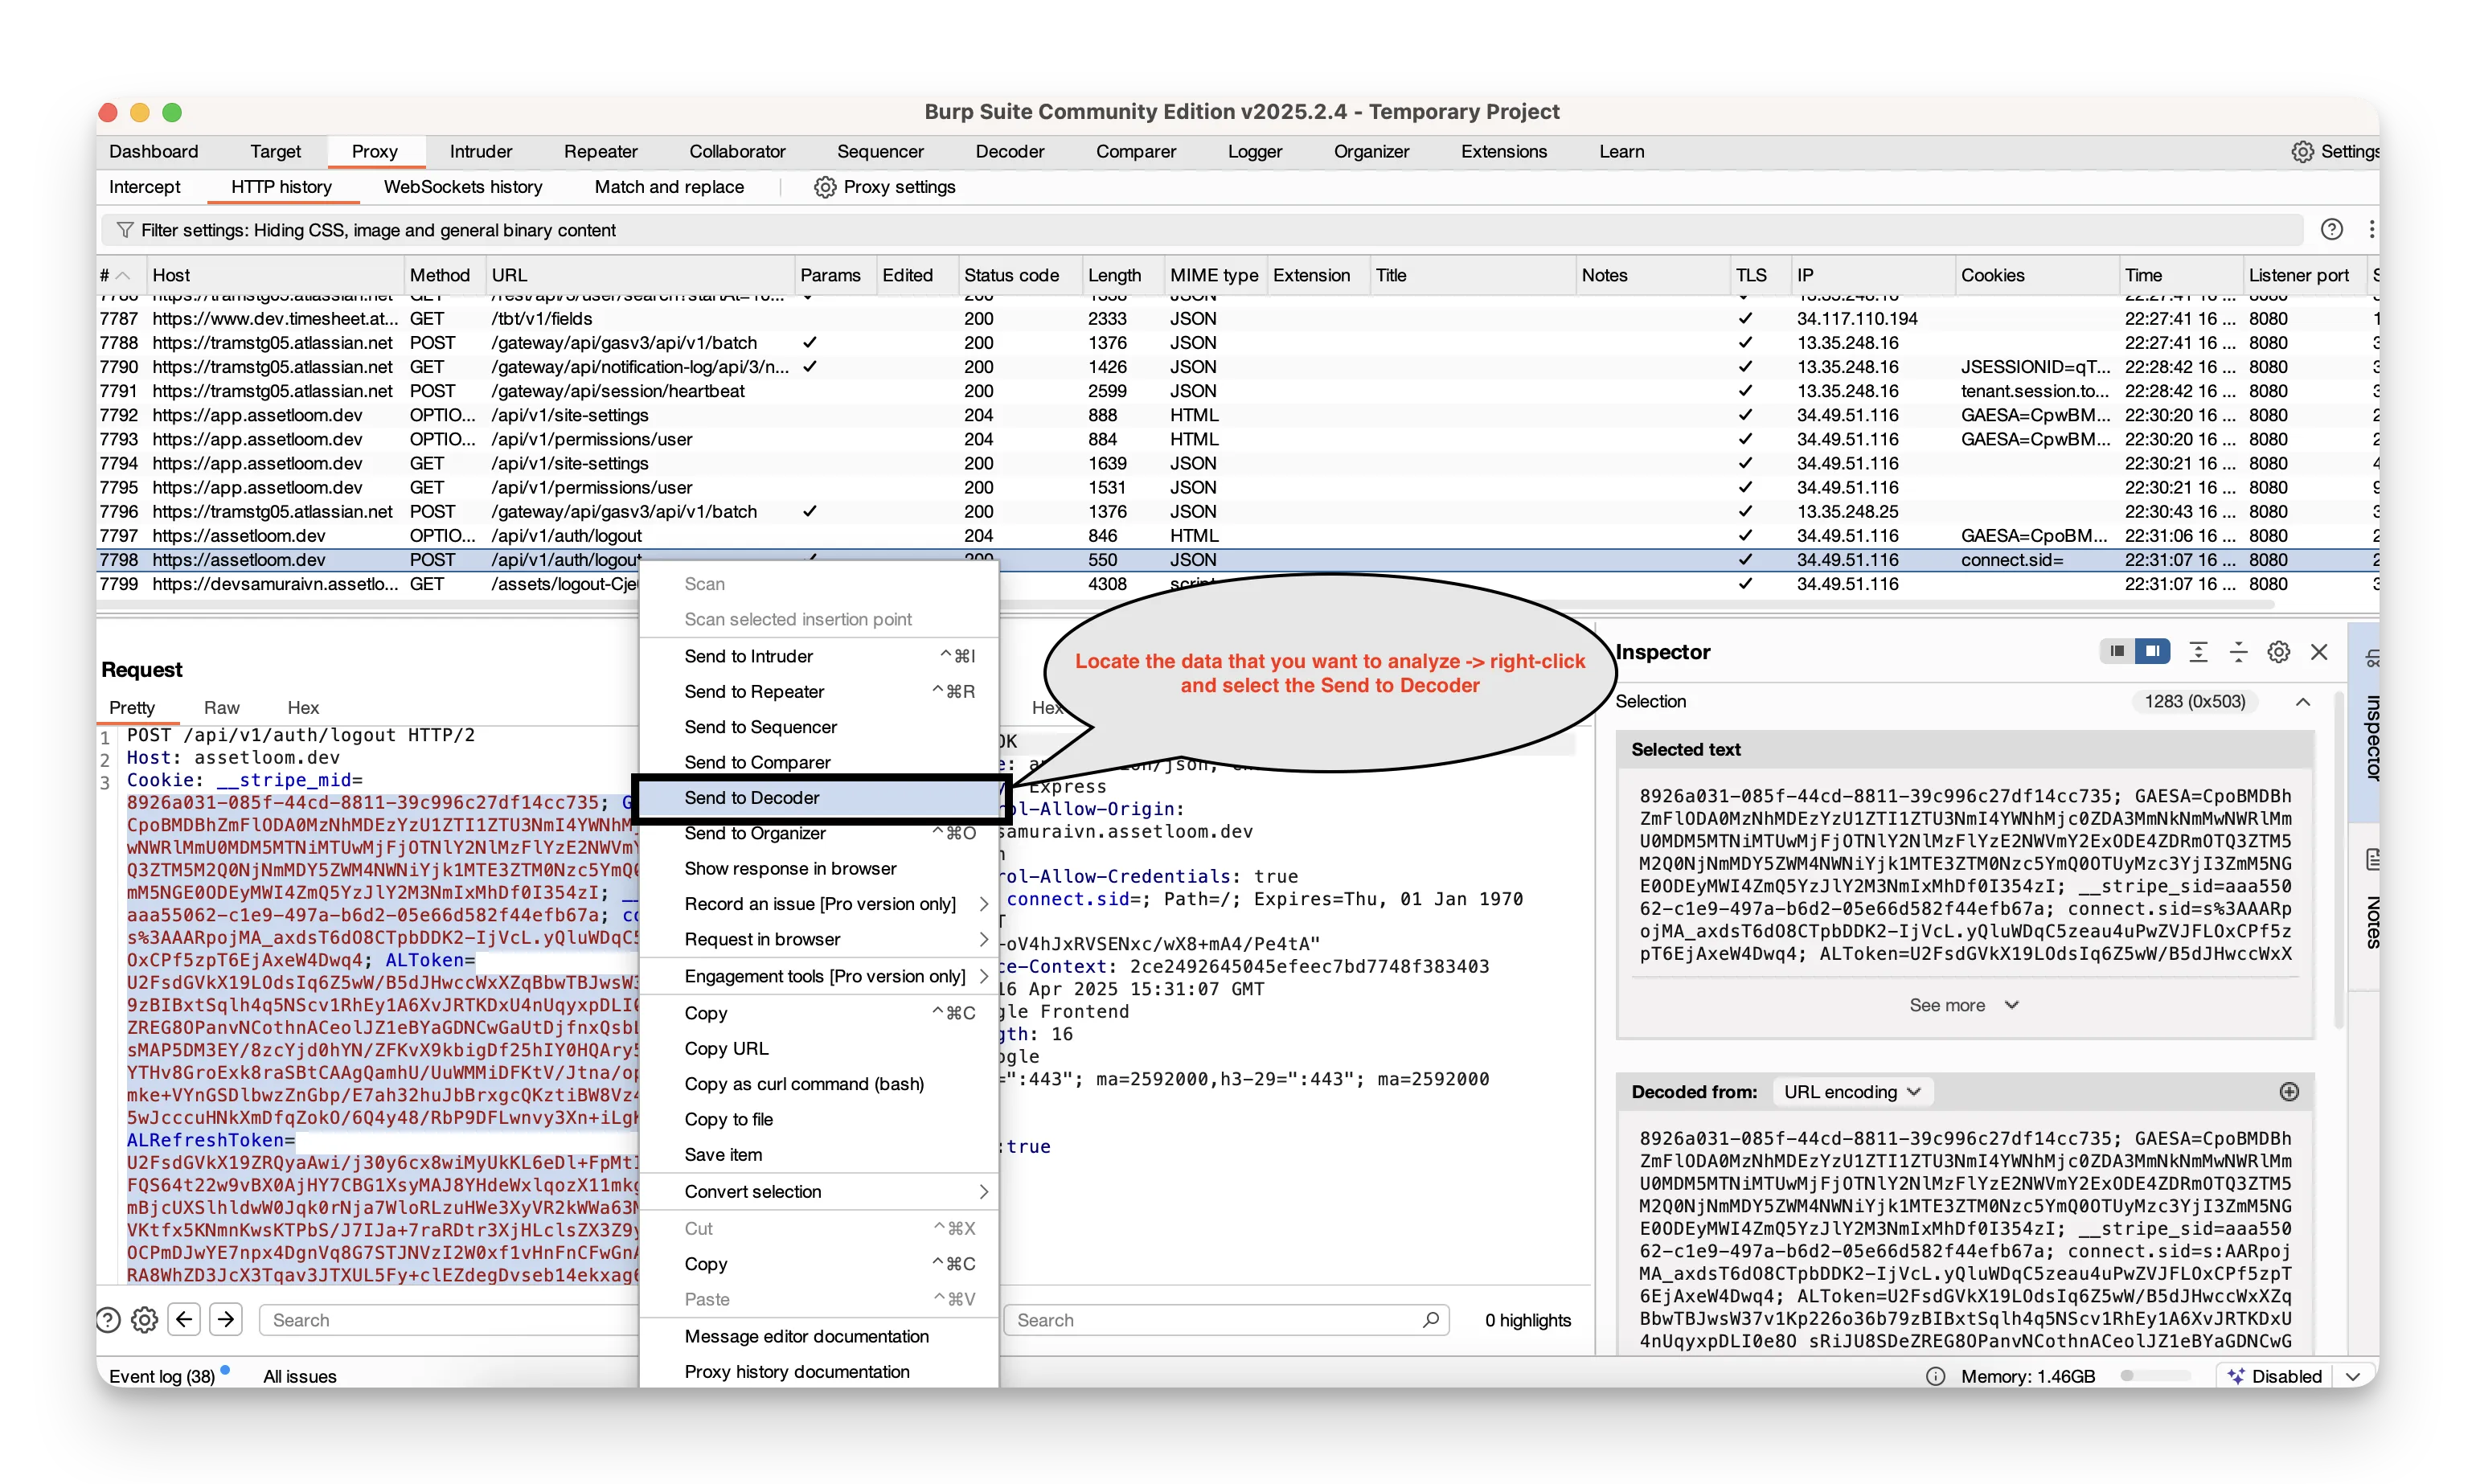
To carry out a data transformation using Burp Decoder:
- Locate the data you want to analyze.
- Right‑click it in the message editor and select Send to Decoder.
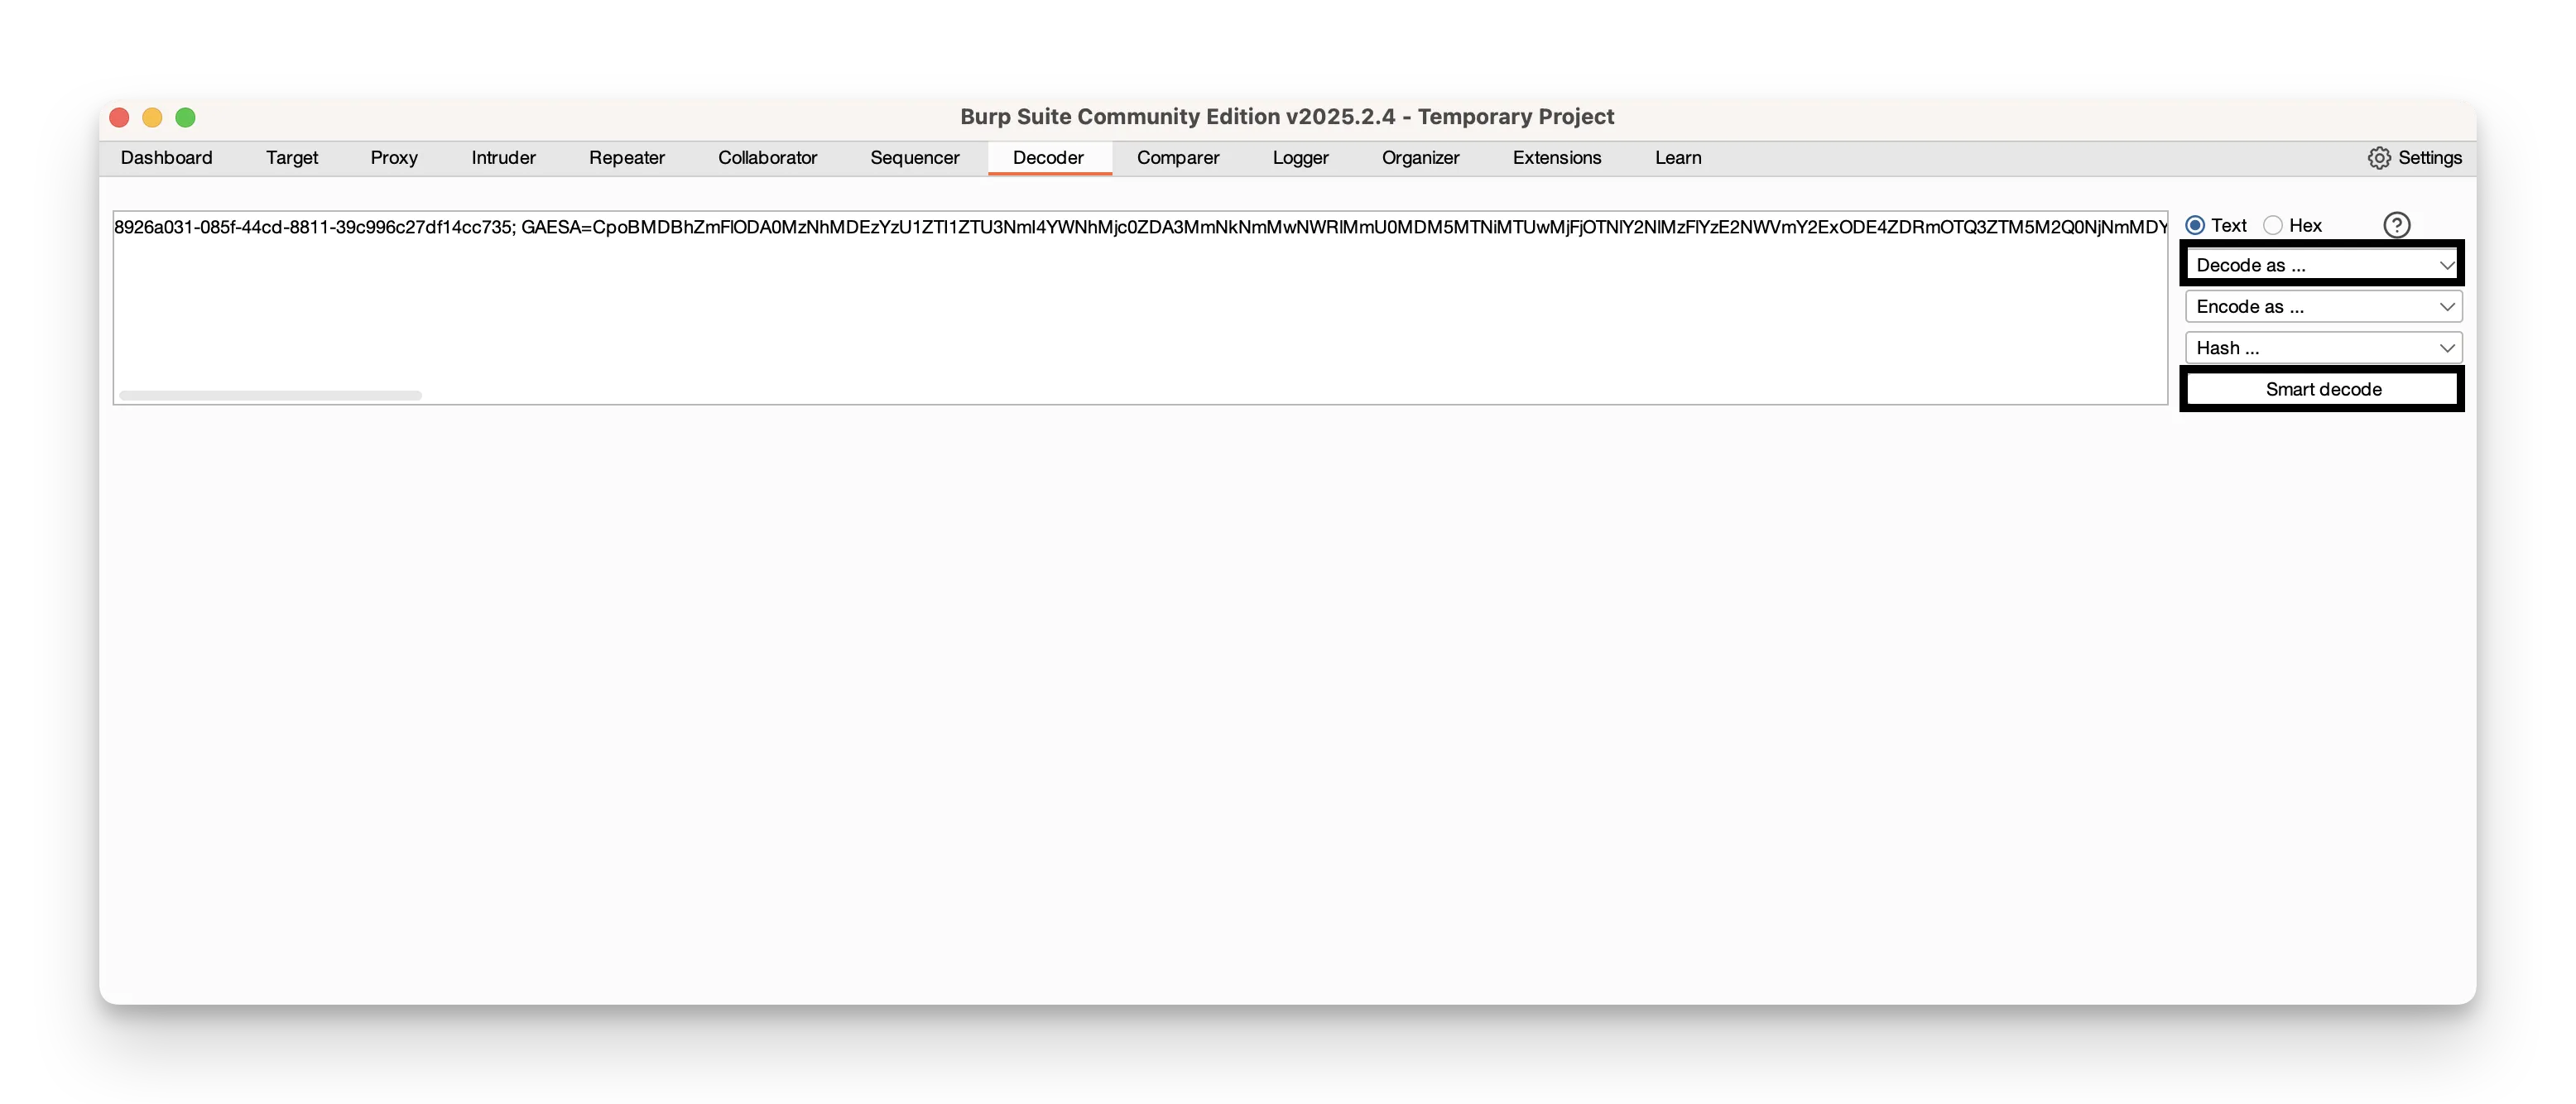
- Switch to the Decoder tab—the data appears in the top panel.
- Pick an operation (for example, Smart decode or Encode as) from the controls beside the panel.
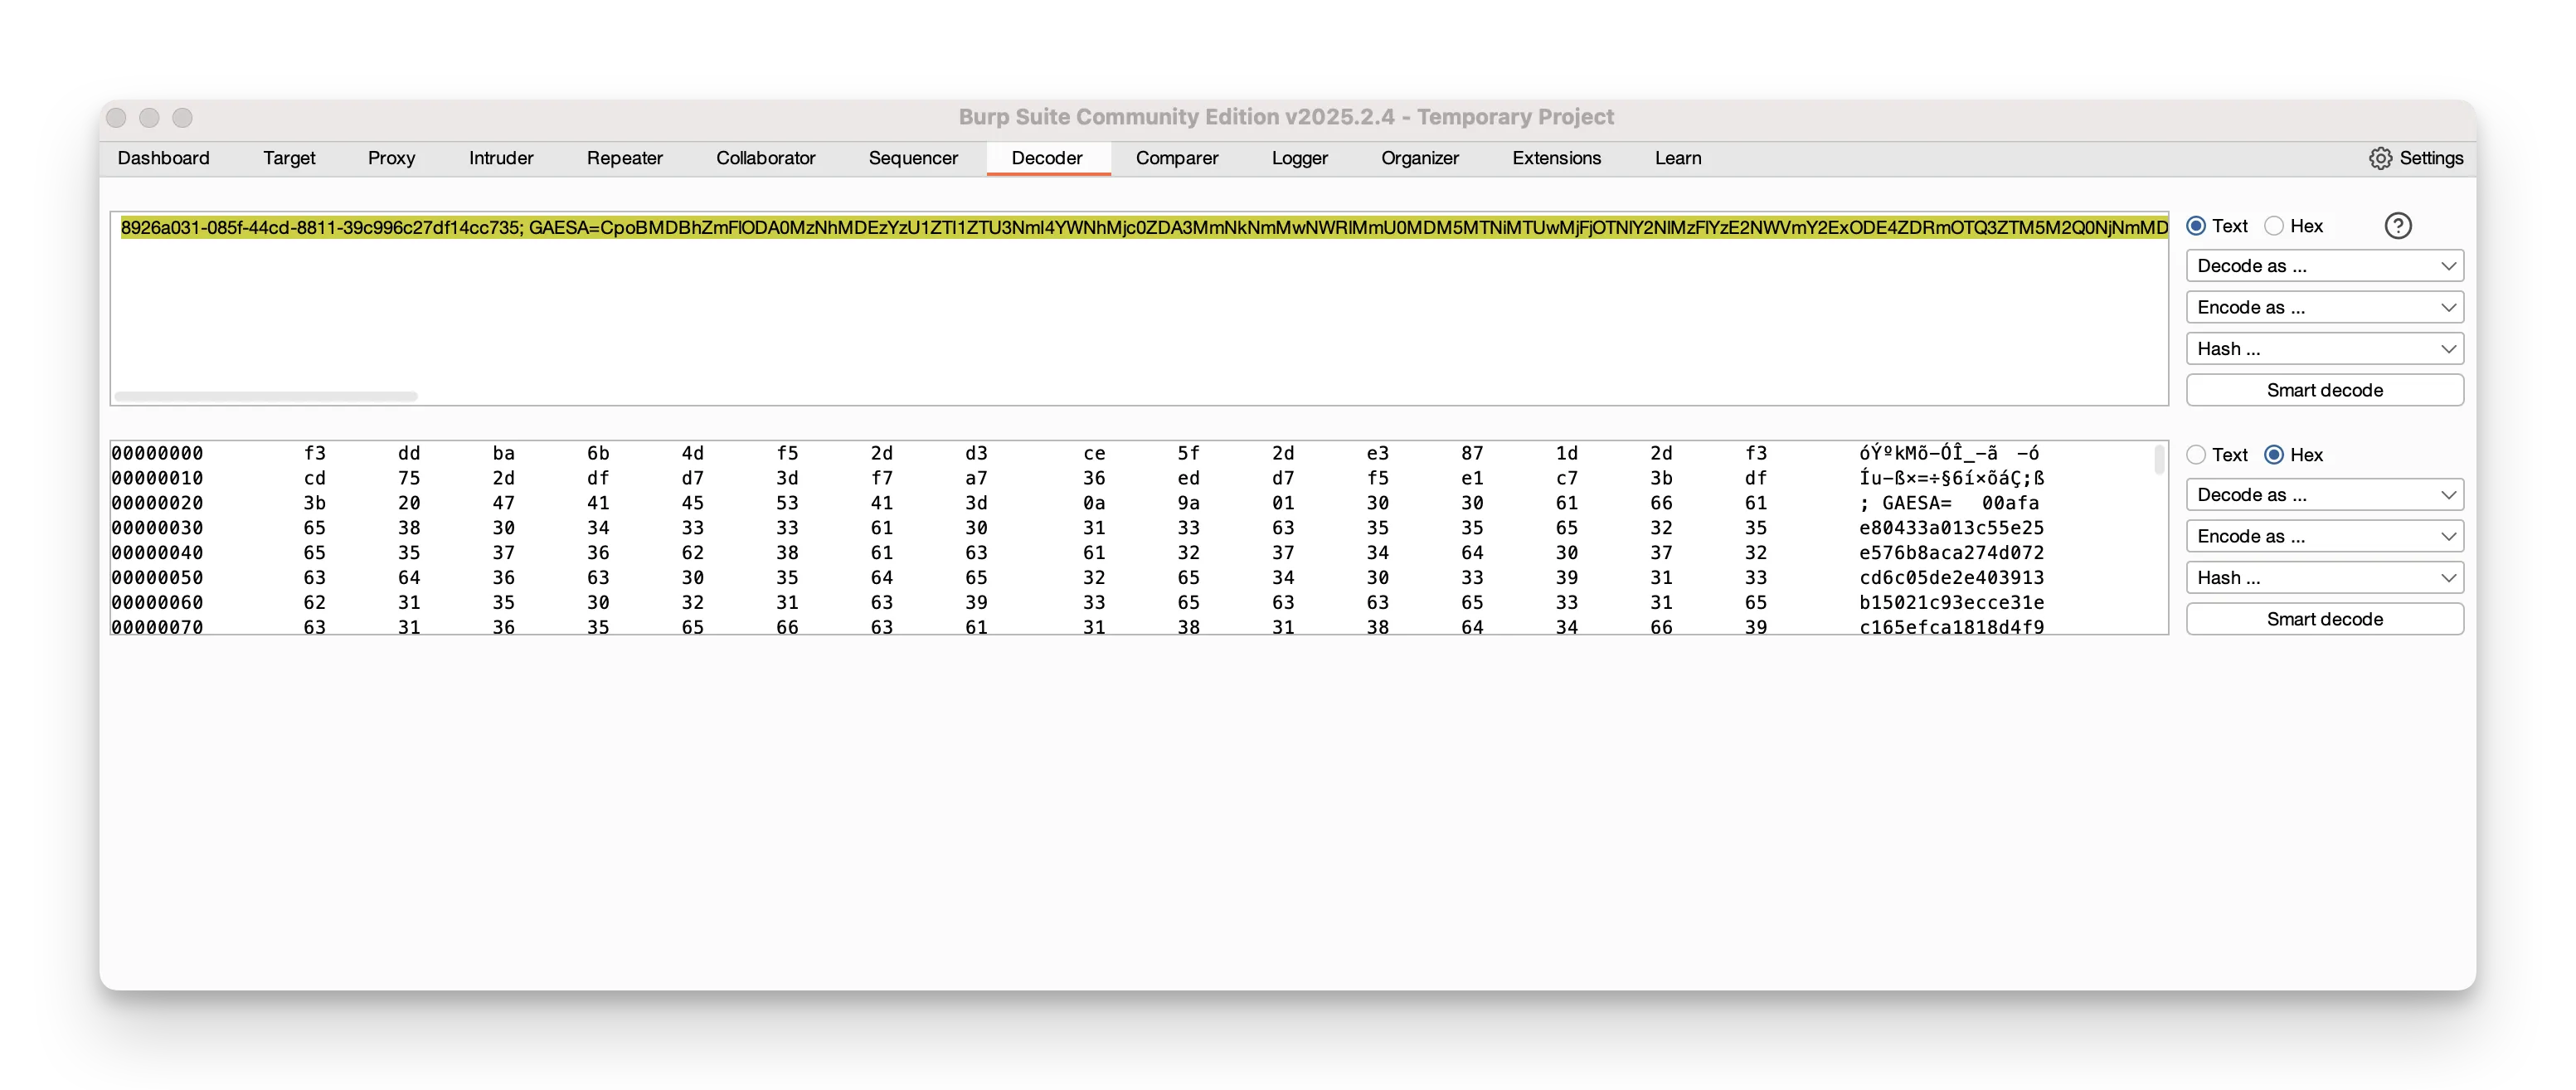
You can toggle between Text and Hex views to see the exact bytes or the human‑readable form. This is vital for uncovering hidden payloads or understanding how data is transformed in transit.
Comparer
Comparer lets you take two similar HTTP messages and see exactly how they differ—word‑ or byte‑by‑byte.
To carry out a comparison using Burp Comparer:
- In Burp, locate the first message you want to compare.
- Right‑click it and choose Send to Comparer.
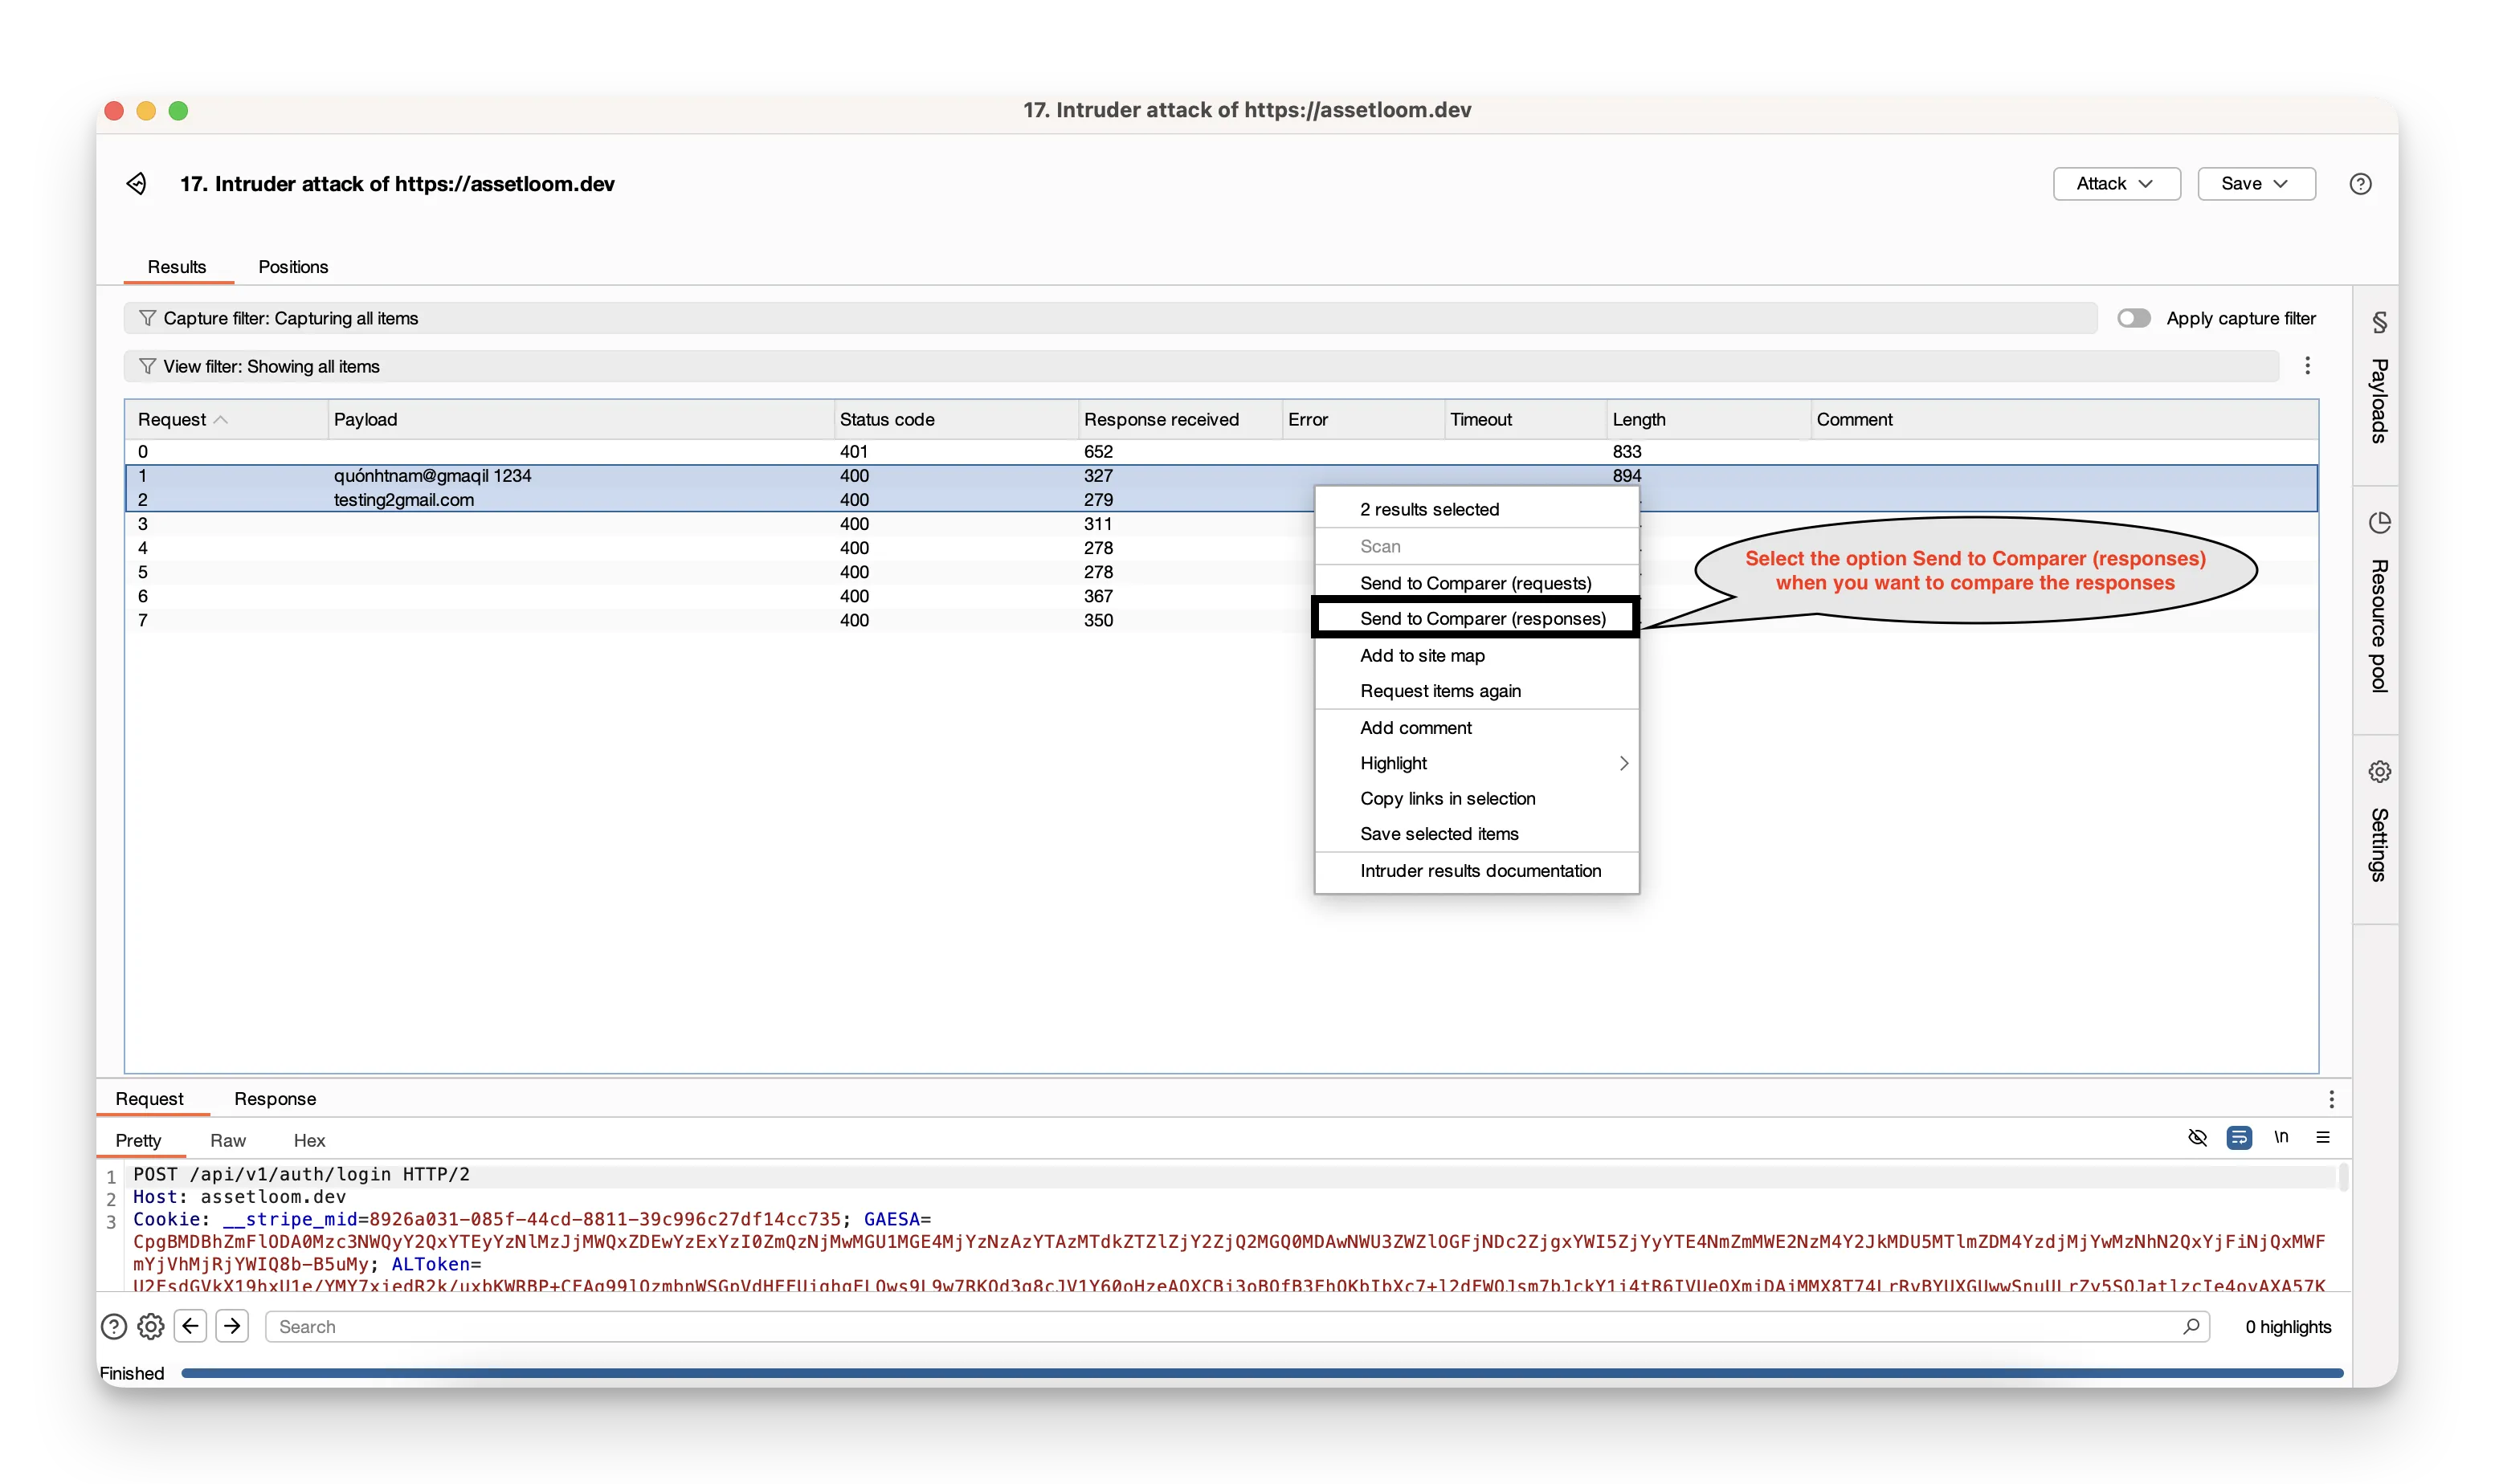
- Repeat for the second message.
- Go to the Comparer tab, where both messages are listed side by side.
- Select Words or Bytes comparison—the differences highlight in a new window.
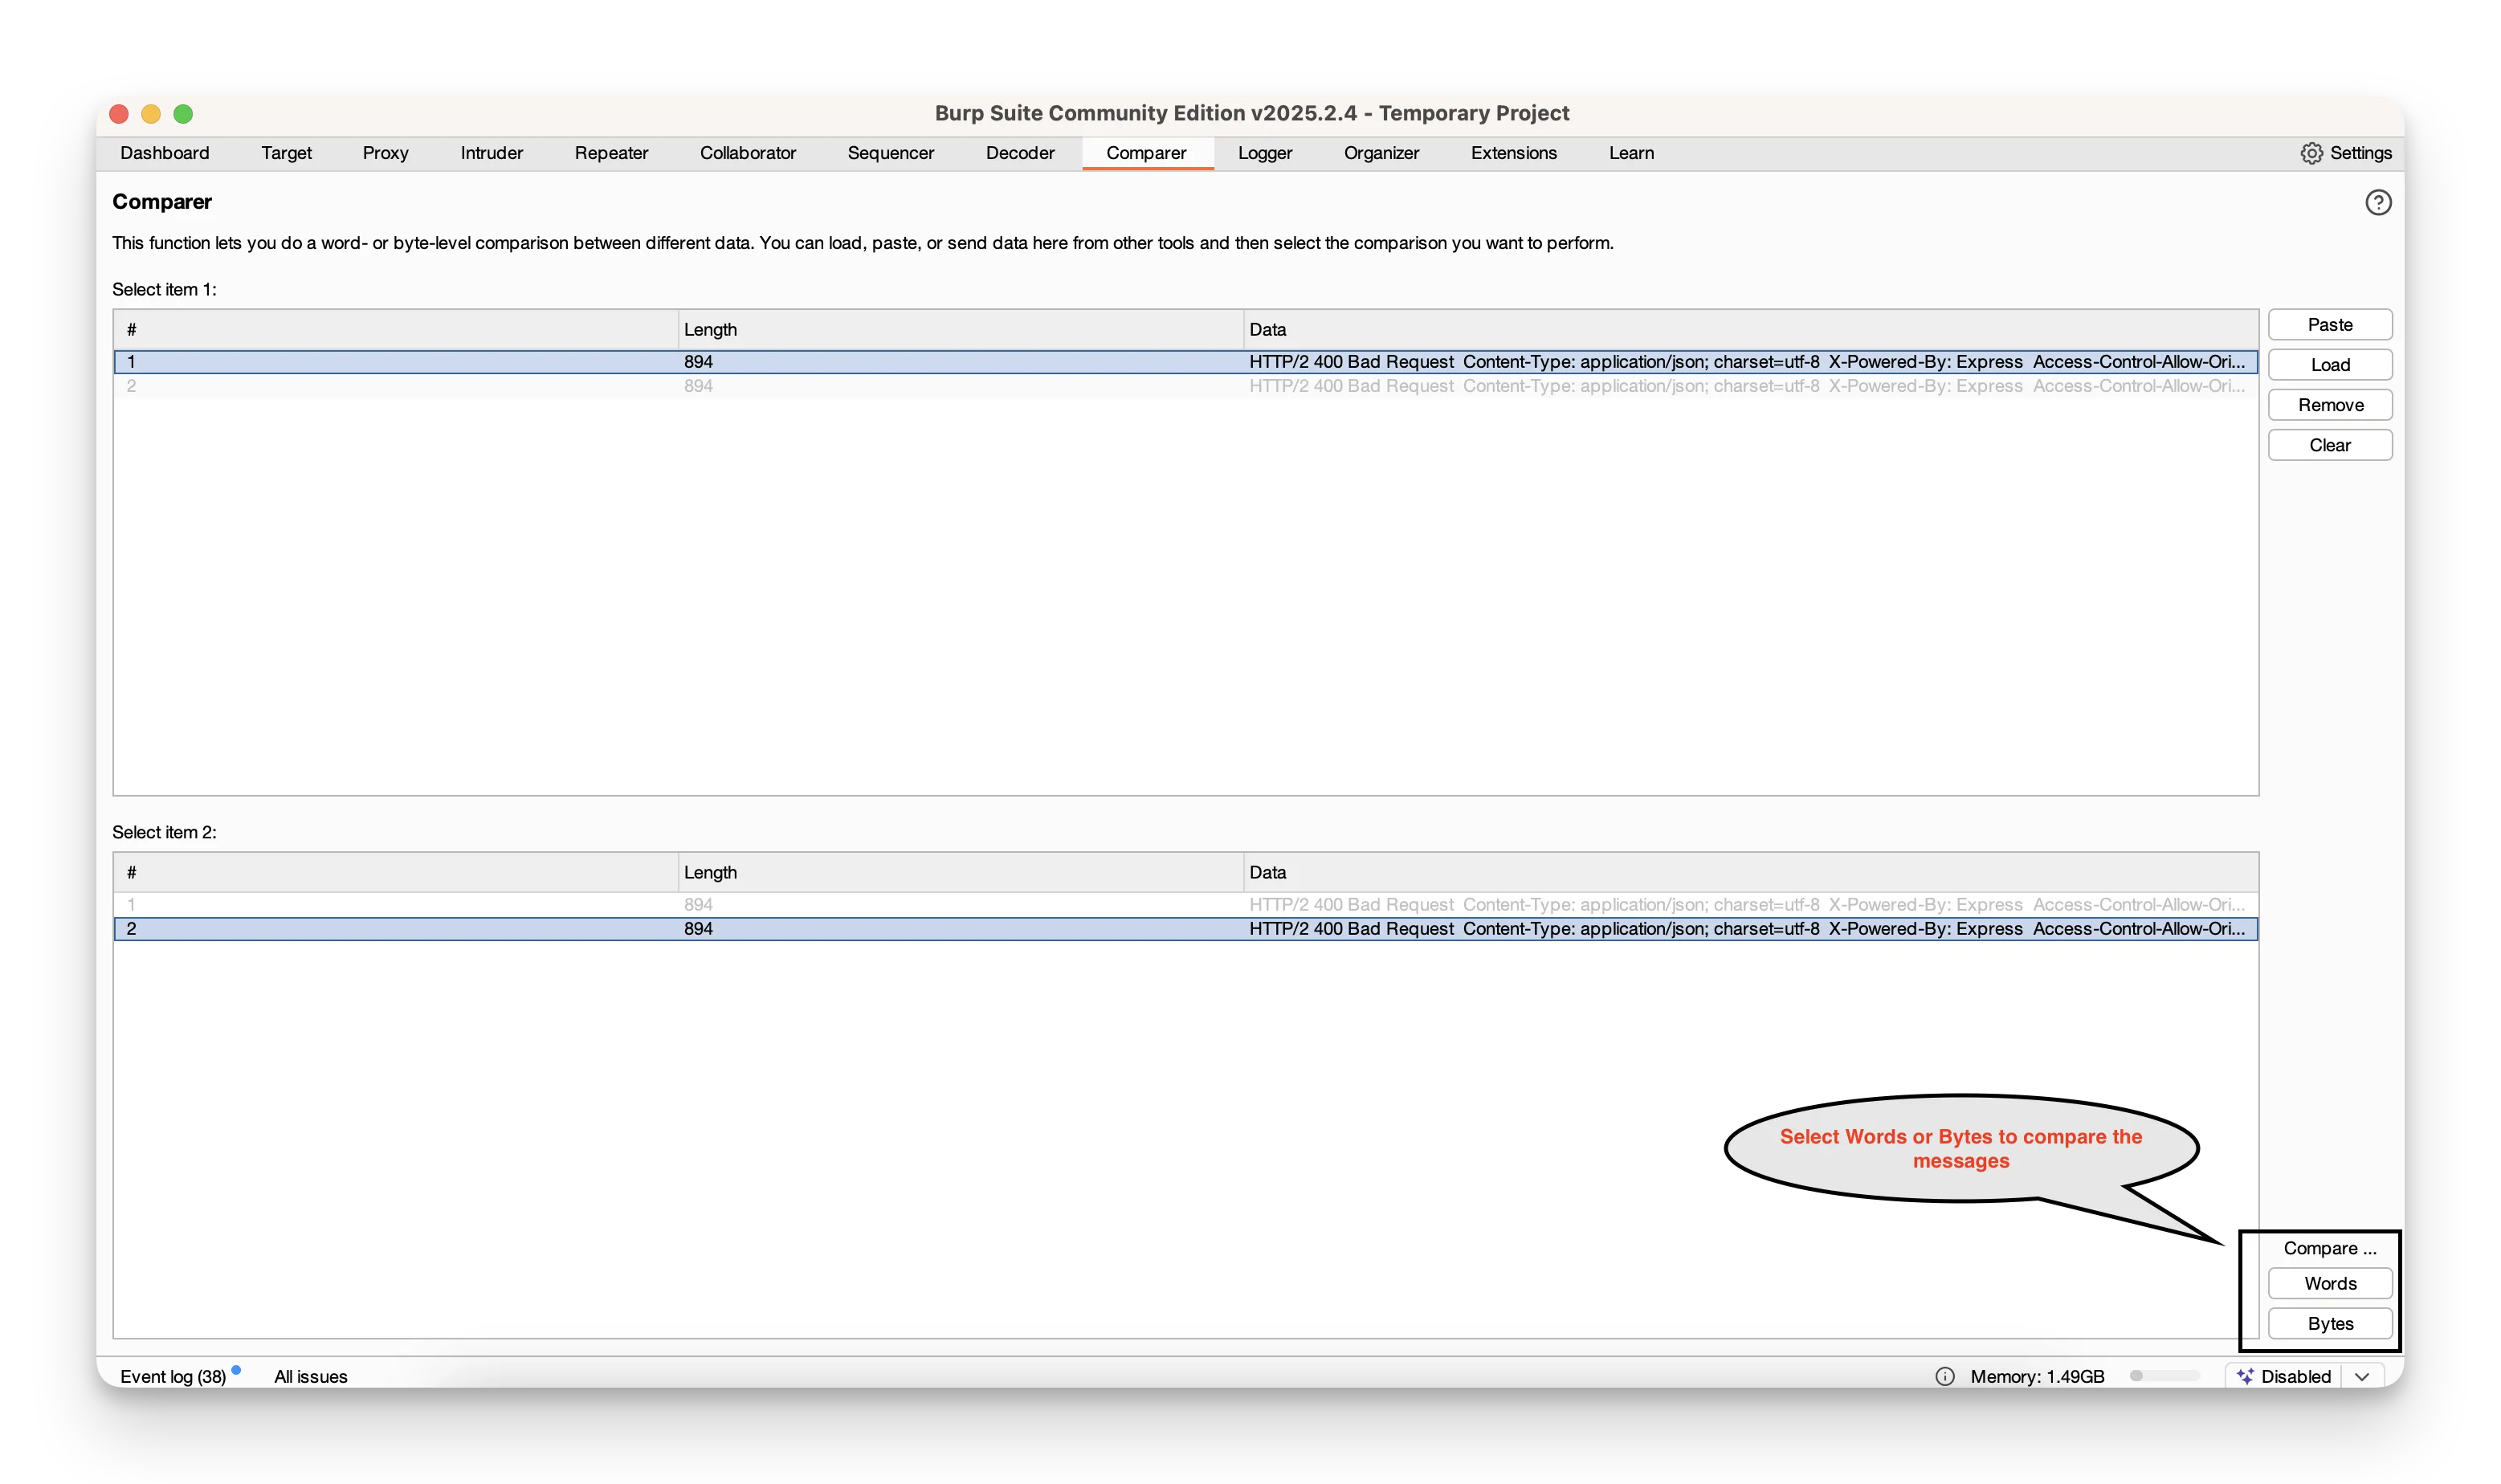
This makes spotting tiny changes—like a shifted cookie value or a subtle error message tweak—fast and foolproof.
Integrating Burp Suite into Your Development and Testing Lifecycle
Burp Suite isn’t just for one‑off security checks—it fits smoothly into your everyday workflows.
During Development
- Keep Burp’s Proxy running as you build new features.
- Watch each HTTP/S call in real time to catch insecure defaults (e.g., overly permissive CORS, sensitive data in URLs) before code even goes to test.
During Testing
- Repeater: Manually tweak inputs and edge‑case payloads to validate how the app handles unexpected data.
- Intruder: Automate basic fuzzing and parameter‑tampering to surface common flaws like weak input validation or broken access controls.
Bug Investigation
- When a bug report hints at a security issue, replay the exact request in Repeater or Intruder.
- Seeing raw requests and responses helps you reproduce problems reliably and share precise repro steps with developers.
Learning and Education
- Practice on intentionally vulnerable apps (OWASP Juice Shop, DVWA) to explore real‑world issues such as SQL injection, XSS, and broken authentication.
- Map your findings back to the OWASP Top 10 to build a deeper understanding of web‑app risks and how to prevent them.
A Gentle Reminder: Ethical and Responsible Use
Always have explicit permission before testing any web application. Unauthorized security testing is not only unethical—it can be illegal and harmful.
Stick to your own development and test environments, approved bug‑bounty targets, or sanctioned training labs. Respect the rules, and use your skills to strengthen security, never to break it.
Enhance your testing with Testingy, a platform that complements Burp Suite by streamlining test management, execution, and defect tracking for comprehensive software quality assurance.